android實現底部布局往往使用RelativeLayout的布局方式,並且設置android:layout_alignParentBottom=”true”,這樣很容易實現底部布局。然而對於比較復雜的布局簡單的屬性設置無法達到這樣的效果,例如top,center,bottom三層的布局,很可能因為中間層(center)的數據太多而將無法顯示全或者將bottom層擠下去。解決這個問題,在采用RelativeLayout布局時,除了設置android:layout_alignParentBottom=”true”外,還需要對中間層進行屬性進行設置:android:layout_above=”@id/bottom”
android:layout_below=”@id/top”。這樣的設置即確保center層能處於中間位置,也可以通過自適應顯示滾動條。
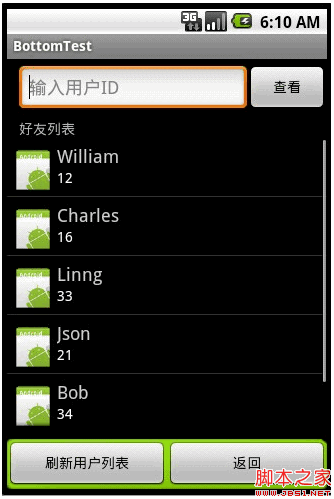
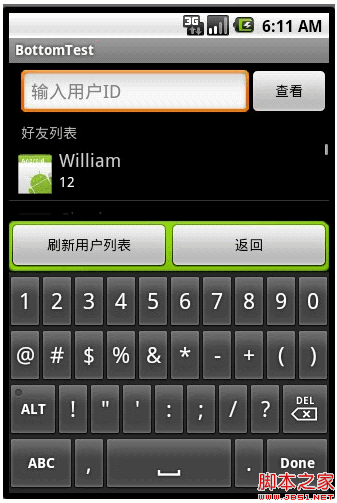
以下的例子就是實現三層布局的底部布局的功能。如圖1,2。

圖-1 三層的底部布局界面

圖 2 彈出輸入法時顯示的底部按鈕
項目只是實現主要的數據填充及布局,故只是簡單的文件加載。以下是源碼:
BottomTestActivity.java 復制代碼 代碼如下:
package com.BottomTest.main;
import java.util.ArrayList;
import java.util.HashMap;
import android.app.Activity;
import android.os.Bundle;
import android.widget.ListView;
import android.widget.SimpleAdapter;
publicclass BottomTestActivityextends Activity {
/** Called when the activity is first created. */
@Override
publicvoid onCreate(Bundle savedInstanceState) {
super.onCreate(savedInstanceState);
setContentView(R.layout.main);
ListView list = (ListView) findViewById(R.id.friends);
//存儲數據的數組列表
ArrayList<HashMap<String, Object>> listData=new ArrayList<HashMap<String,Object>>();
String []name={"William","Charles","Linng","Json","Bob","Carli"};
String []id={"12","16","33","21","34","22"};
for(int i=0;i<6;i++){
HashMap<String, Object> map=new HashMap<String, Object>();
map.put("friend_image", R.drawable.icon);
map.put("friend_username", name[i]);
map.put("friend_id", id[i]);
listData.add(map);
}
//適配器
SimpleAdapter listItemAdapter=new SimpleAdapter(this,
listData,
R.layout.item,
new String[] {"friend_image","friend_username","friend_id" },
newint[] { R.id.friend_image, R.id.friend_username, R.id.friend_id });
list.setAdapter(listItemAdapter);
}
}
主要布局文件
main.xml
復制代碼 代碼如下:
<?xmlversion="1.0"encoding="utf-8"?>
<LinearLayout
xmlns:android="http://schemas.android.com/apk/res/android"
android:layout_width="fill_parent"
android:layout_height="wrap_content"
android:orientation="vertical">
<RelativeLayoutandroid:id="@+id/bottom"
android:layout_width="fill_parent"
android:layout_height="wrap_content" >
<LinearLayoutandroid:id="@+id/top"
android:layout_width="fill_parent"
android:layout_height="wrap_content"
android:orientation="horizontal" >
<EditTextandroid:id="@+id/view_user_input"
android:layout_width="fill_parent"
android:layout_height="wrap_content"
android:layout_marginTop="6dip"
android:layout_marginLeft="12dip"
android:singleLine="true"
android:numeric="integer"
android:imeOptions="actionDone"
android:hint="輸入用戶ID"
android:layout_weight="1"/>
<Buttonandroid:id="@+id/view_user"
android:layout_width="fill_parent"
android:layout_height="wrap_content"
android:layout_marginTop="4dip"
android:layout_weight="3"
android:text="查看"/>
</LinearLayout>
<LinearLayoutandroid:id="@+id/center"
android:layout_width="fill_parent"
android:layout_height="wrap_content"
android:orientation="vertical"
android:layout_above="@id/bottom"
android:layout_below="@id/top">
<TextViewandroid:id="@+id/my_friends_list"
android:layout_width="fill_parent"
android:layout_height="wrap_content"
android:text="好友列表"
android:paddingTop="6dip"
android:paddingLeft="2dip"
android:layout_marginLeft="10dip"/>
<ListViewandroid:id="@+id/friends"
android:layout_width="fill_parent"
android:layout_height="wrap_content"
android:layout_marginBottom="6dip"/>
</LinearLayout>
<LinearLayoutandroid:id="@+id/bottom"
android:background="@drawable/bg"
android:layout_width="fill_parent"
android:layout_height="wrap_content"
android:orientation="horizontal"
android:layout_alignParentBottom="true" >
<Buttonandroid:id="@+id/refresh"
android:layout_width="fill_parent"
android:layout_height="wrap_content"
android:layout_marginTop="2dip"
android:text="刷新用戶列表"
android:layout_weight="1"/>
<Buttonandroid:id="@+id/back"
android:layout_width="fill_parent"
android:layout_height="wrap_content"
android:layout_marginTop="2dip"
android:text="返回"
android:layout_weight="1"/>
</LinearLayout>
</RelativeLayout>
</LinearLayout>
listview item內容的布局文件
item.xml
復制代碼 代碼如下:
<?xmlversion="1.0"encoding="utf-8"?>
<RelativeLayoutxmlns:android="http://schemas.android.com/apk/res/android"
android:id="@+id/RelativeLayout"
android:layout_width="fill_parent"
android:layout_height="wrap_content"
android:paddingBottom="4dip"
android:paddingRight="12dip">
<ImageViewandroid:id="@+id/friend_image"
android:layout_width="wrap_content"
android:layout_height="wrap_content"
android:paddingTop="6dip"
android:paddingLeft="2dip"
android:layout_centerVertical="true"
android:layout_alignParentLeft="true"/>
<TextViewandroid:id="@+id/friend_username"
android:layout_width="fill_parent"
android:layout_height="wrap_content"
android:textSize="18dip"
android:textColor="#ccc"
android:paddingTop="6dip"
android:paddingRight="2dip"
android:layout_toRightOf="@id/friend_image" />
<TextViewandroid:id="@+id/friend_id"
android:layout_width="fill_parent"
android:layout_height="wrap_content"
android:layout_below="@+id/friend_username"
android:layout_marginRight="36dip"
android:paddingRight="2dip"
android:layout_toRightOf="@id/friend_image"
android:textColor="#fff"
android:maxLines="2"/>
</RelativeLayout>


 Android 標簽控件
 android高分段進階攻略(2)傳感器
 Android進程間通信(IPC)常用方式解析
 Android開發之時間日期組件用法實例