編輯:關於Android編程
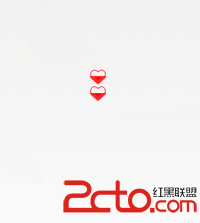
最近在項目中寫了一個自定義的倒計時控件,效果是倒計時開始後,紅心逐漸被填充滿。效果如下圖:
分為兩部分:計時器和繪制Bitmap。
計時器使用Timer和TimerTask,每個一秒執行一次TimerTask的run函數,使控件重繪。代碼如下:
mTimer = new Timer();
		mTimerTask = new TimerTask() {
			@Override
			public void run() {
				postInvalidate();
				synchronized (this) {
					if (index > 59) {
						index = 1;
						mTimer.cancel();
					}
					index++;
				}
			}
		};
mTimer.schedule(mTimerTask, 1000, 1000);
1.從圖片資源中解析得到Bitmap,獲得其Width和Height;
2.重載onMeasure和onSizeChanged函數,設置並得到控件的寬和高;
3.使用PorterDuffXfermode圖形混合模式來得到所需的Bitmap;
4.重載onDraw函數,在函數中,將上一步所得到的Bitmap縮放至控件大小以顯示出來。
下面我們來看一下幾個重要部分,其余代碼最後會附上。
1.重載onMeasure函數完成控件大小的測量
@Override
	public void onMeasure(int widthMeasureSpec, int heightMeasureSpec) {
		int resultW = 0;

		if (MeasureSpec.getMode(widthMeasureSpec) == MeasureSpec.EXACTLY) {
			resultW = MeasureSpec.getSize(widthMeasureSpec);
		} else {
			if (MeasureSpec.getMode(widthMeasureSpec) == MeasureSpec.AT_MOST) {
				resultW = Math.min(bWidth,
						MeasureSpec.getSize(widthMeasureSpec));
			}
		}
		int resultH = 0;
		if (MeasureSpec.getMode(heightMeasureSpec) == MeasureSpec.EXACTLY) {
			resultH = MeasureSpec.getSize(heightMeasureSpec);
		} else {
			if (MeasureSpec.getMode(heightMeasureSpec) == MeasureSpec.AT_MOST) {
				resultH = Math.min(bHeight,
						MeasureSpec.getSize(heightMeasureSpec));
			}
		}

		setMeasuredDimension(resultW, resultH);
	}
我們對控件的寬和高設置的是具體的值:100dp,那麼onMeasure函數在測量控件的寬高時所得的 widthMeasureSpec/heightMeasureSpec的getMode就是
MeasureSpec.EXACTLY,則控件的寬高就是getSize,就是我們設置的100dp。
如果我們在xml中配置如下:
那麼widthMeasureSpec/heightMeasureSpec的getMode就是MeasureSpec.AT_MOST,這時候控件的寬高就是圖片資源寬(或高)與父容器中剩余寬(或高)兩者中比較小
的那個。
2.在onSizeChanged函數中獲得控件的寬和高
@Override
	public void onSizeChanged(int w, int h, int oldw, int oldh) {
		super.onSizeChanged(w, h, oldw, oldh);
		width = w;
		height = h;
		bm = Bitmap.createBitmap(bWidth, bHeight, Bitmap.Config.ARGB_8888);
		mCanvas = new Canvas(bm);
	}
3.在onDraw中通過圖形的混合得到期望的Bitmap。
@Override
	public void onDraw(Canvas canvas) {
		canvas.drawBitmap(
				Bitmap.createScaledBitmap(makeBitmap(), width, height, true),
				0, 0, mPaint);
	}

	// 繪制Bitmap
	public Bitmap makeBitmap() {
		// 先繪制底層圖片
		mCanvas.drawBitmap(charm, 0, 0, mPaint);
		int i = mCanvas.saveLayer(0, 0, bm.getWidth(), bm.getHeight(), null,
				Canvas.ALL_SAVE_FLAG);
		mPaint.setColor(Color.RED);
		Log.i("GrownHeart", "onDraw:index=" + index);
		mCanvas.drawRect(
				new RectF(0f, (60 - index) * H, bm.getWidth(), bm.getHeight()),
				mPaint);
		mPaint.setXfermode(modeIn);
		mCanvas.drawBitmap(charm_on, 0, 0, mPaint);
		mPaint.setXfermode(null);
		mCanvas.restoreToCount(i);

		return bm;
	}
邊框圖和實心圖如下:


PorterDuffXfermode(PorterDuff.Mode.DST_IN));其次將實心圖繪制到圖層中,這樣就能得到重疊區域。然後將圖層上所繪制的restore。最後通過createScaledBitmap將
Bitmap縮放至控件大小並顯示。
源代碼
public class GrownHeart extends View {

	public Timer mTimer;
	public TimerTask mTimerTask;
	public int bWidth;// Bitmap寬度
	public int bHeight;// Bitmap高度
	public int width;// 控件寬度
	public int height;// 控件高度
	public Bitmap charm;// 資源位圖
	public Bitmap charm_on;// 資源位圖
	public Bitmap bm;
	public Canvas mCanvas;
	public Paint mPaint;
	public float H;
	private static int index;
	public static final PorterDuffXfermode modeIn;
	public static final PorterDuffXfermode modeOut;

	static {
		modeIn = new PorterDuffXfermode(PorterDuff.Mode.DST_IN);
		modeOut = new PorterDuffXfermode(PorterDuff.Mode.SRC_IN);
	}

	public GrownHeart(Context context) {
		super(context);
		init();
	}

	public GrownHeart(Context context, AttributeSet attrs) {
		super(context, attrs);
		init();
	}

	public void init() {
		mTimer = new Timer();
		mTimerTask = new TimerTask() {
			@Override
			public void run() {
				postInvalidate();
				synchronized (this) {
					if (index > 59) {
						index = 1;
						mTimer.cancel();
					}
					Log.i("GrownHeart", "TimerTask1:index=" + index);
					index++;
					Log.i("GrownHeart", "TimerTask2:index=" + index);
				}
			}
		};

		charm = BitmapFactory.decodeResource(getResources(),
				R.drawable.chatroom_charm).copy(Bitmap.Config.ARGB_8888, true);
		charm_on = BitmapFactory.decodeResource(getResources(),
				R.drawable.chatroom_charm_on).copy(Bitmap.Config.ARGB_8888,
				true);
		bWidth = charm_on.getWidth();
		bHeight = charm_on.getHeight();
		H = bHeight / 60F;
		index = 1;

		mPaint = new Paint();
		mPaint.setAntiAlias(true);
		mPaint.setFilterBitmap(false);
	}

	public void startTimer() {
		mTimer.schedule(mTimerTask, 1000, 1000);
	}

	@Override
	public void onMeasure(int widthMeasureSpec, int heightMeasureSpec) {
		int resultW = 0;

		if (MeasureSpec.getMode(widthMeasureSpec) == MeasureSpec.EXACTLY) {
			resultW = MeasureSpec.getSize(widthMeasureSpec);
		} else {
			if (MeasureSpec.getMode(widthMeasureSpec) == MeasureSpec.AT_MOST) {
				resultW = Math.min(bWidth,
						MeasureSpec.getSize(widthMeasureSpec));
			}
		}
		int resultH = 0;
		if (MeasureSpec.getMode(heightMeasureSpec) == MeasureSpec.EXACTLY) {
			resultH = MeasureSpec.getSize(heightMeasureSpec);
		} else {
			if (MeasureSpec.getMode(heightMeasureSpec) == MeasureSpec.AT_MOST) {
				resultH = Math.min(bHeight,
						MeasureSpec.getSize(heightMeasureSpec));
			}
		}

		setMeasuredDimension(resultW, resultH);
	}

	@Override
	public void onSizeChanged(int w, int h, int oldw, int oldh) {
		super.onSizeChanged(w, h, oldw, oldh);
		width = w;
		height = h;
		bm = Bitmap.createBitmap(bWidth, bHeight, Bitmap.Config.ARGB_8888);
		mCanvas = new Canvas(bm);
	}

	// 繪制Bitmap
	public Bitmap makeBitmap() {
		// 先繪制底層圖片
		mCanvas.drawBitmap(charm, 0, 0, mPaint);
		int i = mCanvas.saveLayer(0, 0, bm.getWidth(), bm.getHeight(), null,
				Canvas.ALL_SAVE_FLAG);
		mPaint.setColor(Color.RED);
		Log.i("GrownHeart", "onDraw:index=" + index);
		mCanvas.drawRect(
				new RectF(0f, (60 - index) * H, bm.getWidth(), bm.getHeight()),
				mPaint);
		mPaint.setXfermode(modeIn);
		mCanvas.drawBitmap(charm_on, 0, 0, mPaint);
		mPaint.setXfermode(null);
		mCanvas.restoreToCount(i);

		return bm;
	}

	@Override
	public void onDraw(Canvas canvas) {
		canvas.drawBitmap(
				Bitmap.createScaledBitmap(makeBitmap(), width, height, true),
				0, 0, mPaint);
	}

}
public class MainActivity extends Activity {

	@Override
	protected void onCreate(Bundle savedInstanceState) {
		super.onCreate(savedInstanceState);
		setContentView(R.layout.activity_main);
		GrownHeart grownHeart=(GrownHeart)findViewById(R.id.grownHeart);
		grownHeart.startTimer();
	}

}
 使用TextPaint來繪制文字
TextPaint是paint的子類,用它可以很方便的進行文字的繪制,一般情況下遇到繪制文字的需求時,我們一般用TextPaint所提供的方法。開始學習如何繪制文字之前,
 Android仿IOS UIAlertView對話框
顯示效果: 我在參考鏈接中看到了作者的仿的qq提示框,但是在使用的時候並不是很方面,有一些不足,於是我參照Android系統AlertDialog
 Android調節屏幕亮暗度和音量
一.背景做視頻用到了就記錄下,從github(https://github.com/curtis2/SuperVideoPlayer 謝謝)上扒了一個項目的手勢調亮度和音
 Android開發中在TableView上添加懸浮按鈕的方法
如果直接在TableVIewController上貼Button的話會導致這個會隨之滾動,下面解決在TableView上實現位置固定懸浮按鈕的兩種方法: 1.在view