編輯:Android開發實例
今天來講下如何使用android中提供的工具優化我們的布局。首先我們寫一個最簡單的框架布局。
<?xml version="1.0" encoding="utf-8"?>
<FrameLayout xmlns:android="http://schemas.android.com/apk/res/android"
    android:orientation="vertical"
    android:layout_width="fill_parent"
    android:layout_height="fill_parent"
    >
<TextView
    android:layout_width="300dip"
    android:layout_height="300dip"
    android:background="#00008B"
    android:layout_gravity="center"
    />
<TextView
    android:layout_width="250dip"
    android:layout_height="250dip"
    android:background="#0000CD"
    android:layout_gravity="center"
    />
<TextView
    android:layout_width="200dip"
    android:layout_height="200dip"
    android:background="#0000FF"
    android:layout_gravity="center"
    />
<TextView
    android:layout_width="150dip"
    android:layout_height="150dip"
    android:background="#00BFFF"
    android:layout_gravity="center"
    />
<TextView
    android:layout_width="100dip"
    android:layout_height="100dip"
    android:background="#00CED1"
    android:layout_gravity="center"
    />
</FrameLayout>
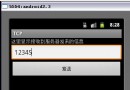
非常簡單的一個布局,實現一個層疊的效果,運行效果如下圖:
下面我們就用android中提供的一個觀察布局的工具,層級觀察器,Hierarchy Viewer來觀察我們的布局。Hierarchy Viewer工具是一個非常好的布局優化工具,同時,你也可以通過它學習他人的布局。應該說是一個非常實用的工具。
Hierarchy Viewer在sdk的tools目錄下,打開後最新界面如圖所示:
界面很簡潔,列出了當前設備上的進程,在前台的進程加粗顯示。上面有三個選項,分別是刷新進程列表,將層次結構載入到樹形圖,截取屏幕到一個擁有像素柵格的放大鏡中。對應的在左下角可以進行三個視圖的切換。在模擬器上打開寫好的框架布局,在頁面上選擇,點擊Load View,進入如圖所示界面。
左邊的大圖為應用布局的樹形結構,上面寫有控件名稱和id等信息,下方的圓形表示這個節點的渲染速度,從左至右分別為測量大小,布局和繪制。綠色最快,紅色最慢。右下角的數字為子節點在父節點中的索引,如果沒有子節點則為0。點擊可以查看對應控件預覽圖、該節點的子節點數(為6則有5個子節點)以及具體渲染時間。雙擊可以打開控件圖。右側是樹形結構的預覽、控件屬性和應用界面的結構預覽。點擊相應的樹形圖中的控件可以在右側看到他在布局中的位置和屬性。工具欄有一系列的工具,保存為png或者psd,刷新等工具。其中有個load overlay選項可以加入新的圖層。當你需要在你的布局中放上一個bitmap,你會用到它來幫你布局。點擊左下角的第三個圖標切換到像素視圖,如下圖所示。
視圖左側為View和ViewGroup關系圖,點擊其中的View會在右邊的圖像中用紅色線條為我們選中相應的View。最右側為設備上的原圖。中間為放大後帶像素柵格的圖像,可以在Zoom欄調整放大倍數。在這裡能定位控件的坐標,顏色。觀察布局就更加的方便了。
接下來再介紹下另一個布局優化工具-layoutopt。這是android為我們提供的布局分析工具。它能分析指定的布局,然後提出優化建議。
要運行它,打開命令行進入sdk的tools目錄,輸入layoutopt加上你的布局目錄命令行。運行後如圖所示,框出的部分即為該工具分析布局後提出的建議,這裡為建議替換標簽。
下面列出一些常會碰到的輸出:
$ layoutopt samples/
samples/compound.xml
7:23 The root-level <FrameLayout/> can be replaced with <merge/>
11:21 This LinearLayout layout or its FrameLayout parent is useless
samples/simple.xml 提示未使用到該布局
7:7 The root-level <FrameLayout/> can be replaced with <merge/>
samples/too_deep.xml
-1:-1 This layout has too many nested layouts: 13 levels, it should have <= 10!
20:81 This LinearLayout layout or its LinearLayout parent is useless
24:79 This LinearLayout layout or its LinearLayout parent is useless
28:77 This LinearLayout layout or its LinearLayout parent is useless
32:75 This LinearLayout layout or its LinearLayout parent is useless
36:73 This LinearLayout layout or its LinearLayout parent is useless
40:71 This LinearLayout layout or its LinearLayout parent is useless
44:69 This LinearLayout layout or its LinearLayout parent is useless
48:67 This LinearLayout layout or its LinearLayout parent is useless
52:65 This LinearLayout layout or its LinearLayout parent is useless
56:63 This LinearLayout layout or its LinearLayout parent is useless
samples/too_many.xml
7:413 The root-level <FrameLayout/> can be replaced with <merge/>
-1:-1 This layout has too many views: 81 views, it should have <= 80!
samples/useless.xml 提示該布局中有太多的控件
7:19 The root-level <FrameLayout/> can be replaced with <merge/>
11:17 This LinearLayout layout or its FrameLayout parent is useless
通過這個工具,能很好的優化我們的UI設計,布局方法。好了,今天就寫到這裡了。
 Android中用ViewPager實現多頁面滑動切換及動畫效果的實例
一、首先,我們來看一下效果圖,這是新浪微博的Tab滑動效果。&nbs
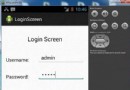 Android登錄實例
登錄應用程序的屏幕,詢問憑據登錄到一些特定的應用。可能需要登錄到Facebook,微博等本章介紹了,如何創建一個登錄界面,以及如何管理安全問題和錯誤嘗試。首先,必須定義兩
 Android加載Spinner
可以顯示在的Android任務,通過加載進度條的進展。進度條有兩種形狀。加載欄和加載微調(spinner)。在本章中,我們將討論微調(spinner)。Spinner 用
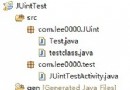 Android編程之單元測試實例分析
本文實例講述了Android編程之單元測試用法。分享給大家供大家參考,具體如下: 在實際開發中,開發android軟件的過程需要不斷地進行測試。使用Junint測