編輯:Android開發實例
上一篇介紹了布局優化的工具,層級觀察器Hierarchy Viewer和布局優化分析工具layoutopt。如果看過上篇博客的會注意到,layoutopt工具提示可以將<FrameLayout/>換成<merge/>。其實<merge/>標簽在UI的結構優化中起著非常重要的作用,通過它可以刪減多余的層級,達到優化UI的目的。
再來看一下上篇博客中使用的框架布局的樹形結構圖:
根節點和LinearLayout上面那個子樹為android的窗口布局,後面的TextView即為標簽。黃色框內的這部分樹形圖即為我們的布局。可以發現紅色框出的FrameLayout是另一個FrameLayout的唯一子元素,並且該父節點並沒有額外的屬性,也就是說,它是完全冗余的,這時候就要用<merge/>標簽來解決這個問題。用<merge/>替換原來的<FrameLayout/>標簽,修改後的布局代碼如下:
<?xml version="1.0" encoding="utf-8"?>
<merge xmlns:android="http://schemas.android.com/apk/res/android"
    android:orientation="vertical"
    android:layout_width="fill_parent"
    android:layout_height="fill_parent"
    >
<TextView
    android:layout_width="300dip"
    android:layout_height="300dip"
    android:background="#00008B"
    android:layout_gravity="center"
    />
<TextView
    android:layout_width="250dip"
    android:layout_height="250dip"
    android:background="#0000CD"
    android:layout_gravity="center"
    />
<TextView
    android:layout_width="200dip"
    android:layout_height="200dip"
    android:background="#0000FF"
    android:layout_gravity="center"
    />
<TextView
    android:layout_width="150dip"
    android:layout_height="150dip"
    android:background="#00BFFF"
    android:layout_gravity="center"
    />
<TextView
    android:layout_width="100dip"
    android:layout_height="100dip"
    android:background="#00CED1"
    android:layout_gravity="center"
    />
</merge>
再觀察下它的樹形圖,如圖所示,顯然層次更簡單了。
為什麼會這樣呢,因為Activity的根節點都是FrameLayout,所以用merge標簽可以直接添加到這個FrameLayout而不要再增加一個FrameLayout節點。但是如果你的布局是以LinearLayout等為根節點,就不能這麼做了。
<merge/>其實還有很多作用,它和<include/>標簽就能完美的結合。<include/>標簽用來實現代碼的重用以及布局的模塊化。如果UI中需要多次用到同一個布局, <include/>標簽會大大提高我們的開發效率。看個例子:
新建一個共享布局:share.xml
<?xml version="1.0" encoding="utf-8"?>
<LinearLayout xmlns:android="http://schemas.android.com/apk/res/android"
    android:orientation="vertical"
    android:layout_width="fill_parent"
    android:layout_height="fill_parent"
    >
<TextView
    android:layout_width="fill_parent"
    android:layout_height="wrap_content"
    android:text="這是一個共享布局"
    />
</LinearLayout>
然後在需要使用這個布局的布局中使用<include/>標簽,並且我們可以重寫它的一些屬性(下面的代碼就重寫了它的id):
<?xml version="1.0" encoding="utf-8"?>
<LinearLayout xmlns:android="http://schemas.android.com/apk/res/android"
    android:orientation="vertical"
    android:layout_width="fill_parent"
    android:layout_height="fill_parent">
    <include android:id="@+id/new" layout="@layout/share"></include>
</LinearLayout>
如果在我們的布局中只需要使用共享布局的內容,這時候就可以用merge標簽,這樣使得布局更加高效靈活。
<?xml version="1.0" encoding="utf-8"?>
<merge xmlns:android="http://schemas.android.com/apk/res/android"
   <include android:id="@+id/newone" layout="@layout/share"></include>
<include android:id="@+id/newtwo" layout="@layout/share"></include>
</merge>
有了<include/>標簽,很容易就能做到共享和重用布局,可是很多情況下,一個布局中有很多View並不常用,這就造成了資源的浪費,android為此提供了ViewStub標簽來解決這個問題。在默認情況下ViewStub下的標簽都有visibility=GONE屬性(不可見),更重要的是在這個標簽下的內容不會占用任何的空間。其實ViewStub和include類似,不過區別就在於ViewStub只會在你需要的時候進入你的界面,viewStub通過inflate()方法來通知系統加載其內部的View。這樣就可以讓我們既享受到<include/>的便利,又不會產生過多沒用的View。 還是看個例子:
其中share.xml前面已經介紹過了,main.xml的布局文件:
 1 <?xml version="1.0" encoding="utf-8"?>
 2  <LinearLayout xmlns:android="http://schemas.android.com/apk/res/android"
 3     android:orientation="vertical"
 4     android:layout_width="fill_parent"
 5     android:layout_height="fill_parent"
 6     >
 7  <Button
 8     android:id="@+id/show"
 9     android:layout_width="wrap_content"
10     android:layout_height="wrap_content"
11     android:text="點擊導入"
12     />
13  <ViewStub
14     android:id="@+id/viewStub"
15     android:layout="@layout/share"
16     android:layout_width="wrap_content"
17     android:layout_height="wrap_content"
18     />
19  </LinearLayout>
MyViewStub.java代碼:
 1 package com.notice520.viewstub;
 2
 3  import android.app.Activity;
 4  import android.os.Bundle;
 5 import android.view.View;
 6 import android.view.ViewStub;
 7 import android.view.View.OnClickListener;
 8 import android.widget.Button;
 9
10 public class MyViewStub extends Activity {
11
12     private ViewStub mViewStub;
13     private Button   showButton;
14
15     /** Called when the activity is first created. */
16     @Override
17     public void onCreate(Bundle savedInstanceState) {
18         super.onCreate(savedInstanceState);
19         setContentView(R.layout.main);
20
21         mViewStub = (ViewStub)findViewById(R.id.viewStub);//實例化ViewStub控件,這裡可以看出我們必//須為ViewStub設定id
22         showButton = (Button)findViewById(R.id.show);
23
24         /*為按鈕添加點擊監聽事件,後面的章節會介紹*/
25         showButton.setOnClickListener(new OnClickListener(){
26
27             @Override
28             public void onClick(View v) {
29                 if (mViewStub != null) {
30                    mViewStub.inflate();  //點擊即導入ViewStub標簽的內容
31                   }
32             }
33         });
34     }
35 }
運行效果如圖所示,當點擊按鈕後,導入的布局就會顯示,如圖所示。這裡要注意的是,其實很多時候我們不需要保留ViewStub的引用(這個例子中我們在字段裡保留了ViewStub的引用),因為當ViewStub inflate後,這個ViewStub就從View層次中移除了。在讀者深入學習後,會經常用到infate()方法來導入布局加載到原來的view上,那時候你會發現用ViewStub是個比那更好的辦法。但是要注意的是,ViewStub還不支持<merge/>標簽。
好了,今天就寫到這了。希望對大家有幫助,有問題可以留言交流。
 Android本地化
Android應用程序可以在許多不同地區的許多設備上運行。為了使應用程序更具交互性,應用程序應該處理以適合應用程序將要使用的語言環境方面的文字,數字,文件等。在本章中,我
 Android通用流行框架大全【整理】
Android通用流行框架大全 1. 緩存 DiskLruCacheJava實現基於LRU的磁盤緩存 2.圖片加載 Android Univer
 Android MediaPlayer(多媒體播放)
Android提供了許多方法來控制播放的音頻/視頻文件和流。其中該方法是通過一類稱為MediaPlayer。Android是提供MediaPlayer類訪問內置的媒體播放
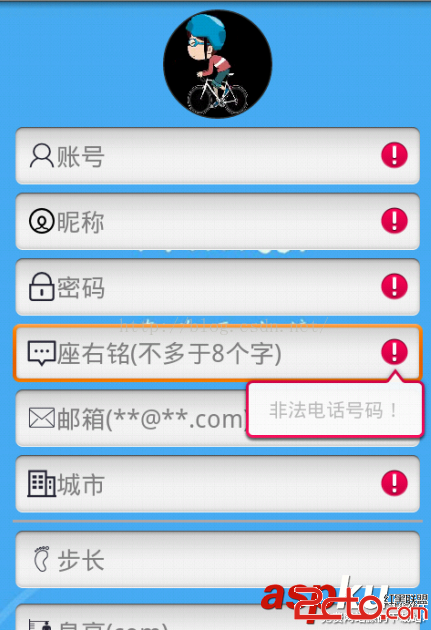 Android字段驗證的實例代碼
這篇文章主要介紹了Android字段驗證的實例代碼的相關資料,代碼簡單易懂,具有參考借鑒價值,需要的朋友可以參考下 先給大家展示效果圖: