編輯:Android開發教程
沉浸式狀態欄確切的說應該叫做透明狀態欄。一般情況下,狀態欄的底色都為黑色,而沉浸式狀態欄則是把狀態欄設置為透明或者半透明。
沉浸式狀態欄是從android Kitkat(Android 4.4)開始出現的,它可以被設置成與APP頂部相同的顏色,這就使得切換APP時,整個界面就好似切換到了與APP相同的風格樣式一樣。在內容展示上會顯得更加美觀。
本博客主要說的是結合ToolBar來實現狀態欄的兩種實現方式,效果如圖:

前提條件是 Api得大於等於19(4.4版本以上)
方式1:
布局 toolbar1.xml
<LinearLayout xmlns:android="http://schemas.android.com/apk/res/android"
    xmlns:app="http://schemas.android.com/apk/res-auto"
    android:layout_width="match_parent"
    android:layout_height="match_parent"
    android:orientation="vertical">

    <android.support.v7.widget.Toolbar
        android:id="@+id/toolbar"
        android:layout_width="match_parent"
        app:title="App Title"
        app:subtitle="Sub Title"
        app:navigationIcon="@android:drawable/ic_input_add"
        android:layout_height="wrap_content"
        android:background="?attr/colorPrimary"
        android:fitsSystemWindows="true"
        android:theme="@style/ThemeOverlay.AppCompat.Dark.ActionBar"
        app:popupTheme="@style/ThemeOverlay.AppCompat.Light"/>

    <RelativeLayout
        android:layout_width="match_parent"
        android:layout_height="match_parent">
        <TextView
            android:layout_width="wrap_content"
            android:layout_height="wrap_content"
            android:layout_centerInParent="true"
            android:text="沉浸式狀態欄"
            android:textSize="30sp" />
    </RelativeLayout>
</LinearLayout>
Activity.Java
public class TooBarStatusActivity1 extends AppCompatActivity{
    @Override
    protected void onCreate(@Nullable Bundle savedInstanceState) {
        super.onCreate(savedInstanceState);
        requestWindowFeature(Window.FEATURE_NO_TITLE);//去標題
        setContentView(R.layout.toolbar_layout);
        //透明狀態欄
        getWindow().addFlags(WindowManager.LayoutParams.FLAG_TRANSLUCENT_STATUS);
        //透明導航欄
        getWindow().addFlags(WindowManager.LayoutParams.FLAG_TRANSLUCENT_NAVIGATION);
        //透明導航欄
        Toolbar mToolbar = (Toolbar) findViewById(R.id.toolbar);
        mToolbar.setTitle("App Title"); //設置Toolbar標題
        mToolbar.setSubtitle("Sub Title"); //設置Toolbar 副標題
        mToolbar.setLogo(R.mipmap.ic_launcher);//設置Toolbar的Logo
        mToolbar.setNavigationIcon(R.mipmap.abc_ic_ab_back_mtrl_am_alpha);
        setSupportActionBar(mToolbar);
    }
}
方式2:
布局 toolbar2.xml
<LinearLayout xmlns:android="http://schemas.android.com/apk/res/android"
    xmlns:tools="http://schemas.android.com/tools"
    android:layout_width="match_parent"
    android:layout_height="match_parent"
    android:background="@android:color/white"
    android:orientation="vertical"
   >
    <TextView
        android:layout_width="match_parent"
        android:layout_height="100dp"
        android:background="@color/colorAccent"
        android:fitsSystemWindows="true"
        android:clipToPadding="true"
        android:text="自定義的ToolBar布局"
        android:textSize="20sp"
        android:gravity="center_vertical"
        />
    <TextView
        android:layout_width="match_parent"
        android:layout_height="match_parent"
        android:background="#FFFF00"
        android:text="主布局"
        android:textSize="22sp"
        android:gravity="center"
        />
</LinearLayout>
Activity.Java
public class TooBarStatusActivity2 extends AppCompatActivity {

    @Override
    protected void onCreate(@Nullable Bundle savedInstanceState) {
        super.onCreate(savedInstanceState);
        setContentView(R.layout.toolbar_layout2);
        if (Build.VERSION.SDK_INT >= Build.VERSION_CODES.KITKAT) {
            //透明狀態欄
            getWindow().addFlags(WindowManager.LayoutParams.FLAG_TRANSLUCENT_STATUS);
            //透明導航欄
            getWindow().addFlags(WindowManager.LayoutParams.FLAG_TRANSLUCENT_NAVIGATION);
        }
    }
}
style.xml
<style name="AppTheme" parent="Theme.AppCompat.Light.DarkActionBar">
        <!-- Customize your theme here. -->
        <item name="colorPrimary">@color/colorPrimary</item>
        <item name="colorPrimaryDark">@color/colorPrimaryDark</item>
        <item name="colorAccent">@color/colorAccent</item>
        <item name="windowActionBar">false</item>
        <item name="windowNoTitle">true</item>
    </style>
 Android中如何使用資源(resource)
Android平台, 可以使用本地資源, 也可以使用系統資源;使用靜態R類訪問資源, R類中包含一個靜態子類, R類中每一個子類都把它的相關資源表示為變量的形式;資源表被
 as 摘引模塊 ( android stdio modules )
as 引用模塊 ( android stdio modules ) as 模塊 使用 android stdio modules 1.在g
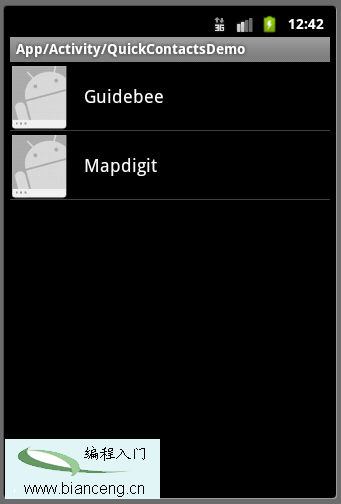 Android ApiDemos示例解析(10) App->Activity->QuickContactsDemo
QuickContactsDemo示例介紹了如果使用Content Provider來訪問Android系統的Contacts 數據庫。Content Provider
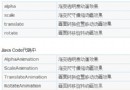 Android Animations動畫使用詳解
一、動畫類型Android的animation由四種類型組成:alpha、scale、translate、rotateXML配置文件中二、 Android動畫模式Anim