編輯:Android開發教程
到目前為止,想必大家已經都熟悉使用Toast去給用戶顯示信息了。盡管使用Toast很方便,但是Toast顯 示的通知並不是永久存儲的。它只在屏幕上顯示一小段時間,然後就消失了。如果它包含一些特別重要的信 息,如果用戶沒有觀察屏幕,那麼用戶就很容易錯過它。
對於那些重要的信息,應該采用一種更加持 久保存的方法。在這種情況下,應該使用NotificationMnanger(消息管理器)去顯示一個長久的信息,這個 消息被顯示在了StatusBar(狀態欄)上面,使用用戶能夠很容易地看見。
接下來展示如何發送一個 Notification通知。
1. 創建一個工程:Notifications。
2. 在包中新建一個名為 NotificationView的類,同時在res/layout文件夾下面新建一個名為notification.xml 文件,它將作為 NotificationView的視圖。
3. notification.xml中的文件。
<?xml version="1.0" encoding="utf-8"?>
<LinearLayout xmlns:android="http://schemas.android.com/apk/res/android"
    android:layout_width="fill_parent"
    android:layout_height="fill_parent"
    android:orientation="vertical" >

    <TextView
        android:layout_width="fill_parent"
        android:layout_height="wrap_content"
        android:text="Here are the details for the notification..." />

</LinearLayout>
4.NotificationView.java中的代碼。
public class NotificationView extends Activity {
    @Override
    public void onCreate(Bundle savedInstanceState) {
        super.onCreate(savedInstanceState);
        setContentView(R.layout.notification);

        // ---look up the notification manager service---
        NotificationManager nm = (NotificationManager) getSystemService(NOTIFICATION_SERVICE);


        // ---cancel the notification that we started---
        nm.cancel(getIntent().getExtras().getInt("notificationID"));
    }
}
5. AndroidManifest.xml中的代碼。
<?xml version="1.0" encoding="utf-8"?>


<manifest xmlns:android="http://schemas.android.com/apk/res/android"
    package="net.learn2develop.Notifications"
    android:versionCode="1"
    android:versionName="1.0" >

    <uses-sdk android:minSdkVersion="14" />
    <uses-permission android:name="android.permission.VIBRATE"/>

    <application
        android:icon="@drawable/ic_launcher"
        android:label="@string/app_name" >
        <activity
            android:label="@string/app_name"
            android:name=".NotificationsActivity" >
            <intent-filter >
                <action android:name="android.intent.action.MAIN" />

                <category android:name="android.intent.category.LAUNCHER" />
            </intent-filter>
        </activity>
        <activity android:name=".NotificationView"
            android:label="Details of notification">
            <intent-filter>
                <action android:name="android.intent.action.MAIN" />
                <category android:name="android.intent.category.DEFAULT" />
            </intent-filter>
        </activity>
    </application>

</manifest>
 Android多線程研究(2)定時器
先來看一段代碼:public static void main(String[] args) { new Timer().schedule(new TimerT
 Android簡明開發教程三:第一個應用Hello World
在安裝後Android開發環境和創建好Android模擬器之後,就可以開始寫第一個Android應用“Hello,World”。後面的例子均 采用
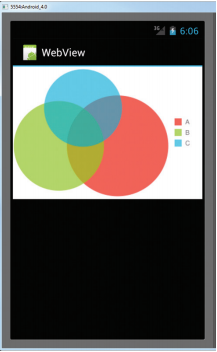 Android開發入門(十六)其他視圖 16.2 WebView
WebView能夠讓你在activity中去內嵌一個web浏覽器。如果你的應用需要內嵌一些web內容的話,這是非 常有用的。下面展示如何在activity中通過編碼的方式
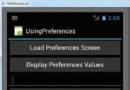 Android開發入門(十七)首選項 17.2 編碼實現獲取與修改預設信息中的值
在上一節中,大家已經看到了,PreferenceActivity這個類允許用戶在運行時去創建和修改首選項信息。 如果想要使用這些首選項信息,你就需要使用SharedPre