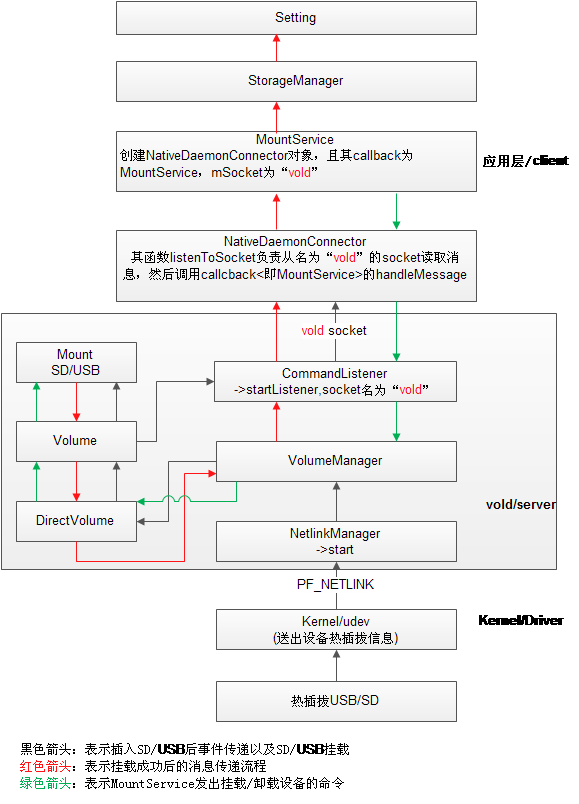
1. 首先是調用framework層的Camera.java(frameworks\base\core\java\android\hardware)的takePicture方法
2. 接著會調用到JNI層的android_hardware_Camera.cpp(frameworks\base\core\jni)的android_hardware_Camera_takePicture方法,其中會通過get_native_camera獲取一個Camera對象。
3. 上述Camera對象的定義在Camera.h(frameworks\av\include\camera),camera.h同時定義了CameraInfo。Camera對象繼承自publicBnCameraClient,DeathRecipient。Camera對象的真正實現是在Camera.cpp(frameworks\av\camera) 。BnCameraClient是作為CameraService回調而存在的。Camera對象內含有一個mCameraService變量用於保存CameraService引用。
class Camera : public BnCameraClient,public IBinder::DeathRecipient
constsp<ICameraService>& Camera::getCameraService()
{
Mutex::Autolock _l(mLock);
if (mCameraService.get() == 0) {
sp<IServiceManager> sm = defaultServiceManager();
sp<IBinder> binder;
do {
binder =sm->getService(String16("media.camera"));
if (binder != 0)
break;
ALOGW("CameraService notpublished, waiting...");
usleep(500000); // 0.5 s
} while(true);
if (mDeathNotifier == NULL) {
mDeathNotifier = newDeathNotifier();
}
binder->linkToDeath(mDeathNotifier);
mCameraService =interface_cast<ICameraService>(binder);
}
4. 在ICameraClient.h和ICameraService.h文件中,ICameraClient和ICameraService都繼承自IInterface,也就是Binder通信的基礎,此外ICamera.h也繼承自IInterface
class ICameraClient:public IInterface
class ICameraService :public IInterface
class ICamera: publicIInterface
然後發現BnCameraClient繼承自BnInterface<ICameraClient>,作為ICameraClient的服務器端存在:
class BnCameraClient: publicBnInterface<ICameraClient>
BnCameraService繼承自BnInterface<ICameraService>,作為ICameraService的服務器端存在:
class BnCameraService: publicBnInterface<ICameraService>
BnCamera繼承自BnInterface<ICamera>,作為ICamera的服務器端存在:
class BnCamera: public BnInterface<ICamera>
對應的上述三個分別存在一個作為Binder客戶端的類存在,為Bp***:
class BpCameraClient:public BpInterface<ICameraClient>
class BpCameraService:public BpInterface<ICameraService>
class BpCamera: publicBpInterface<ICamera>
上述三個的實現分別在ICameraClient.cpp、ICameraService.cpp、ICamera.cpp,在這三支文件中分別實現了三組Binder的Server端和Client端,Camera常用的方法都在ICamera中實現。
5. Camera.cpp文件connect方法在JNI層去setupCamera的時候會調用,JNI層是在上層opencamera的時候被調用的,在camera.cpp的connect方法中獲取一個ICamera對象來完成對Camera的真正操作。
sp<Camera>Camera::connect(int cameraId)
{
ALOGV("connect");
sp<Camera> c = new Camera();
const sp<ICameraService>& cs =getCameraService();
if (cs != 0) {
c->mCamera = cs->connect(c, cameraId);
}
if (c->mCamera != 0) {
c->mCamera->asBinder()->linkToDeath(c);
c->mStatus = NO_ERROR;
} else {
c.clear();
}
return c;
}
6. 在CameraService.h文件中可以看到CameraService定義內部類Client,CameraClient繼承此類,在CameraService中持有對mClient對象的一個數組,這個數組也是Camera.cpp客戶端調用connect方法後需要返回的Binder引用對象
class Client : public BnCamera
class CameraClient : public CameraService::Client
wp<Client> mClient[MAX_CAMERAS];
switch(deviceVersion) {
case CAMERA_DEVICE_API_VERSION_1_0:
client = new CameraClient(this,cameraClient, cameraId,
info.facing, callingPid, getpid());
break;
case CAMERA_DEVICE_API_VERSION_2_0:
client = new Camera2Client(this,cameraClient, cameraId,
info.facing, callingPid,getpid());
並且Google好像有開發新的API2.0,在此處通過判斷不同的version實例化不同的CameraClient的Binder引用對象回去,目前Camera2文件夾有Burst等實現
7. 在CameraService層的CameraClient對象的定義中,持有CameraHardwareInterface對象的引用mHardware.在CameraClient的initilize方法中會創建此對象,在對象的構造方法中傳入需要打開的Camera的ID。
sp<CameraHardwareInterface> mHardware;
status_t CameraClient::initialize(camera_module_t *module) {
int callingPid = getCallingPid();
LOG1("CameraClient::initialize E (pid%d, id %d)", callingPid, mCameraId);
char camera_device_name[10];
status_t res;
snprintf(camera_device_name, sizeof(camera_device_name),"%d", mCameraId);
mHardware = new CameraHardwareInterface(camera_device_name);
res = mHardware->initialize(&module->common);
if (res != OK) {
ALOGE("%s: Camera %d: unable toinitialize device: %s (%d)",
__FUNCTION__, mCameraId,strerror(-res), res);
mHardware.clear();
return NO_INIT;
}
mHardware->setCallbacks(notifyCallback,
dataCallback,
dataCallbackTimestamp,
(void*)mCameraId);
//Enable zoom, error, focus, and metadata messages by default
enableMsgType(CAMERA_MSG_ERROR | CAMERA_MSG_ZOOM | CAMERA_MSG_FOCUS |
CAMERA_MSG_PREVIEW_METADATA | CAMERA_MSG_FOCUS_MOVE);
//!++
#ifdef MTK_CAMERA_BSP_SUPPORT
// Enable MTK-extended messages by default
enableMsgType(MTK_CAMERA_MSG_EXT_NOTIFY |MTK_CAMERA_MSG_EXT_DATA);
#endif
//!--
LOG1("CameraClient::initialize X (pid%d, id %d)", callingPid, mCameraId);
return OK;
}
8. 在CameraService的onFirstRef方法中,會加載CameraHal Module
void CameraService:: onFirstRef()
{
BnCameraService::onFirstRef();
if (hw_get_module(CAMERA_HARDWARE_MODULE_ID,
(const hw_module_t**)&mModule) < 0) {
ALOGE("Could not load camera HALmodule");
mNumberOfCameras = 0;
}
else {
mNumberOfCameras =mModule->get_number_of_cameras();
if (mNumberOfCameras > MAX_CAMERAS){
ALOGE("Number of cameras(%d)> MAX_CAMERAS(%d).",
mNumberOfCameras, MAX_CAMERAS);
mNumberOfCameras = MAX_CAMERAS;
}
for (int i = 0; i <mNumberOfCameras; i++) {
setCameraFree(i);
}
}
}
hw_get_module方法的實現在hardware/libhardware/Hardware.c文件中實現
int hw_get_module(constchar *id, const struct hw_module_t **module)
{
return hw_get_module_by_class(id, NULL,module);
}
Camera_module_t的結構體定義在camera_common.h文件中
typedef structcamera_module {
hw_module_t common;
int (*get_number_of_cameras)(void);
int (*get_camera_info)(int camera_id,struct camera_info *info);
} camera_module_t;
Hw_module_t的定義在hardware.h文件中,hw_module_t持有對hw_module_methods_t引用,其中有定義一個open指針
typedef structhw_module_methods_t {
/** Open a specific device */
int (*open)(const struct hw_module_t*module, const char* id,
struct hw_device_t** device);
} hw_module_methods_t;
而加載CamDevice的操作是在CameraHardwareInterface的init方法中調用open
int rc =module->methods->open(module, mName.string(),
(hw_device_t **)&mDevice);
 Android中fragment與activity之間的交互(兩種實現方式)
 Android開發之WebView知識和常見問題
 pkbox安卓模擬器雙開多開辦法
 android 從源碼分析view事件分發機制