編輯:關於Android編程
從啟動說起
Android系統加載時,首先啟動init進程,該進程會啟動Zygote進程。Zygote進程執行/system/bin/app_process程序。app_process程序在執行中,通過AppRuntime::start()函數來創建虛擬機實例,並注冊JNI方法。
[cpp]
int main(int argc, const char* const argv[])
{
...
if (zygote) {
runtime.start("com.android.internal.os.ZygoteInit",
startSystemServer ? "start-system-server" : "");
}
...
}
int main(int argc, const char* const argv[])
{
...
if (zygote) {
runtime.start("com.android.internal.os.ZygoteInit",
startSystemServer ? "start-system-server" : "");
}
...
}
看一下AppRuntime::start()函數的說明:
[cpp]
/*
* Start the Android runtime. This involves starting the virtual machine
* and calling the "static void main(String[] args)" method in the class
* named by "className".
*
* Passes the main function two arguments, the class name and the specified
* options string.
*/
void AndroidRuntime::start(const char* className, const char* options)
{
...
}
這就是說,這個函數做兩件事情:首先虛擬機,其次執行className參數提供的Java類的main()方法。
這裡傳入className是"com.android.internal.os.ZygoteInit",那麼看一下它的main()方法:
[java]
public static void main(String argv[]) {
...
try {
if (argv[1].equals("start-system-server")) {
startSystemServer();
...
}
public static void main(String argv[]) {
...
try {
if (argv[1].equals("start-system-server")) {
startSystemServer();
...
}
看一下startSystemServer()方法的實現:
[java]
private static boolean startSystemServer()
throws MethodAndArgsCaller, RuntimeException {
…
int pid;
try {
…
/* Request to fork the system server process */
pid = Zygote.forkSystemServer(
parsedArgs.uid, parsedArgs.gid,
parsedArgs.gids,
parsedArgs.debugFlags,
null,
parsedArgs.permittedCapabilities,
parsedArgs.effectiveCapabilities);
} catch (IllegalArgumentException ex) {
throw new RuntimeException(ex);
}
/* For child process */
if (pid == 0) {
handleSystemServerProcess(parsedArgs);
}
return true;
}
在這裡,Zygote進程fork出SystemServer進程,隨後再handleSystemServerProcess()方法中對它做初始處理,包括關閉克隆Zygote進程所帶來的socket。
接下來,調用RuntimeInit.zygoteInit()方法完成其它的初始化工作。其中,將會調用SystemServer.main()方法進入SystemServer本身的初始化。main()方法經過一系列的步驟之後,調用本地方法init1()來啟動SurfaceFlinger和SensorService這樣的關鍵服務。之後init1()從本地回調Java層的SystemServer.init2()方法來啟動Java層的各項服務:
[java]
public static final void init2() {
Slog.i(TAG, "Entered the Android system server!");
Thread thr = new ServerThread();
thr.setName("android.server.ServerThread");
thr.start();
}
public static final void init2() {
Slog.i(TAG, "Entered the Android system server!");
Thread thr = new ServerThread();
thr.setName("android.server.ServerThread");
thr.start();
}
SystemThread是一個線程子類,在這個線程的執行中,將建立一個消息循環,接著啟動系統的各個服務,並注冊到ServiceManager中。
終於可以進入主題了。在這裡,就包括AccountManagerService的創建與注冊:
[java]
class ServerThread extends Thread {
private static final String TAG = "SystemServer";
…
@Override
public void run() {
...
Looper.prepare();
...
AccountManagerService accountManager = null;
...
// Critical services...
try {
...
// The AccountManager must come before the ContentService
try {
Slog.i(TAG, "Account Manager");
accountManager = new AccountManagerService(context);
ServiceManager.addService(Context.ACCOUNT_SERVICE, accountManager);
} catch (Throwable e) {
Slog.e(TAG, "Failure starting Account Manager", e);
}
...
}
...
}
接下來學習AccountManagerService相關的接口與實現。
 Android開發-DesignDemo-AndroidStudio(九)FloatingActionButton(1)
簡單對比FloatingActionButton和ImageButton的區別:左邊是ImageButton,右邊是FloatingActionButton:activi
 Android實習札記(10)---ImageView的src屬性 VS blackground屬性
問題分析 相信大家對於ImageView圖片組件並不陌生吧,見名知意,就是用來顯示圖片的咯! 而顯示圖片的話可以通過src屬性,又或者blac
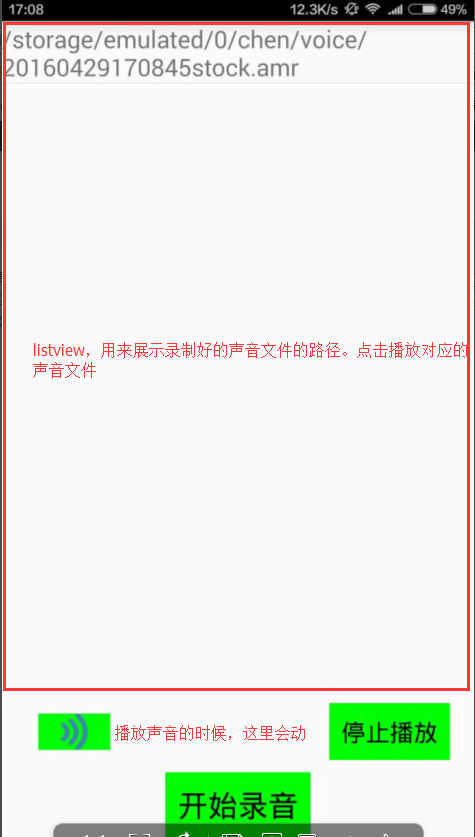 Android錄制聲音文件(音頻),並播放
readme:1、這個demo中沒有對多次點擊同一個聲音文件做詳細處理,偶爾會有崩潰,用的時候需要注意。2、按住錄音按鈕錄音過程中,只對豎直方向處理了一下,水平方向沒寫;
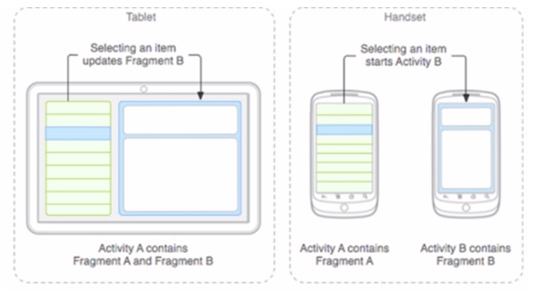
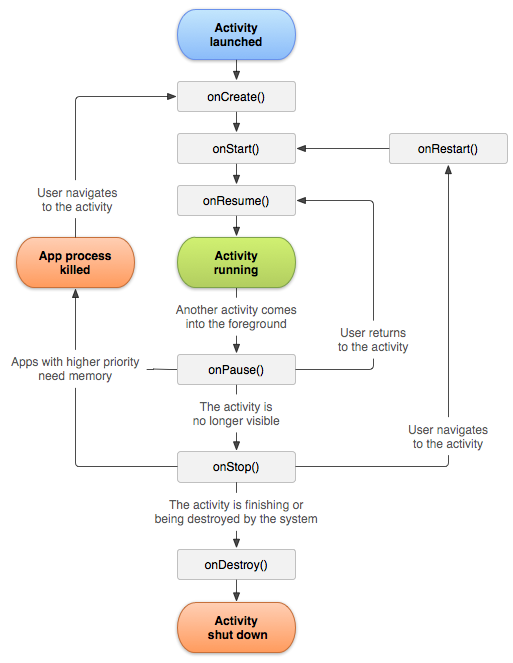 Android官方文檔之App Components(Activities)
Activity是Android四大組件之首,本文將介紹Activity的含義、創建、啟動、銷毀、生命周期 等。如需訪問官方原文,您可以點擊這個鏈接:《Activitie