編輯:關於Android編程
docs -> 幫助文檔
platforms -> 最開始是空的 沒有內容.
存放的是對應平台模擬器相關的內容
Android-8目錄:
images目錄是模擬器的鏡像文件
Sources 目錄: 平台的源代碼目錄,默認不存在,創建將源文件放在這個目錄下。
android.jar 開發framework提供的jar包
platform-tools :存放開發工具。
開發用到的工具
aapt.exe 程序打包 ->apk文件 android application package tools
adb.exe 開發的一個調試橋 android debug bridge
dx.bat class->dex的工具
samples目錄:google工程師給我們提供的實例代碼.
tools
android開發經常用到的一些工具
android.bat ->創建和啟動模擬器
emulator.exe 模擬器對應的進程可執行文件
ddms -> dalvik debug manager system :dalvik調試管理系統集
屏幕的大小:
vga 640*480
hvga 480*320 i5700 G1
qvga 320*240 u880
wvga 800*480
fwvga 854*480
1.查看多少個設備連接到了電腦 adb devices
2.adb -s :-s 用於指定設備。
3. 查看模擬器日志命令:adb -s 設備名稱 logcat
4.adb pull
例:從模擬器中將文件放到windows上:
adb -s emulator-5554 pull /sdcard/aa.txt c:\aa.txt
例:將window中的文件放到模擬器中:
adb -s emulator-5554 push aa.txt /mnt/sdcard/aa.txt
5.當控制台報出了紅色的錯誤,connection timeout
connection error
DeviceMonitor] Adb connection Error:遠程主機強迫關閉了一個現有的連接。
[2012-04-13 11:03:51 - Unexpected error while launching logcat.Try reselecting the device.] 遠程主機強迫關閉了一個現有的連接。
java.io.IOException: 遠程主機強迫關閉了一個現有的連接。
atsun.nio.ch.SocketDispatcher.read0(Native Method)
atsun.nio.ch.SocketDispatcher.read(Unknown Source)
atsun.nio.ch.IOUtil.readIntoNativeBuffer(Unknown Source)
atsun.nio.ch.IOUtil.read(Unknown Source)
使用:adb kill-server :關閉連接橋。
再使用:adb start-server:啟動連接橋。
assets:資產目錄,資產目錄特點:不會對文件產生引用。
bin目錄:eclipse編譯的.class文件的目錄,並調用dx.bat通過class文件生成.dex
文件存放在bin目錄下。
aapt工具完成程序的打包,生成apk文件。放在bin目錄下。
res目錄:程序的資源文件。
src :java源文件。
AndroidManifest.xml文件介紹:
package="com.example.hello" //包名
android:versionCode="1"
android:versionName="1.0" > //程序的版本.
android:minSdkVersion="8" //指定運行的android平台版本
android:targetSdkVersion="15" />
android:icon="@drawable/ic_launcher" //指定應用程序顯示的圖標
android:label="@string/app_name" //應用程序的名稱。
android:theme="@style/AppTheme" >
android:name=".MainActivity" //與類名相同。
//指定界面上顯示的名字,引用res/values目錄下的strings.xml文
件中的string元素name="test"的值。
android:label="@string/test" >
res目錄下的所有文件都會在R文件中生成引用。
assets目錄下的文件不會在R文件中生成引用,在打apk包時會原封不動的將資源放置到apk的包assets目錄裡。
public class MainActivity extends Activity{
@Override
//onCreate的方法會在MainActivity第一次被創建的時候執行。
public void onCreate(BundlesavedInstanceState) {
super.onCreate(savedInstanceState);
//將layout目錄下的activity_main.xml布局文件引進來。
setContentView(R.layout.activity_main);
}
@Override
public boolean onCreateOptionsMenu(Menu menu) {
getMenuInflater().inflate(R.menu.activity_main, menu);
return true;
}
}
android:layout_width="fill_parent"
android:layout_height="fill_parent"
android:orientation="vertical">
android:id="@+id/tv" //tv 是顯示文本的id
android:layout_width="fill_parent"
android:layout_height="wrap_content"
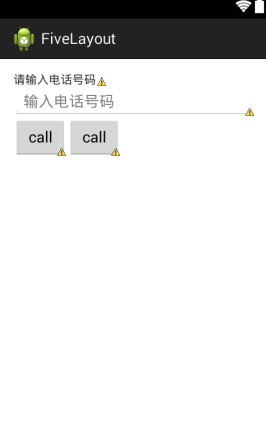
android:text="@string/input_number"
android:textAppearance="@android:attr/textAppearanceLarge" //顯示狀態
/>
android:id="@+id/editText1" //id
android:layout_width="match_parent"
android:layout_height="wrap_content"
android:hint="@string/hint"//指定輸入框中的提示信息
android:inputType="phone"> //指定輸入類型,只允許輸入電話號碼
android:id="@+id/bt_submit"
android:layout_width="wrap_content"
android:layout_height="wrap_content"
android:text="@string/submit"/> //按鈕上的字
MainActivity 類實現了View.OnClickListener接口,說明該類作為點擊事件的監聽器
覆寫接口中的onClick方法,當事件被觸發時,執行onclick事件。
public class MainActivityextends Activity
implements View.OnClickListener {
private EditText et;
public voidonCreate(Bundle savedInstanceState) {
super.onCreate(savedInstanceState);
setContentView(R.layout.activity_main);
//根據id獲取文本框組件
et = (EditText) MainActivity.this.findViewById(R.id.editText1);
//獲取按鈕組件
Button button = (Button)this.findViewById(R.id.button1);
//增加點擊事件監聽器 .//讓當前的activity實現onclicklistener接口
button.setOnClickListener(this);
}
@Override
public booleanonCreateOptionsMenu(Menu menu) {
getMenuInflater().inflate(R.menu.activity_main, menu);
return true;
}
//當按鈕被點擊到的時候 調用的方法。View.OnClickListener接口中的方法
public void onClick(Viewv) {
//獲取文本框中的數據
String number = et.getText().toString().trim();
//輸入框為空
if ("".equals(number)) {
//創建一個提示框,方法參數(上下文,提示信息,顯示時間)
Toast.makeText(getApplicationContext(), R.string.error,
Toast.LENGTH_LONG).show();
return;
}
// 撥打電話
// intent 意圖, 作用:激活組件的.
Intent intent = new Intent();
intent.setAction(Intent.ACTION_CALL);
// Uri.parse() 返回Uri對象,"tel:"+number 為固定寫法。
intent.setData(Uri.parse("tel:" + number));
// 激活系統的撥打電話的組件(activity)
startActivity(intent);
}
}
即可.
如果不設置權限,執行時會拋java.lang.SecurityException 異常。
提示需要: android.permission.CALL_PHONE 權限。
日志輸出的級別 和輸出的方式:
//verbose 提示信息 ,方法參數tag:日志標記,默認設置為類名。
Log.v(TAG, "verbose");
// debug 調試
Log.d(TAG, "debug");
// info 重要的信息
Log.i(TAG, "info");
// warn 警告
Log.w(TAG, "warn");
// error 錯誤的提示
Log.e(TAG, "error");
在layout目錄下的xml文件中,使用 android:orientation指定布局。
1、線性布局:xml文件的根元素為:LinearLayout:表示線性布局。
android:orientation="vertical" :組件線性豎直布局,
android:orientation="horizontal":表示組件線性水平布局。
例 :
xmlns:android="http://schemas.android.com/apk/res/android"
android:layout_width="fill_parent"
android:layout_height="fill_parent"
android:orientation="vertical">
2、相對布局:xml根元素節點是RelativeLayout。
xmlns:android="http://schemas.android.com/apk/res/android"
android:layout_width="match_parent"
android:layout_height="match_parent" >
android:id="@+id/tv_number"
android:layout_width="wrap_content"
android:layout_height="wrap_content"
android:textColor="#FF0000"
android:layout_alignParentLeft="true"
android:layout_alignParentTop="true"
android:text="@string/sms_number"/>
android:id="@+id/et_number"
android:layout_width="wrap_content"
android:layout_height="wrap_content"
android:layout_alignParentLeft="true"
android:layout_below="@+id/tv_number"//指定當前控件在哪個控件下面
android:ems="10"
android:inputType="phone" />
android:layout_alignParentRight="true":表示顯示在父窗體的最右邊。
android:layout_alignParentBottom="true":顯示在父窗體的最底部。
android:layout_above="@id/bt_corner" 當前控件在哪個控件的上面
3、幀布局:FrameLayout根元素:
<frameLayoutxmlns:android="http://schemas.android.com/apk/res/android" android:layout_width="match_parent"
android:layout_height="match_parent" >
android:layout_width="fill_parent"
android:layout_height="fill_parent"
android:src="@drawable/ic_launcher"
android:scaleType="center" //圖片的大小
//水平居中和豎直居中
android:layout_gravity="center_vertical|center_horizontal"
android:visibility="visible" //控制顯示
/>
4、絕對布局:
android:layout_width="match_parent"
android:layout_height="match_parent" >
android:id="@+id/button1"
android:layout_width="wrap_content"
android:layout_height="wrap_content"
android:layout_x="17dp"
android:layout_y="182dp"
android:text="Button" />
5、表格布局:
android:layout_width="match_parent"
android:layout_height="match_parent" >
android:layout_width="match_parent"
android:layout_height="wrap_content" >
android:layout_width="wrap_content"
android:layout_height="wrap_content"
android:text="textview01" />
android:layout_width="wrap_content"
android:layout_height="wrap_content"
android:src="@drawable/ic_launcher" />
android:layout_width="match_parent"
android:layout_height="wrap_content" >
android:layout_width="wrap_content"
android:layout_height="wrap_content"
android:text="textview01"/>
android:layout_width="wrap_content"
android:layout_height="wrap_content"
android:src="@drawable/ic_launcher" />
px (pixels)像素 :不建議使用.
一般HVGA代表320x480像素,這個用的比較多。
建議使用:dp /dip 代替px。
dip或dp(device independent pixels)設備獨立像素
這個和設備硬件有關,一般為了支持WVGA、HVGA和QVGA推薦使用這個,不依賴像素。
字體的單位:
sp (scaled pixels — best for text size)比例像素
主要處理字體的大小,可以根據系統的字體自適應。
十、發送短息:
 Android 手機衛士實現平移動畫示例
本文實現如下幾個界面之間的平移動畫實現分析:導航界面移動過程中,平移動畫上一頁移入動畫 (-屏幕寬度,y)------>(0,y)上一頁移出動畫 (0,y)----
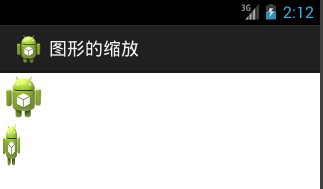 Android 圖片縮放實例詳解
本文實現Android中的圖片的縮放效果首先設計布局:<LinearLayout xmlns:android=http://schemas.android.com/
 AndroidFM模塊學習之錄音功能
前些天分析了一下FM的流程以及主要類,接下來我們分析一下FM的錄音功能; 首先看下流程圖: Fm錄音時,當點擊了錄音按鈕,會發一個廣播出去,源碼在FMRadioServ
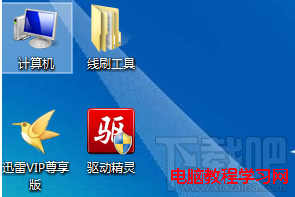 Android手機線刷教程
本教程為通用教程 幾乎適合所有的安卓手機 希望可以幫到酷愛刷機的機油們!注意 不支持win8 支持win7/