創建工程之後,建立一個包,主要是寫SQLite的。
image
再來補充下背景,在這裡,我在first這個包裡寫了兩個類,這是因為我在弄兩個activity的切換,不影響本實驗,本實驗是放在OtherActivity.java裡面的進行的。
建立一個Sqlite.java的類,繼承SQLiteOpenHelper。
復制代碼
public class Sqlite extends SQLiteOpenHelper{
private static final int VERSION = 1;
public Sqlite(Context context, String name, CursorFactory factory,
int version) {
super(context, name, factory, version);
// TODO 自動生成的構造函數存根
}
public Sqlite(Context context,String name){
this(context,name,VERSION);
}
public Sqlite(Context context,String name,int version){
this(context, name,null,version);
}
@Override
public void onCreate(SQLiteDatabase arg0) {
// TODO 自動生成的方法存根
System.out.println("create a Database");
//execSQL函數用於執行SQL語句
arg0.execSQL("create table user(id int,name varchar(20))");
}
@Override
public void onUpgrade(SQLiteDatabase db, int oldVersion, int newVersion) {
// TODO 自動生成的方法存根
System.out.println("update a Database");
}
}
復制代碼
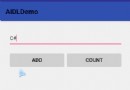
在OtherActivity.java中加入這個包,
import com.yuyidong.db.Sqlite;
image
這裡是布局,前面的TextView和Button(Call)請大家無視掉。
復制代碼
<?xml version="1.0" encoding="utf-8"?>
<LinearLayout xmlns:android="http://schemas.android.com/apk/res/android"
android:layout_width="match_parent"
android:layout_height="match_parent"
android:gravity="center_horizontal"
android:orientation="vertical" >
<TextView
android:id="@+id/text"
android:layout_width="wrap_content"
android:layout_height="wrap_content"
android:text="Test"
android:textSize="30sp"
/>
<Button
android:id="@+id/button_other"
android:layout_width="wrap_content"
android:layout_height="wrap_content"
android:text="Call"
/>
<Button
android:id="@+id/button_create"
android:layout_width="match_parent"
android:layout_height="wrap_content"
android:text="Create"
/>
<Button
android:id="@+id/button_update"
android:layout_width="match_parent"
android:layout_height="wrap_content"
android:text="Update"
/>
<Button
android:id="@+id/button_insert"
android:layout_width="match_parent"
android:layout_height="wrap_content"
android:text="Insert"
/>
<Button
android:id="@+id/button_update_table"
android:layout_width="match_parent"
android:layout_height="wrap_content"
android:text="Update_Table"
/>
<Button
android:id="@+id/button_query"
android:layout_width="match_parent"
android:layout_height="wrap_content"
android:text="Query"
/>
</LinearLayout>
復制代碼
接下來是申明已經添加到監聽器中。
復制代碼
public class OtherActivity extends Activity{
private TextView text;
private Button button;
private Button createButton;
private Button insertButton;
private Button updateButton;
private Button updateRecordButton;
private Button queryButton;
@Override
protected void onCreate(Bundle savedInstanceState) {
// TODO 自動生成的方法存根
super.onCreate(savedInstanceState);
setContentView(R.layout.activity_other);
Intent intenter = getIntent();
String value = intenter.getStringExtra("hello");
text = (TextView) findViewById(R.id.text);
text.setText(value);
button = (Button) findViewById(R.id.button_other);
buttonListener lisbtn = new buttonListener();
button.setOnClickListener(lisbtn);
createButton = (Button) findViewById(R.id.button_create);
buttonListener createbtn = new buttonListener();
createButton.setOnClickListener(createbtn);
updateButton = (Button) findViewById(R.id.button_update);
buttonListener updatebtn = new buttonListener();
updateButton.setOnClickListener(updatebtn);
insertButton = (Button) findViewById(R.id.button_insert);
buttonListener insertbtn = new buttonListener();
insertButton.setOnClickListener(insertbtn);
updateRecordButton = (Button) findViewById(R.id.button_update_table);
buttonListener updatetablebtn = new buttonListener();
updateRecordButton.setOnClickListener(updatetablebtn);
queryButton = (Button) findViewById(R.id.button_query);
buttonListener querybtn = new buttonListener();
queryButton.setOnClickListener(querybtn);
}
復制代碼
請大家繼續無視掉Intent、text、button這三個對象。
接下來講一講Button的監聽器裡面發生的故事。紅色的注釋是主要的說明。
復制代碼
class buttonListener implements OnClickListener
{
private Button button_check;
private int version = 1;;
@Override
public void onClick(View v) {
// TODO 自動生成的方法存根
//將View的對象v轉換成Button的
button_check = (Button) v;
//請無視掉這裡,這個是轉跳到發短信的Activity的Button的操作
if(button_check==button)
{
Uri uri = Uri.parse("smsto:10086");
Intent intenter = new Intent(Intent.ACTION_SENDTO,uri);
intenter.putExtra("sms_body", "Test good!");
startActivity(intenter);
}
//如果是按下的創建數據庫的那個Button的話,執行
else if(button_check == createButton)
{
//創建一個Sqlite對象
Sqlite dbHelper = new Sqlite(OtherActivity.this,"yyd_test_db");
//只有調用了Sqlite對象的getReadableDatabase()方法,或者是getWritableDatabase()方法之後,才會創建,或打開一個數據庫
SQLiteDatabase db = dbHelper.getReadableDatabase();
//Toast顯示調試
Toast.makeText(OtherActivity.this, "Create", Toast.LENGTH_SHORT).show();
}
else if(button_check == updateButton)
{
//每次更新後,數據庫版本加1
version++;
Sqlite dbHelper = new Sqlite(OtherActivity.this,"yyd_test_db",version);
SQLiteDatabase db = dbHelper.getReadableDatabase();
Toast.makeText(OtherActivity.this, "Update", Toast.LENGTH_SHORT).show();
}
else if(button_check == insertButton)
{
//生成ContentValues對象
ContentValues values = new ContentValues();
//想該對象當中插入鍵值對,其中鍵是列名,值是希望插入到這一列的值,值必須和數據庫當中的數據類型一致
values.put("id", 1);
values.put("name","zhangsan");
Sqlite dbHelper = new Sqlite(OtherActivity.this, "yyd_test_db", version);
SQLiteDatabase db = dbHelper.getWritableDatabase();
//調用insert方法,就可以將數據插入到數據庫當中
db.insert("user", null, values);
Toast.makeText(OtherActivity.this, "Insert", Toast.LENGTH_SHORT).show();
}
else if(button_check == updateRecordButton)
{
//得到一個可寫的SQLiteDatabase對象
Sqlite dbHelper = new Sqlite(OtherActivity.this, "yyd_test_db", version);
SQLiteDatabase db = dbHelper.getWritableDatabase();
ContentValues values = new ContentValues();
values.put("name", "zhangsanfeng");
//第一個參數是要更新的表名、第二個參數是一個ContentValeus對象、第三個參數是where子句
db.update("user", values, "id=?", new String[]{"1"});
Toast.makeText(OtherActivity.this, "Update_Table", Toast.LENGTH_SHORT).show();
}
else if(button_check == queryButton)
{
Sqlite dbHelper = new Sqlite(OtherActivity.this,"yyd_test_db");
SQLiteDatabase db = dbHelper.getReadableDatabase();
Cursor cursor = db.query("user", new String[]{"id","name"}, "id=?", new String[]{"1"}, null, null, null);
//用cursor.moveToNext()判斷是否還存在下一個,若存在返回真,不存在返回假。
while(cursor.moveToNext())
{
String name = cursor.getString(cursor.getColumnIndex("name"));
System.out.println("Get--->" + name);
}
}
}
}
復制代碼
不僅可以寫程序操作SQLite,還可以用shell操作SQLite數據庫。
 Android實現TextView字符串關鍵字變色的方法
 自定義(下拉刷新、上拉加載)幀動畫
 手機qq怎麼安裝 手機qq安卓教程 手機qq安裝目錄哪裡找
 android 微信 sdk api調用不成功解決方案
 Notification(Notification的通知欄常駐、Notification的各種樣式、Notification點擊無效)