編輯:關於Android編程
現在app基本都有推送的功能,於是看了下百度雲的推送,官方文檔和Demo都很到位,記錄下使用過程,目標是利用百度雲推送最為服務器寫個及時通訊的例子~當然了,這是第一篇入門~
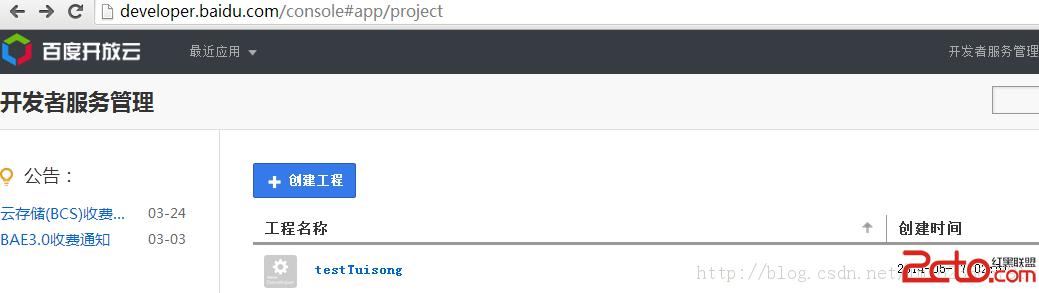
1、第一步就是在百度開發者服務管理中創建項目,然後拿到API key , Secret Key ;這個過程就不多說了,上官網直接申請就行,不復雜。
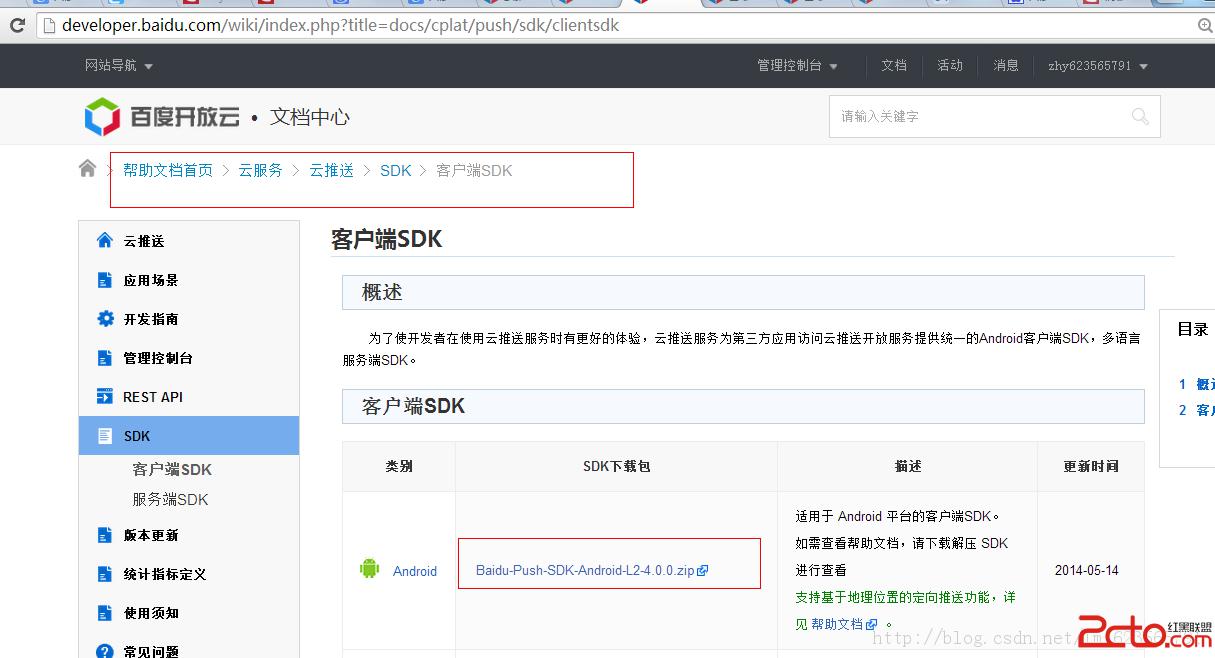
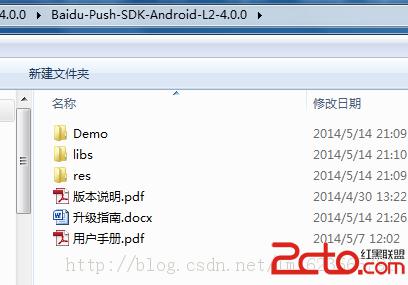
2、下載雲推送的客戶端SDK,SDK的壓縮文件中包含一個例子代碼,一個用戶手冊,和所需的libs和資源等(其實直接看用戶手冊和Demo基本就沒問題了)。
3、准備工作結束,接下來,我們就直接開始新建項目測試
a、新建一個項目,然後把SDK中的libs中的jar和so文件夾拷貝到新建的項目中去

b、將manifest中的application的name設置為:com.baidu.frontia.FrontiaApplication
c、添加權限
package com.example.zhy_baiduyun_tuisong01.receiver;

import java.util.List;

import org.json.JSONException;
import org.json.JSONObject;

import android.content.Context;
import android.content.Intent;
import android.text.TextUtils;
import android.util.Log;

import com.baidu.frontia.api.FrontiaPushMessageReceiver;
import com.example.zhy_baiduyun_tuisong01.MainActivity;
import com.example.zhy_baiduyun_tuisong01.util.PreUtils;

/**
 * Push消息處理receiver。請編寫您需要的回調函數, 一般來說: onBind是必須的,用來處理startWork返回值;
 * onMessage用來接收透傳消息; onSetTags、onDelTags、onListTags是tag相關操作的回調;
 * onNotificationClicked在通知被點擊時回調; onUnbind是stopWork接口的返回值回調
 *
 * 返回值中的errorCode,解釋如下:
 *  0 - Success
 *  10001 - Network Problem
 *  30600 - Internal Server Error
 *  30601 - Method Not Allowed
 *  30602 - Request Params Not Valid
 *  30603 - Authentication Failed
 *  30604 - Quota Use Up Payment Required
 *  30605 - Data Required Not Found
 *  30606 - Request Time Expires Timeout
 *  30607 - Channel Token Timeout
 *  30608 - Bind Relation Not Found
 *  30609 - Bind Number Too Many
 *
 * 當您遇到以上返回錯誤時,如果解釋不了您的問題,請用同一請求的返回值requestId和errorCode聯系我們追查問題。
 *
 */
public class MyPushMessageReceiver extends FrontiaPushMessageReceiver {
    /** TAG to Log */
    public static final String TAG = MyPushMessageReceiver.class
            .getSimpleName();

    /**
     * 調用PushManager.startWork後,sdk將對push
     * server發起綁定請求,這個過程是異步的。綁定請求的結果通過onBind返回。 如果您需要用單播推送,需要把這裡獲取的channel
     * id和user id上傳到應用server中,再調用server接口用channel id和user id給單個手機或者用戶推送。
     *
     * @param context
     *            BroadcastReceiver的執行Context
     * @param errorCode
     *            綁定接口返回值,0 - 成功
     * @param appid
     *            應用id。errorCode非0時為null
     * @param userId
     *            應用user id。errorCode非0時為null
     * @param channelId
     *            應用channel id。errorCode非0時為null
     * @param requestId
     *            向服務端發起的請求id。在追查問題時有用;
     * @return none
     */
    @Override
    public void onBind(Context context, int errorCode, String appid,
            String userId, String channelId, String requestId) {
        String responseString = onBind errorCode= + errorCode +  appid=
                + appid +  userId= + userId +  channelId= + channelId
                +  requestId= + requestId;
        Log.e(TAG, responseString);

        // 綁定成功,設置已綁定flag,可以有效的減少不必要的綁定請求
        if (errorCode == 0) {
            PreUtils.bind(context);
        }
        // Demo更新界面展示代碼,應用請在這裡加入自己的處理邏輯
        updateContent(context, responseString);
    }

    /**
     * 接收透傳消息的函數。
     *
     * @param context
     *            上下文
     * @param message
     *            推送的消息
     * @param customContentString
     *            自定義內容,為空或者json字符串
     */
    @Override
    public void onMessage(Context context, String message,
            String customContentString) {
        String messageString = 透傳消息 message= + message
                +  customContentString= + customContentString;
        Log.e(TAG, messageString);

        // 自定義內容獲取方式,mykey和myvalue對應透傳消息推送時自定義內容中設置的鍵和值
        if (!TextUtils.isEmpty(customContentString)) {
            JSONObject customJson = null;
            try {
                customJson = new JSONObject(customContentString);
                String myvalue = null;
                if (customJson.isNull(mykey)) {
                    myvalue = customJson.getString(mykey);
                }
            } catch (JSONException e) {
                // TODO Auto-generated catch block
                e.printStackTrace();
            }
        }

        // Demo更新界面展示代碼,應用請在這裡加入自己的處理邏輯
        updateContent(context, messageString);
    }


    /**
     * 接收通知點擊的函數。注:推送通知被用戶點擊前,應用無法通過接口獲取通知的內容。
     *
     * @param context
     *            上下文
     * @param title
     *            推送的通知的標題
     * @param description
     *            推送的通知的描述
     * @param customContentString
     *            自定義內容,為空或者json字符串
     */
    @Override
    public void onNotificationClicked(Context context, String title,
            String description, String customContentString) {


    	String notifyString = 通知點擊 title= + title +  description=
                + description +  customContent= + customContentString;
        Log.e(TAG, notifyString);

        // 自定義內容獲取方式,mykey和myvalue對應通知推送時自定義內容中設置的鍵和值
        if (!TextUtils.isEmpty(customContentString)) {
            JSONObject customJson = null;
            try {
                customJson = new JSONObject(customContentString);
                String myvalue = null;
                if (customJson.isNull(mykey)) {
                    myvalue = customJson.getString(mykey);
                }
            } catch (JSONException e) {
                // TODO Auto-generated catch block
                e.printStackTrace();
            }
        }

        // Demo更新界面展示代碼,應用請在這裡加入自己的處理邏輯
        updateContent(context, notifyString);
    }

    /**
     * setTags() 的回調函數。
     *
     * @param context
     *            上下文
     * @param errorCode
     *            錯誤碼。0表示某些tag已經設置成功;非0表示所有tag的設置均失敗。
     * @param successTags
     *            設置成功的tag
     * @param failTags
     *            設置失敗的tag
     * @param requestId
     *            分配給對雲推送的請求的id
     */
    @Override
    public void onSetTags(Context context, int errorCode,
            List sucessTags, List failTags, String requestId) {
        String responseString = onSetTags errorCode= + errorCode
                +  sucessTags= + sucessTags +  failTags= + failTags
                +  requestId= + requestId;
        Log.e(TAG, responseString);

        // Demo更新界面展示代碼,應用請在這裡加入自己的處理邏輯
        updateContent(context, responseString);
    }

    /**
     * delTags() 的回調函數。
     *
     * @param context
     *            上下文
     * @param errorCode
     *            錯誤碼。0表示某些tag已經刪除成功;非0表示所有tag均刪除失敗。
     * @param successTags
     *            成功刪除的tag
     * @param failTags
     *            刪除失敗的tag
     * @param requestId
     *            分配給對雲推送的請求的id
     */
    @Override
    public void onDelTags(Context context, int errorCode,
            List sucessTags, List failTags, String requestId) {
        String responseString = onDelTags errorCode= + errorCode
                +  sucessTags= + sucessTags +  failTags= + failTags
                +  requestId= + requestId;
        Log.e(TAG, responseString);

        // Demo更新界面展示代碼,應用請在這裡加入自己的處理邏輯
        updateContent(context, responseString);
    }

    /**
     * listTags() 的回調函數。
     *
     * @param context
     *            上下文
     * @param errorCode
     *            錯誤碼。0表示列舉tag成功;非0表示失敗。
     * @param tags
     *            當前應用設置的所有tag。
     * @param requestId
     *            分配給對雲推送的請求的id
     */
    @Override
    public void onListTags(Context context, int errorCode, List tags,
            String requestId) {
        String responseString = onListTags errorCode= + errorCode +  tags=
                + tags;
        Log.e(TAG, responseString);

        // Demo更新界面展示代碼,應用請在這裡加入自己的處理邏輯
        updateContent(context, responseString);
    }

    /**
     * PushManager.stopWork() 的回調函數。
     *
     * @param context
     *            上下文
     * @param errorCode
     *            錯誤碼。0表示從雲推送解綁定成功;非0表示失敗。
     * @param requestId
     *            分配給對雲推送的請求的id
     */
    @Override
    public void onUnbind(Context context, int errorCode, String requestId) {
        String responseString = onUnbind errorCode= + errorCode
                +  requestId =  + requestId;
        Log.e(TAG, responseString);

        // 解綁定成功,設置未綁定flag,
        if (errorCode == 0) {
            PreUtils.unbind(context);
        }
        // Demo更新界面展示代碼,應用請在這裡加入自己的處理邏輯
        updateContent(context, responseString);
    }

    private void updateContent(Context context, String content) {
        Log.e(TAG, updateContent);
        //String logText =  + Utils.logStringCache;

//        if (!logText.equals()) {
//            logText +=
;
//        }

//        SimpleDateFormat sDateFormat = new SimpleDateFormat(HH-mm-ss);
//        logText += sDateFormat.format(new Date()) + : ;
//        logText += content;

        //Utils.logStringCache = logText;

        Intent intent = new Intent();
        intent.putExtra(result, content);
        intent.setClass(context.getApplicationContext(), MainActivity.class);
        intent.addFlags(Intent.FLAG_ACTIVITY_NEW_TASK);
        context.getApplicationContext().startActivity(intent);
    }

}
package com.example.zhy_baiduyun_tuisong01;

import android.app.Activity;
import android.content.Intent;
import android.os.Bundle;
import android.util.Log;
import android.widget.TextView;

import com.baidu.android.pushservice.PushConstants;
import com.baidu.android.pushservice.PushManager;
import com.example.zhy_baiduyun_tuisong01.util.PreUtils;

public class MainActivity extends Activity
{
	private TextView mTextView;

	@Override
	protected void onCreate(Bundle savedInstanceState)
	{
		super.onCreate(savedInstanceState);
		setContentView(R.layout.activity_main);
		initView();

		autoBindBaiduYunTuiSong();

	}

	private void initView()
	{
		mTextView = (TextView) findViewById(R.id.id_textview);
	}

	@Override
	protected void onNewIntent(Intent intent)
	{
		String result = intent.getStringExtra(result);
		if (result != null)
		{
			mTextView.setText(result);

		}
		// super.onNewIntent(intent);
	}

	/**
	 * 如果沒有綁定百度雲,則綁定,並記錄在屬性文件中
	 */
	private void autoBindBaiduYunTuiSong()
	{
		if (!PreUtils.isBind(getApplicationContext()))
		{
			PushManager.startWork(getApplicationContext(),
					PushConstants.LOGIN_TYPE_API_KEY,
					TVkKGesssSDs5q7AamLGnNCs);
		}
	}

}
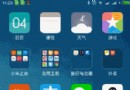
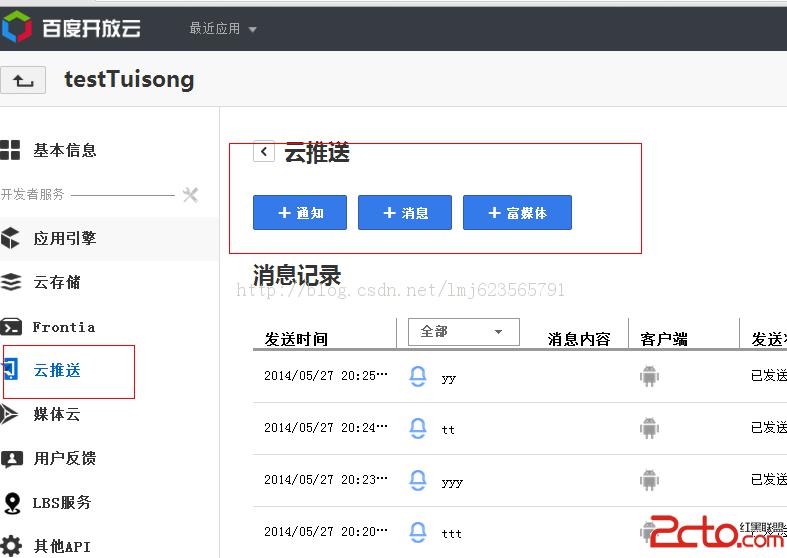
1、應用安裝後,如果綁定成功,主界面:
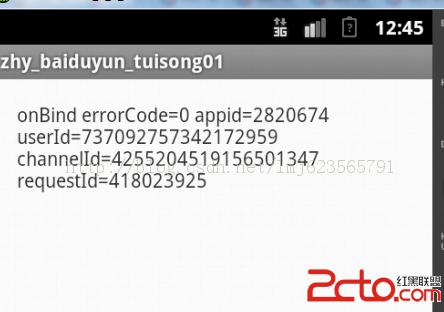
然後在管理控制台開始分別發送通知和消息:
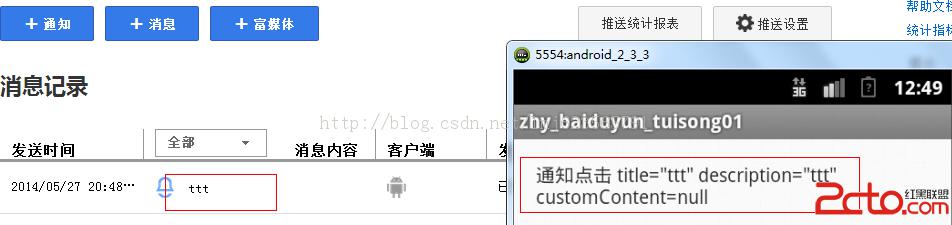
2、當發送通知並點擊通知:
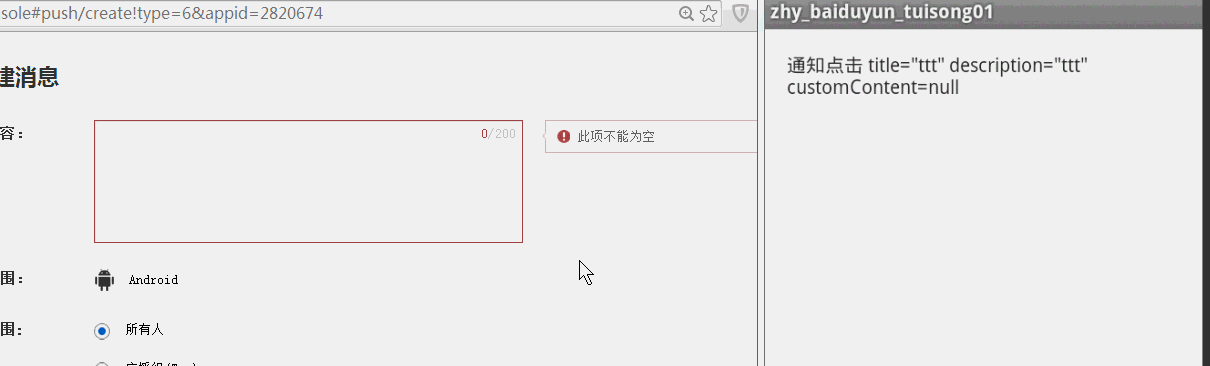
3、當發送消息:
好了,都是最基本的功能,沒什麼技術含量就是需要點耐心,下面貼上源碼,使用源碼請把MainActivity裡面的KEY設置成自己申請的KEY。
源碼點擊下載
 【Android 系統開發】CyanogenMod 13.0 源碼下載 編譯 ROM 制作
本文操作手機平台 : 小米4 ;編譯平台 : Ubuntu 14.04 LTS 虛擬機,使用CyanogenMod 源碼編譯ROM。手機的兩種模式: 在下面有詳細的圖片示
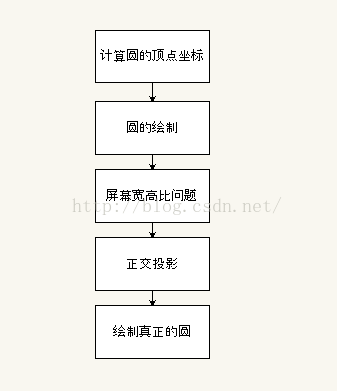 OpenglES2.0 for Android:來畫個圓吧
首先看看本節的流程: 計算圓的頂點坐標: 我們先要明白OpenglES中圓是怎麼畫的,前面我們已經知道三角形扇的繪制方式,我們的圓其實也可
 android studio測試--Uiautomator
安裝Android Support Repository最低版本 minSdkVersion 18添加Uiautomator在build.gradle添加對Uiautom
 android 記一次annotation + AbstractProcessor 編譯自動生成sdcard管理類
https://github.com/shf981862482/SuperAnnotation在app開發中,難免要做一些sdcard的操作比如:判斷sdcard存在,生