編輯:關於Android編程
創建通知
為了創建在手機與可穿戴設備中都能展現的通知,可以使用 NotificationCompat.Builder。通過該類創建的通知,系統會處理該通知是否展現在手機或者穿戴設備中。
導入必要的類庫
在開發之前首先需要導入以下類庫
importandroid.support.v4.app.NotificationCompat;
importandroid.support.v4.app.NotificationManagerCompat;
importandroid.support.v4.app.NotificationCompat.WearableExtender;
使用Notification Builder創建通知
v4 support library 庫允許開發者使用最新的通知特性,如action button或者large icons,編譯環境需要在4以上。
使用支持庫開發的通知,需要創建NotificationCompat.Builder實例,發布通知使用notify(),如下代碼所示:
int notificationId = 001;
// Build intent for notification content
Intent viewIntent = new Intent(this,ViewEventActivity.class);
viewIntent.putExtra(EXTRA_EVENT_ID, eventId);
PendingIntent viewPendingIntent =
        PendingIntent.getActivity(this,0, viewIntent,0);

NotificationCompat.BuildernotificationBuilder=
        new NotificationCompat.Builder(this)
        .setSmallIcon(R.drawable.ic_event)
        .setContentTitle(eventTitle)
        .setContentText(eventLocation)
        .setContentIntent(viewPendingIntent);

// Get an instance of the NotificationManager service
NotificationManagerCompat notificationManager =
        NotificationManagerCompat.from(this);

// Build the notification and issues it with notification manager.
notificationManager.notify(notificationId,notificationBuilder.build());
當這條通知出現在手機上是,使用者可以指定PendingIntent通過使用setContentIntent()方法觸發這條通知,當通知出現在手機中時,使用者何以向左滑動來銷毀出現的通知。
添加Action Button
除了定義的setcontentintent()主要內容的行為,你可以通過傳遞一個PendingIntent到addaction()方法添加其他行動。
例如,下面的代碼展示了與上面代碼相同類型的通知,但是添加了一個動作在view的上面。
// Build an intent for an action to view a map
Intent mapIntent = new Intent(Intent.ACTION_VIEW);
Uri geoUri = Uri.parse("geo:0,0?q=" + Uri.encode(location));
mapIntent.setData(geoUri);
PendingIntent mapPendingIntent =
        PendingIntent.getActivity(this, 0, mapIntent, 0);

NotificationCompat.Builder notificationBuilder =
        new NotificationCompat.Builder(this)
        .setSmallIcon(R.drawable.ic_event)
        .setContentTitle(eventTitle)
        .setContentText(eventLocation)
        .setContentIntent(viewPendingIntent)
        .addAction(R.drawable.ic_map,
                getString(R.string.map), mapPendingIntent);
在手機上,該action是以button形式附加在notification一起,在穿戴設備中,該action是以一個大按鈕形式出現的,當用戶單擊該按鈕,intent中的內容將在手機中被調起。
指定可穿戴設備獨有的行為
如果希望可穿戴設備中的行為有別於手機,使用WearableExtender.addAction().當使用該方法,穿戴設備中將不再展現使用NotificationCompat.Builder.addAction().的行為,也就是只顯示其在可穿戴設備中。
// Create an intent for the reply action
Intent actionIntent = new Intent(this, ActionActivity.class);
PendingIntent actionPendingIntent =
        PendingIntent.getActivity(this, 0, actionIntent,
                PendingIntent.FLAG_UPDATE_CURRENT);

// Create the action
NotificationCompat.Action action =
        new NotificationCompat.Action.Builder(R.drawable.ic_action,
                getString(R.string.label, actionPendingIntent))
                .build();

// Build the notification and add the action via WearableExtender
Notification notification =
        new NotificationCompat.Builder(mContext)
                .setSmallIcon(R.drawable.ic_message)
                .setContentTitle(getString(R.string.title))
                .setContentText(getString(R.string.content))
                .extend(new WearableExtender().addAction(action))
                .build();
添加Big View
開發者可以插入一個Big View形式的內容進入通知,在手機中,用戶可以通過展開通知來查看該Big View,在可穿戴設備中,該Big View是默認可見的。
添加這種可展開的內容作為通知,使用 NotificationCompat.Builder 對象中的setStyle() 方法,傳遞給實例BigTextStyle 或者 InboxStyle樣式。
例如下面代碼是添加了BigTextStyle 到通知中。
// Specify the 'big view' content to display the long
// event description that may not fit the normal content text.
BigTextStyle bigStyle = new NotificationCompat.BigTextStyle();
bigStyle.bigText(eventDescription);

NotificationCompat.Builder notificationBuilder =
        new NotificationCompat.Builder(this)
        .setSmallIcon(R.drawable.ic_event)
        .setLargeIcon(BitmapFractory.decodeResource(
                getResources(), R.drawable.notif_background))
        .setContentTitle(eventTitle)
        .setContentText(eventLocation)
        .setContentIntent(viewPendingIntent)
        .addAction(R.drawable.ic_map,
                getString(R.string.map), mapPendingIntent)
        .setStyle(bigStyle);
為通知添加可穿戴設備特性
如果想添加可穿戴設備中特有的特性,如語音輸入等,可以使用NotificationCompat.WearableExtender 類,使用該類分以下幾步。
1 創建WearableExtender實例,設置可穿戴設備特有的特性
2 創建NotificationCompat.Builder實例,設置如前文所述
3 調用extend()方法,傳遞給WearableExtender
4 調用build()創建通知
下面代碼使用 setHintHideIcon()移除通知卡片中的圖標
// Create a WearableExtender to add functionality for wearables
NotificationCompat.WearableExtender wearableExtender =
        new NotificationCompat.WearableExtender()
        .setHintHideIcon(true);

// Create a NotificationCompat.Builder to build a standard notification
// then extend it with the WearableExtender
Notification notif = new NotificationCompat.Builder(mContext)
        .setContentTitle("New mail from " + sender)
        .setContentText(subject)
        .setSmallIcon(R.drawable.new_mail);
        .extend(wearableExtender)
        .build();
如果想在後面讀取特有的特性的值,可以如下代碼所示
NotificationCompat.WearableExtender wearableExtender =
        new NotificationCompat.WearableExtender(notif);
boolean hintHideIcon = wearableExtender.getHintHideIcon();
傳送通知
當需要傳遞通知時,使用 NotificationManagerCompat API代替NotificationManager:
// Get an instance of the NotificationManager service
NotificationManagerCompat notificationManager =
        NotificationManagerCompat.from(mContext);

// Issue the notification with notification manager.
notificationManager.notify(notificationId, notif);
當使用NotificationManager,一些 NotificationCompat.WearableExtender 的特性不能工作
NotificationCompat.WearableExtender wearableExtender =
        new NotificationCompat.WearableExtender(notif);
boolean hintHideIcon = wearableExtender.getHintHideIcon();
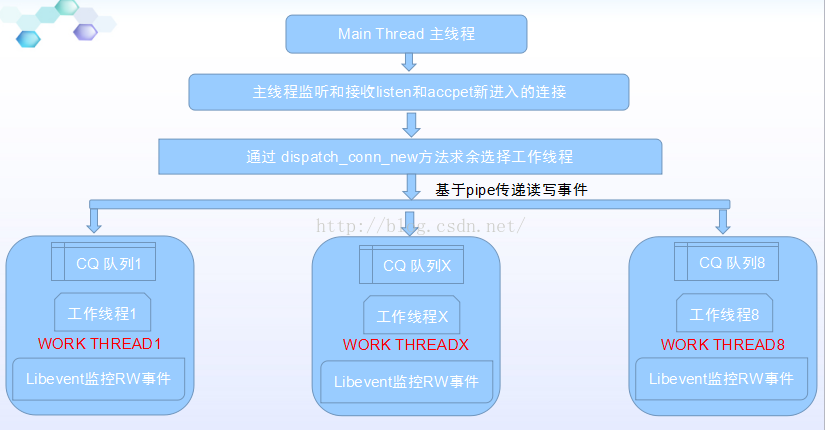 Memcached 源碼分析--網絡模型流程分析
一、功能介紹Memcached 是一個高性能的分布式內存對象緩存系統,用於動態Web應用以減輕數據庫負載。它通過在內存中緩存數據和對象來減少讀取數據庫的次數,從而提高動態
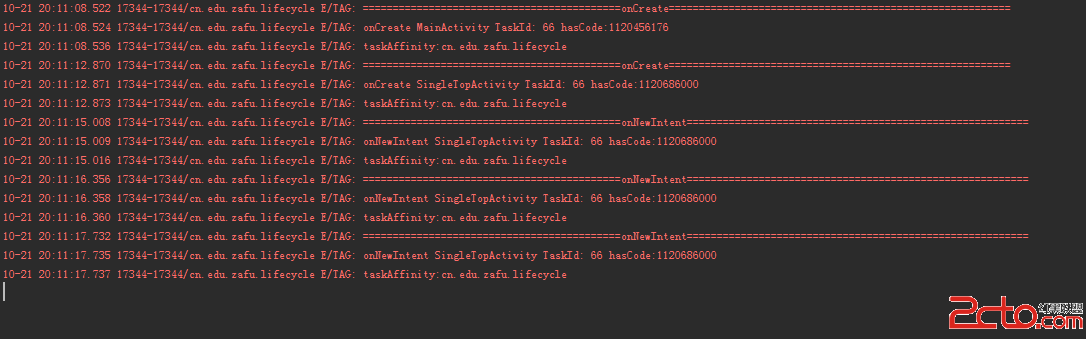 Android Activity啟動模式的功能驗證
之前一直都是看別人寫的啟動模式,發現網上大多數的內容都是抄襲來抄襲去,直到最近看了開發藝術這本書,發現之前對啟動模式的理解過於簡單,很多東西都沒有考慮到,為了加深理解,於
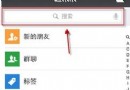 微信朋友圈熱文在哪 微信朋友圈熱文怎麼看
新版的微信裡,細心的朋友應該能看到在搜索那裡多出了一個功能:朋友圈熱文。隨時了解朋友圈的熱門文章,不過有不少人都很疑惑微信朋友圈熱文要怎麼查看,下面就讓小編
 Android開發入門教程--Android應用程序結構分析
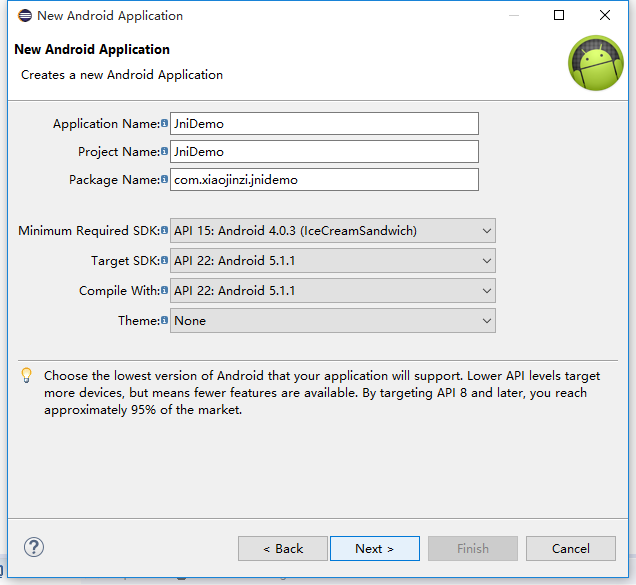
一、新建HelloWorld項目: Project-Android Application Project: 選擇項目保存位置,一路“next”完成項目創建