編輯:關於Android編程
當我們在app的不同頁面間穿梭翱翔的時候,app中的Activity也在他們各自的生命周期中轉換著不同的狀態。當用戶執行進入或者是離開某個Activity的操作時,Android系統會調用一系列生命周期的回調函數進行處理,而我們也可以重寫這些回調函數,讓Activity在不同的狀態下執行我們想要的操作。
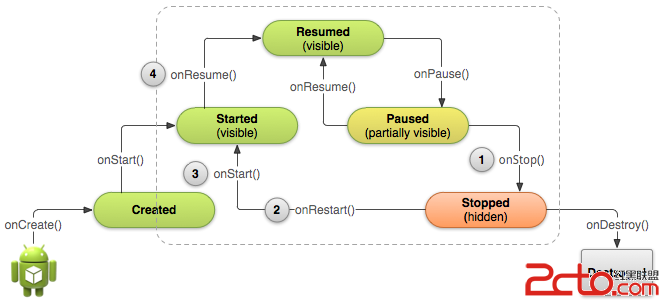
下圖展示了一個Activity的生命周期以及回調方法。這張圖看起來就像是一個梯形金字塔,每一步都對應著Activity的一種生命狀態。
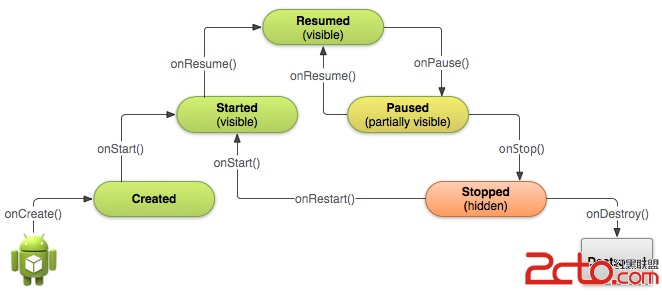
在這些狀態中,只有如下三種狀態是靜態的,即可持續一段時間的,其他狀態都是瞬態的:
Resumed:在這個狀態下,Activity處於前台,用戶可以與它交互(也可以稱之為Running態,即運行態);
Paused:在這個狀態下,Activity部分被其他Activity遮擋(其他處於前台的Activity是半透明的或者並沒與充滿整個屏幕),處在這個狀態的Activity並不接收用戶輸入,也不執行任何代碼;
Stopped:在這個狀態下,Activity是完全被隱藏的,用戶無法看到,這種狀態可以認為Activity處於後台,這個Activity實例以及它的狀態信息在這種狀態下都被保存了下來,但是不能執行任何代碼。
Created和Started這兩個狀態都是瞬間態的,系統會在到達這兩個狀態後很快就調用後面的生命周期回調方法,即系統在調用onCreate()之後緊跟著就會調用onStart(),然後再緊跟著調用onResume()。
需要注意的是,如果MAIN或者是LAUNCHER二者之一沒有定義,則這個app的圖標將不會顯示在安卓系統中。
無論用戶是在安卓系統中點擊app圖標開啟一個Activity還是在app內部翱翔時跳轉到新的Activity,系統都會通過調用onCreate()方法來創建對應的Activity實例。
onCreate()在一個Activity的生命周期中僅會調用一次,所以我們可以在這個方法中實現一些UI和成員變量的初始化動作,例如:
TextView mTextView; // Member variable for text view in the layout

@Override
public void onCreate(Bundle savedInstanceState) {
    super.onCreate(savedInstanceState);

    // Set the user interface layout for this Activity
    // The layout file is defined in the project res/layout/main_activity.xml file
    setContentView(R.layout.main_activity);

    // Initialize member TextView so we can manipulate it later
    mTextView = (TextView) findViewById(R.id.text_message);

    // Make sure we're running on Honeycomb or higher to use ActionBar APIs
    if (Build.VERSION.SDK_INT >= Build.VERSION_CODES.HONEYCOMB) {
        // For the main activity, make sure the app icon in the action bar
        // does not behave as a button
        ActionBar actionBar = getActionBar();
        actionBar.setHomeButtonEnabled(false);
    }
}
技術上來說,在調用onStart()的時候Activity對用戶就是可見的了。
總結下,創建Activity的三部曲:onCreate() -> onStart() -> onResume()。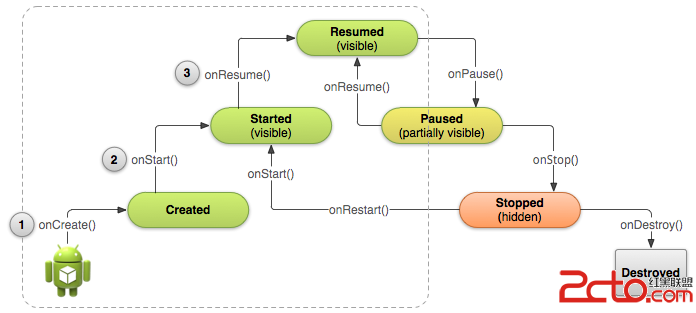
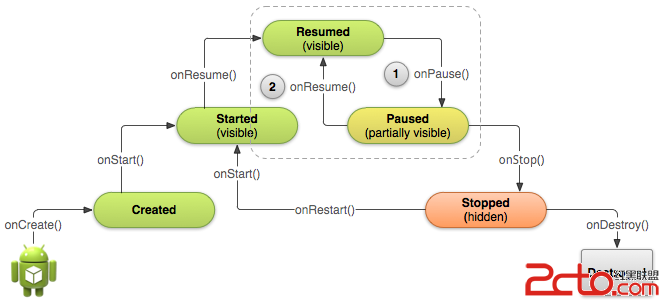 雖然系統調用onPause()方法是因為你的Activity被部分遮擋,但更普遍的其實是用戶就要離開你的app了,所以我們應該在這個狀態下做些事情:
1) 停止動畫或者是其他在執行的可能會消耗CPU的動作;
2) 提交未保存的修改,這個動作僅當可以確認用戶希望這些數據在他們離開app後也可以得到的保存的時候(例如短信草稿);
3) 釋放系統資源,例如broadcast receivers、對傳感器(例如GPS)的操作以及其他可能在Paused時候消耗電量而用戶又不需要的資源。
舉個例子:
雖然系統調用onPause()方法是因為你的Activity被部分遮擋,但更普遍的其實是用戶就要離開你的app了,所以我們應該在這個狀態下做些事情:
1) 停止動畫或者是其他在執行的可能會消耗CPU的動作;
2) 提交未保存的修改,這個動作僅當可以確認用戶希望這些數據在他們離開app後也可以得到的保存的時候(例如短信草稿);
3) 釋放系統資源,例如broadcast receivers、對傳感器(例如GPS)的操作以及其他可能在Paused時候消耗電量而用戶又不需要的資源。
舉個例子:
@Override
public void onPause() {
    super.onPause();  // Always call the superclass method first

    // Release the Camera because we don't need it when paused
    // and other activities might need to use it.
    if (mCamera != null) {
        mCamera.release();
        mCamera = null;
    }
}
在onPause()中我們應該盡量做些簡單的操作,而避免做高CPU負荷的操作,例如寫入數據庫,因為這會減慢跳轉到下一個Activity的速度(大負荷的操作我們可以在onStop()中執行)。
在Paused的時候,Activity的實例還是存儲在內存中的,所以我們並不需要重新初始化各個部件。
當用戶從Paused態恢復Activity的時候,系統就會調用onResume()。需要注意的是,每次Activity來到前台的時候系統都會調用這個方法,即使是app第一次啟動。正是由於這樣,我們需要在這個方法中實現對onPause()中釋放的組件的重新初始化,以及對那些每次到達Resumed態都要發生的事件進行處理,舉個例子:
@Override
public void onResume() {
    super.onResume();  // Always call the superclass method first

    // Get the Camera instance as the activity achieves full user focus
    if (mCamera == null) {
        initializeCamera(); // Local method to handle camera init
    }
}
 當Activity在stop之後,系統可能由於需要恢復系統內存而destroy Activity實例,極端情況下也可能不調用onDestroy()就直接將app的進程結束了。所以我們有必要在onStop()就釋放可能漏內存的資源。
雖然我們在onPause()和onStop()中都會執行一些清理工作,但前面也提到了,onPause()中應盡量做一些簡單的工作,而onStop()中可以做一些高負荷的工作。
舉個例子:
當Activity在stop之後,系統可能由於需要恢復系統內存而destroy Activity實例,極端情況下也可能不調用onDestroy()就直接將app的進程結束了。所以我們有必要在onStop()就釋放可能漏內存的資源。
雖然我們在onPause()和onStop()中都會執行一些清理工作,但前面也提到了,onPause()中應盡量做一些簡單的工作,而onStop()中可以做一些高負荷的工作。
舉個例子:
@Override
protected void onStop() {
    super.onStop();  // Always call the superclass method first

    // Save the note's current draft, because the activity is stopping
    // and we want to be sure the current note progress isn't lost.
    ContentValues values = new ContentValues();
    values.put(NotePad.Notes.COLUMN_NAME_NOTE, getCurrentNoteText());
    values.put(NotePad.Notes.COLUMN_NAME_TITLE, getCurrentNoteTitle());

    getContentResolver().update(
            mUri,    // The URI for the note to update.
            values,  // The map of column names and new values to apply to them.
            null,    // No SELECT criteria are used.
            null     // No WHERE columns are used.
            );
}
在停止的時候,Activity實例會保存在內存中,所以在恢復的時候我們並不需要重新初始化。同時,系統也記錄了布局中各個view的當前狀態,所以如果用戶在文本輸入框中輸入了文字,那麼這些內容會被保存下來,所以並不需要我們去另外存儲及還原它們。
@Override
protected void onStart() {
    super.onStart();  // Always call the superclass method first

    // The activity is either being restarted or started for the first time
    // so this is where we should make sure that GPS is enabled
    LocationManager locationManager =
            (LocationManager) getSystemService(Context.LOCATION_SERVICE);
    boolean gpsEnabled = locationManager.isProviderEnabled(LocationManager.GPS_PROVIDER);

    if (!gpsEnabled) {
        // Create a dialog here that requests the user to enable GPS, and use an intent
        // with the android.provider.Settings.ACTION_LOCATION_SOURCE_SETTINGS action
        // to take the user to the Settings screen to enable GPS when they click "OK"
    }
}

@Override
protected void onRestart() {
    super.onRestart();  // Always call the superclass method first

    // Activity being restarted from stopped state
}
static final String STATE_SCORE = "playerScore";
static final String STATE_LEVEL = "playerLevel";
//...

@Override
public void onSaveInstanceState(Bundle savedInstanceState) {
    // Save the user's current game state
    savedInstanceState.putInt(STATE_SCORE, mCurrentScore);
    savedInstanceState.putInt(STATE_LEVEL, mCurrentLevel);

    // Always call the superclass so it can save the view hierarchy state
    super.onSaveInstanceState(savedInstanceState);
}
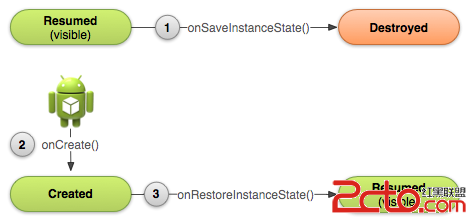
當Activity要重建的時候,系統會將之前這個Bundle傳到onCreate()和onRestoreInstanceState()這兩個方法中。這兩個方法的差別在於,onCreate()中並不會檢查Bundle是否為null,而onRestoreInstanceState()僅當Bundle中有需要被還原的狀態時才會被調用,所以並不需要檢查是否為null,且這個方法是在onStart()後調用的。
兩種方法還原數據舉例:
@Override
protected void onCreate(Bundle savedInstanceState) {
    super.onCreate(savedInstanceState); // Always call the superclass first

    // Check whether we're recreating a previously destroyed instance
    if (savedInstanceState != null) {
        // Restore value of members from saved state
        mCurrentScore = savedInstanceState.getInt(STATE_SCORE);
        mCurrentLevel = savedInstanceState.getInt(STATE_LEVEL);
    } else {
        // Probably initialize members with default values for a new instance
    }
    //...
}
public void onRestoreInstanceState(Bundle savedInstanceState) {
    // Always call the superclass so it can restore the view hierarchy
    super.onRestoreInstanceState(savedInstanceState);

    // Restore state members from saved instance
    mCurrentScore = savedInstanceState.getInt(STATE_SCORE);
    mCurrentLevel = savedInstanceState.getInt(STATE_LEVEL);
}
@Override
public void onDestroy() {
    super.onDestroy();  // Always call the superclass

    // Stop method tracing that the activity started during onCreate()
    android.os.Debug.stopMethodTracing();
}
谷歌官方的demo
 Android布局之View.measure()動態量取高度並設置布局--(例:動態計算評論高度並顯示)
需求是這樣的:在應用程序的詳情介紹時,有評論的版塊,該頁評論最多顯示5條,而每條最大字數是140個字符,每條評論可能根據字數不同,所占據的高度也不一樣,如有的是1行,有的
 一個簡單的例子帶你了解jni流程
1、前言jni是java調用原生語言來進行開發的一座橋梁,原生語言一般是指c,c++語言,即jni機制可以讓java語言調用c,c++語言,也可以讓c,c++語言調用ja
 Android應用中設置alpha值來制作透明與漸變效果的實例
Android系統支持的顏色是由4個值組成的,前3個為RGB,也就是我們常說的三原色(紅、綠、藍),最後一個值是A,也就是Alpha。這4個值都在0~255之間。顏色值越
 Android2個Activity之間傳遞對象
為了實現android activity之間的數據傳遞,主要利用意圖Intent 對象的方法來完成。 基本數據類型的傳遞是相當簡單了,主要通過如下方式完成如下: putE