編輯:關於Android編程
該文章主要修改於CSDN某大神的一篇文章,本人覺得這篇文章的面向對象很透徹,下面分享如下可學習的幾點:
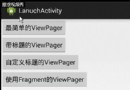
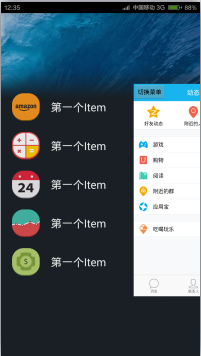
Android應用經典主界面框架之一:仿QQ (使用Fragment, 附源碼)
1.通過&符號實現計算優化:(後來通過問同事,說是計算機通過位運算 效率比平時的switch效率高,並講解了該算法的原理。)
public class Constant {

	public static final int SIGN_FRAGMENT_MESSAGE=0x01 <<1;
	public static final int SIGN_FRAGMENT_CONTACTS=0x01 <<2;
	public static final int SIGN_FRAGMENT_NEWS=0x01 <<3;
	public static final int SIGN_FRAGMENT_SETTENGS=0x01 <<4;

}
@Override
	public void onClickCallBack(int itemID) {
		String tag = "";
		if ((itemID & Constant.SIGN_FRAGMENT_MESSAGE) != 0) {
			tag = Constant.STR_FRAGMENT_MESSAGE;
		} else if ((itemID & Constant.SIGN_FRAGMENT_CONTACTS) != 0) {
			tag = Constant.STR_FRAGMENT_CONTACTS;
		} else if ((itemID & Constant.SIGN_FRAGMENT_NEWS) != 0) {
			tag = Constant.STR_FRAGMENT_NEWS;
		} else if ((itemID & Constant.SIGN_FRAGMENT_SETTENGS) != 0) {
			tag = Constant.STR_FRAGMENT_SETTINGS;
		}
		mHeaderPanelLayout.setText(tag);
		setTabSection(tag);
	}
2.通過onLayout對底部欄中間的按鈕進行“動態”調整
@Override
	protected void onLayout(boolean changed, int l, int t, int r, int b) {
		super.onLayout(changed, l, t, r, b);
		layoutItem(l, t, r, b);
	}

	private void layoutItem(int left, int top, int right, int bottom) {
		int allChildWidth=0;
		int num=getChildCount();
		for (int i = 0; i < num; i++) {
			allChildWidth+=getChildAt(i).getWidth();
		}
		int absoluteWidth=right-left-getPaddingLeft()-getPaddingRight();
		int blankWidth=(absoluteWidth-allChildWidth)/(num-1);
		//設置第2 3個按鈕的間距
		LayoutParams params1=(LayoutParams) mContactsBtn.getLayoutParams();
		params1.leftMargin=blankWidth;
		mContactsBtn.setLayoutParams(params1);
		LayoutParams params2=(LayoutParams) mNewsBtn.getLayoutParams();
		params2.leftMargin=blankWidth;
		mNewsBtn.setLayoutParams(params2);
}1)通過layoutInflater.
	public ImageText(Context context, AttributeSet attrs) {
		super(context, attrs);
		LayoutInflater.from(context).inflate(R.layout.image_text_layout, this,true);
		mImageView=(ImageView) findViewById(R.id.iv_imgae_text);
		mTextiew=(TextView) findViewById(R.id.tv_imgae_text);
	}
2)通過onFinishInflater()
@Override
	protected void onFinishInflate() {
		super.onFinishInflate();
		mMessageBtn=(ImageText) findViewById(R.id.message_btn);
		mContactsBtn=(ImageText) findViewById(R.id.contacts_btn);
		mNewsBtn=(ImageText) findViewById(R.id.news_btn);
		mSettingsBtn=(ImageText) findViewById(R.id.settings_btn);
		initClickEvent();
}4.代理實現數據傳遞(IOS中最常用的一種設計模式)
public class BottomPanelLayout extends RelativeLayout implements OnClickListener{

	private BottomPanelCallBackProtocal mCallBackProtocal;

	//代理協議
	public void setCallBackProtocal(BottomPanelCallBackProtocal callBackProtocal) {
		this.mCallBackProtocal = callBackProtocal;
	}

	public interface BottomPanelCallBackProtocal{
		public void onClickCallBack(int itemID);
	}

	/**
	 * 1.修改本身樣式
	 * 2.對外聲明事件
	 */
	@Override
	public void onClick(View v) {
		initBottomPanel();
		int index=-1;
		switch (v.getId()) {
			case R.id.message_btn:
				index=Constant.SIGN_FRAGMENT_MESSAGE;
				mMessageBtn.setChecked(index);
				break;
			case R.id.contacts_btn:
				index=Constant.SIGN_FRAGMENT_CONTACTS;
				mContactsBtn.setChecked(index);
				break;
			case R.id.news_btn:
				index=Constant.SIGN_FRAGMENT_NEWS;
				mNewsBtn.setChecked(index);
				break;
			case R.id.settings_btn:
				index=Constant.SIGN_FRAGMENT_SETTENGS;
				mSettingsBtn.setChecked(index);
				break;
			default:
				break;
		}
		if (mCallBackProtocal!=null) {
			mCallBackProtocal.onClickCallBack(index);
		}
	}

}
public class MainActivity extends Activity implements
		BottomPanelCallBackProtocal {
	@Override
	public void onClickCallBack(int itemID) {
		String tag = "";
		if ((itemID & Constant.SIGN_FRAGMENT_MESSAGE) != 0) {
			tag = Constant.STR_FRAGMENT_MESSAGE;
		} else if ((itemID & Constant.SIGN_FRAGMENT_CONTACTS) != 0) {
			tag = Constant.STR_FRAGMENT_CONTACTS;
		} else if ((itemID & Constant.SIGN_FRAGMENT_NEWS) != 0) {
			tag = Constant.STR_FRAGMENT_NEWS;
		} else if ((itemID & Constant.SIGN_FRAGMENT_SETTENGS) != 0) {
			tag = Constant.STR_FRAGMENT_SETTINGS;
		}
		mHeaderPanelLayout.setText(tag);
		setTabSection(tag);
	}

}private void setTabSection(String tag) {
if (TextUtils.equals(tag, currFagTag)) {
return;
}
ensureTransaction();
if (currFagTag != null && !currFagTag.equals("")) {
detachFragment(getFragment(currFagTag));
}
attachFragment(R.id.fragment_panel, getFragment(tag), tag);
commitTransaction();
}private void ensureTransaction() {
if (mFragmentTransaction == null) {
mFragmentTransaction = mFragmentManager.beginTransaction();
mFragmentTransaction
.setTransition(FragmentTransaction.TRANSIT_FRAGMENT_FADE);
}
}1>在MessageFragment 中
	@Override
	public void onActivityCreated(Bundle savedInstanceState) {
		super.onActivityCreated(savedInstanceState);
		getActivity().findViewById(R.id.msg_tv).setOnClickListener(new OnClickListener() {

			@Override
			public void onClick(View v) {
				((MainActivity)getActivity()).setTabSection(Constant.STR_FRAGMENT_CONTACTS);
			}
		});
} //聲明一個變量,該變量存儲該Fragment所需要的一切參數 當刷新View時手動調用其更新數據
private ContactFragmentCallBack mContactFragmentCallBack;
//聲明該接口
public interface ContactFragmentCallBack{
//說明該Fragment更新時需要一個String對象
public String getContentStr();
}
3>MessageFragment 實現該代理
public class MessageFragment extends BaseFragment implements ContactFragmentCallBack{
	@Override
	public String getContentStr() {
		return "abc";
	}
}
	@Override
	public void onResume() {
		super.onResume();
		MainActivity.currFagTag=Constant.STR_FRAGMENT_CONTACTS;

		//通過取出 存儲於上個Fragment中的數據
		Fragment f=((MainActivity)getActivity()).getFragment(Constant.STR_FRAGMENT_MESSAGE);
		if (f!=null&&f instanceof ContactFragmentCallBack) {
			mContactFragmentCallBack=(ContactFragmentCallBack)f;
			TextView textView=(TextView) ((MainActivity)getActivity()).findViewById(R.id.contact_tv);
			textView.setText(mContactFragmentCallBack.getContentStr());
		}
	}
 Android Sqlite命令詳解(基本命令)
在Android開發中SQLite起著很重要的作用,網上SQLite的教程有很多很多,不過那些教程大多數都講得不是很全面。本人總結了一些SQLite命令,借著論壇的大賽,
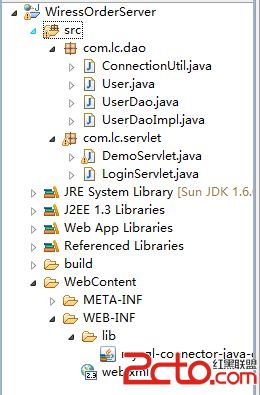 Android項目之無線點餐(2)--用戶登錄的客戶端和服務器端實現
一、服務器端實現 (1)創建動態服務器項目 個部分代碼如下: package com.lc.dao; import java.sql.Connection; imp
 13.View的事件分發機制——dispatchTouchEvent詳解
在前面的第二篇文章中,我們提過,View的事件分發是一種委托思想:上層委托下層,父容器委托子元素來處理這個流程。接下來,我們就將深入去學習View的事件分發機制。&nbs
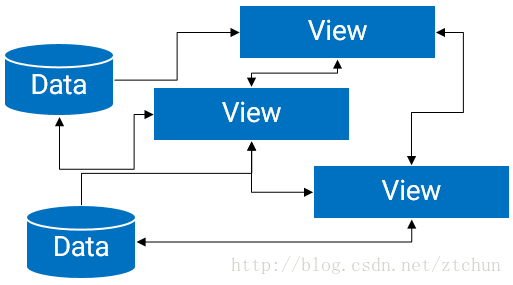 詳解Android中的MVP架構分解和實現
1、概述傳統的Android開發架構一般是MVC模式, Model:業務邏輯和實體模型 View:對應於布局文件 Controllor:對應於Activity 單