編輯:關於Android編程
 1 private void getAllFiles(File root){
 2         File files[] = root.listFiles();
 3         if(files != null){
 4             for (File f : files){
 5                 if(f.isDirectory()){
 6                     getAllFiles(f);
 7                 }else{
 8                     String strf = f.toString();
 9                     String str = strf.substring(strf.length() - 4, strf.length());
10                     if(str.equals(".bmp")||str.equals(".jpg")||str.equals(".jpeg")||str.equals(".png")||str.equals(".gif")||str.equals(".tif")||str.equals(".tiff")){
11                         boolean bool = fullPathImg.add(strf);
12                     }
13                 }
14             }
15         }
16     }
上面三段代碼的作用分別為:定義一個String類型的ArrayList變量fullPathImg,用來存儲圖片路徑;獲取手機SD卡路徑;搜索圖片文件實現函數,是一個遞歸過程。 對於第二點,在Android中可以顯示圖片的組件太多了,如ImageView、ImageButton,連Button、Toast等有時候都可以來湊下熱鬧。 這裡采用ImageView,給其賦於圖片也有很多種方式: 1、setImageBitmap(BitmapFactory.decodeFile(imagePath)); imagePath為String類型,指圖片完整名稱; 2、setImageResource(R.mipmap.ic_launcher); 通過資源來賦值,需要事先導入工程中,或者調用Android自帶資源; 3、setImageDrawable(getResources().getDrawable(R.mipmap.ic_launcher)); 和第二種很相近,通過Drawable來賦值,只是多了若干步驟; 由於本應用是要通過文件名來讀取圖片資源,故采用的是第一種。 要完成第三點,由於是初學,采用的是較好實現的GridView組件。但是需要實現一個繼承自BaseAdapter的類ImageAdapter,代碼如下:
 1 public class ImageAdapter extends BaseAdapter {
 2
 3         private Context context;
 4
 5         int countImg;
 6
 7         public ImageAdapter(Context context){
 8             this.context = context;
 9             this.countImg = fullPathImg.size();
10         }
11
12         @Override
13         public int getCount(){
14             return countImg;
15         }
16
17         public Object getItem(int position){
18             return position;
19         }
20
21         public long getItemId(int position)
22         {
23             return position;
24         }
25
26         @Override
27         public View getView(int position, View convertView, ViewGroup parent)
28         {
29             windowWidth = getWindowManager().getDefaultDisplay().getWidth();
30             int pad = 4;
31             if(convertView == null){
32                 imageView = new ImageView(context);
33             }
34             else{
35                 imageView = (ImageView)convertView;
36             }
37             imageView.setLayoutParams(new GridView.LayoutParams((windowWidth - pad * 12) / 4, (windowWidth - pad * 12) / 4));
38             imageView.setScaleType(ImageView.ScaleType.CENTER_CROP);
39             imageView.setImageBitmap(BitmapFactory.decodeFile(fullPathImg.get(position)));
40             return imageView;
41         }
42 } ImageAdapter類主要實現五個方法,分別為構造、獲取總數、獲取元素位置、獲取元素ID、獲取視圖,最為關鍵的是最後一個getView()。 需要注意兩點: 1、不用手動一個個去將所有圖片資源和組件GridView關聯起來,通過下面的語句制定路徑變量和位置信息即可, imageView.setImageBitmap(BitmapFactory.decodeFile(fullPathImg.get(position))); imageView為ImageView類的變量; 2、對imageView的大小進行設置時,已手機屏幕的分辨率作為參考,獲取方式如下, int windowWidth = getWindowManager().getDefaultDisplay().getWidth(); 獲取寬度,高度類似; ImageAdapter實現了,下面給出GridView定義的activity_main.xml文件內容:
 1 <LinearLayout xmlns:android="http://schemas.android.com/apk/res/android"
 2     xmlns:tools="http://schemas.android.com/tools"
 3     android:layout_width="match_parent"
 4     android:layout_height="match_parent" >
 5
 6     <GridView
 7         android:id="@+id/gridView"
 8         android:layout_width="match_parent"
 9         android:layout_height="match_parent"
10         android:listSelector="@android:color/transparent"
11         android:cacheColorHint="@android:color/transparent"
12         android:horizontalSpacing="4dp"
13         android:verticalSpacing="4dp"
14         android:layout_marginLeft="8dp"
15         android:layout_marginRight="8dp"
16         android:layout_marginTop="8dp"
17         android:layout_marginBottom="8dp"
18         android:stretchMode="columnWidth"
19         android:gravity="center"
20         android:fadeScrollbars="true"
21         android:fastScrollEnabled="true"
22         android:numColumns="4" >
23     </GridView>
24
25 </LinearLayout>
對其進行設置的屬性包括大小、透明度、自身與父類及內容之間的空隙、縮略圖列數、居中、滑動條,挺簡單就不一一解釋了。 一切准備好後,在主程序文件MainActivity中進行加載即可,下面給出關鍵代碼:
1 setContentView(R.layout.activity_main);
2 gridView = (GridView)findViewById(R.id.gridView);
3 adapter = new ImageAdapter(this);
4 gridView.setAdapter(adapter);
運行後的效果還不錯,工程名為ImageScan。 當然,對於一款真正的圖片浏覽器來說,這只是其中最基礎的功能,即第一步,需要實現還有很多, 如單擊某一幅圖片立刻放大顯示,隨後可以左右或上下滑動;對放大浏覽的圖片可以任意縮放、編輯等。 有興趣的朋友可以一起學習交流,有錯誤或不足的還望大神們指點一二。
 華為mate9和mate9 pro哪個好?華為mate9和mate9 pro的區別
華為mate9和mate9 pro的區別 華為mate9介紹 新一代旗艦芯片 華為麒麟960 HUAWEI Mate 9搭載的麒麟960芯片, 八核C
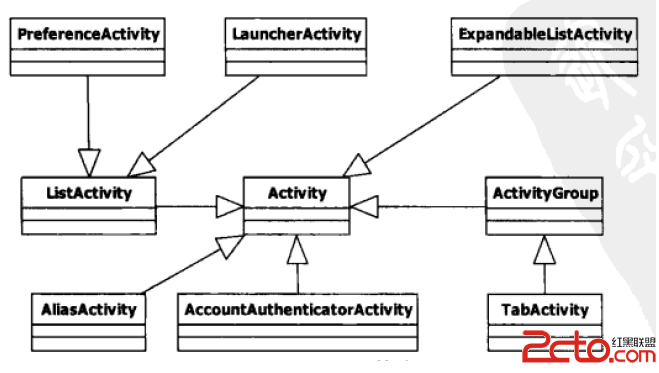
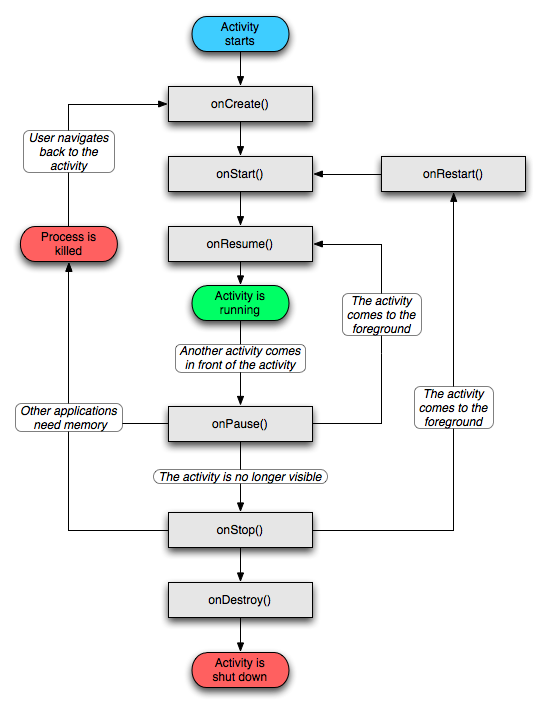 Android Activity生命周期
今天給大家詳解一下Android中Activity的生命周期,我希望我的講解不像網上大多數文章一樣,基本都是翻譯Android API,過於籠統,相信大家看了,會有一點點
 Android中自定義View實現圓環等待及相關的音量調節效果
圓環交替、等待效果效果就這樣,分析了一下,大概有這幾個屬性,兩個顏色,一個速度,一個圓環的寬度。自定View的幾個步驟:1、自定義View的屬性2、在View的構造方法中
 通過android XML 創建圖行,減少對美工的依賴
在開發中總會需要自定義各種View的樣式,如果總是依賴美工作圖弄出需要的UI樣式圖片(比如:一個按鈕要選中和默認兩張圖片),不但時間上會浪費、往往也會有適配問題。雖然可以