編輯:關於Android編程
在我們的開發工作時,findViewById可能是用得最多的函數之一,但它特別討厭的地方就是我們經常需要對返回的view進行類型轉換,輸入麻煩、代碼丑陋,例如以前我們在Activity中找一些子控件一般是這樣 :
@Override
protected void onCreate(Bundle savedInstanceState) {
        super.onCreate(savedInstanceState);
        setContentView(R.layout.activity_main);
        //  查找子控件
        TextView textView = (TextView)findViewById(R.id.my_textview);
        ImageView imageView = (ImageView)findViewById(R.id.my_imageview);
        ListView listView = (ListView)findViewById(R.id.my_listview);
}
如果頁面中的控件比較多,就會有很多的類型轉換,這麼搞下去還能不能在Android上愉快地開發項目了? 而使用ViewFinder則免去了類型轉換,ViewFinder是一個在一個布局中找某個子控件的工具類,用戶需要在使用時調用ViewFinder.initContentView函數來初始化ContentView,參數為Context和布局id。然後使用ViewFinder.findViewById來獲取需要的view,返回的view則直接是你接收的類型,而不需要進行強制類型轉換。
示例如下 :
@Override
protected void onCreate(Bundle savedInstanceState) {
        super.onCreate(savedInstanceState);
        setContentView(R.layout.activity_main);
        // 初始化
        ViewFinder.initContentView(this, R.layout.activity_main) ;
        // 查找子控件
        TextView textView = ViewFinder.findViewById(R.id.my_textview);
        ImageView imageView = ViewFinder.findViewById(R.id.my_imageview);
        ListView listView = ViewFinder.findViewById(R.id.my_listview);
}ViewFinder的實現/**
* view finder, 方便查找View。用戶需要在使用時調用initContentView,
* 將Context和布局id傳進來,然後使用findViewById來獲取需要的view
* ,findViewById為泛型方法,返回的view則直接是你接收的類型,而不需要進行強制類型轉換.比如,
* 以前我們在Activity中找一個TextView一般是這樣 :
* TextView textView = (TextView)findViewById(viewId);
* 如果頁面中的控件比較多,就會有很多的類型轉換,而使用ViewFinder則免去了類型轉換,
* 示例如下 :
* TextView textView = ViewFinder.findViewById(viewId);
*
* @author mrsimple
*/
public final class ViewFinder {
/**
* LayoutInflater
*/
static LayoutInflater mInflater;
/**
* 每項的View的sub view Map
*/
private static SparseArray mViewMap = new SparseArray();
/**
* Content View
*/
static View mContentView;
/**
* 初始化ViewFinder, 實際上是獲取到該頁面的ContentView.
*
* @param context
* @param layoutId
*/
public static void initContentView(Context context, int layoutId) {
mInflater = LayoutInflater.from(context);
mContentView = mInflater.inflate(layoutId, null, false);
if (mInflater == null || mContentView == null) {
throw new RuntimeException(
"ViewFinder init failed, mInflater == null || mContentView == null.");
}
}
/**
* @return
*/
public static View getContentView() {
return mContentView;
}
/**
* @param viewId
* @return
*/
@SuppressWarnings("unchecked")
public static T findViewById(int viewId) {
// 先從view map中查找,如果有的緩存的話直接使用,否則再從mContentView中找
View tagetView = mViewMap.get(viewId);
if (tagetView == null) {
tagetView = mContentView.findViewById(viewId);
mViewMap.put(viewId, tagetView);
}
return tagetView == null ? null : (T) mContentView.findViewById(viewId);
}
}
 Android 聊天表情輸入、表情翻頁帶效果、下拉刷新聊天記錄
經過一個星期的折騰,終於做完了這個Android 聊天表情輸入、表情翻頁帶效果、下拉刷新聊天記錄。這只是一個單獨聊天表情的輸入,以及聊天的效果實現。因為我沒有寫服務器,所
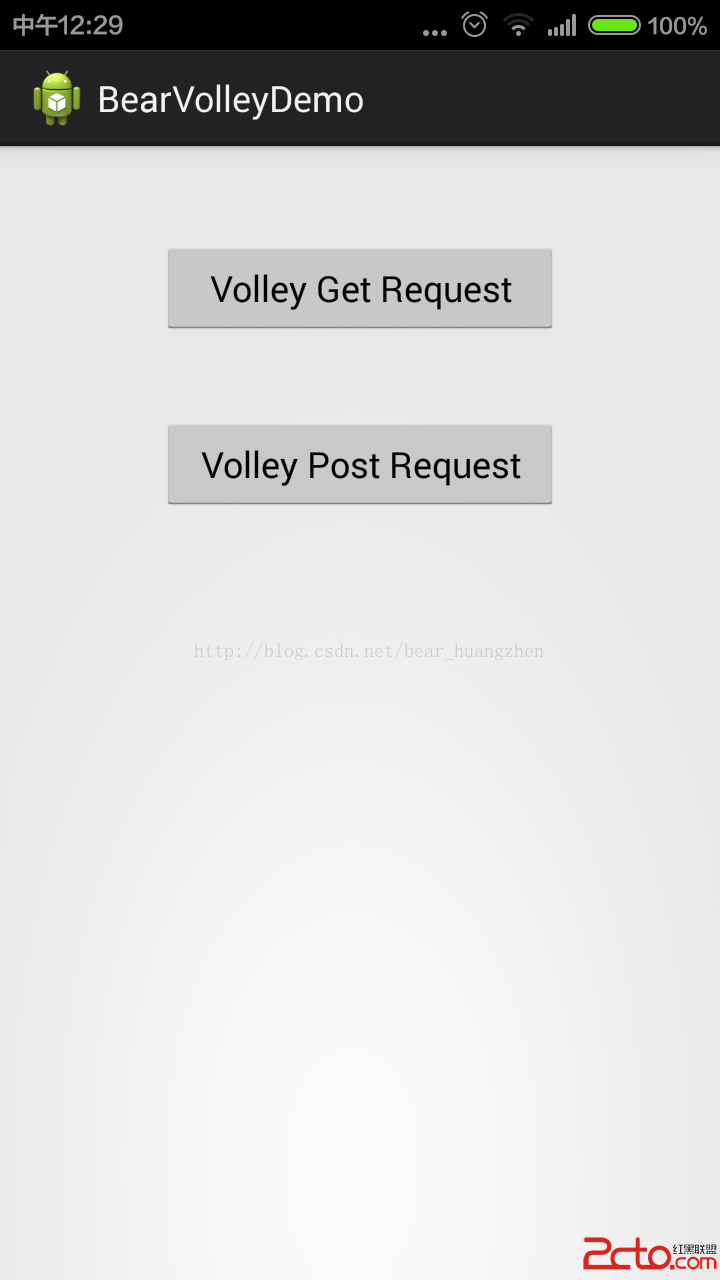 Android之Volley
簡介:Volley是Google I/O 2013上Google官方發布的一款Android平台上的網絡通信庫。以前的網絡請求,要考慮開啟線程、內存洩漏、性能等等復雜的問
 Android經典面試題總結(未完待續)
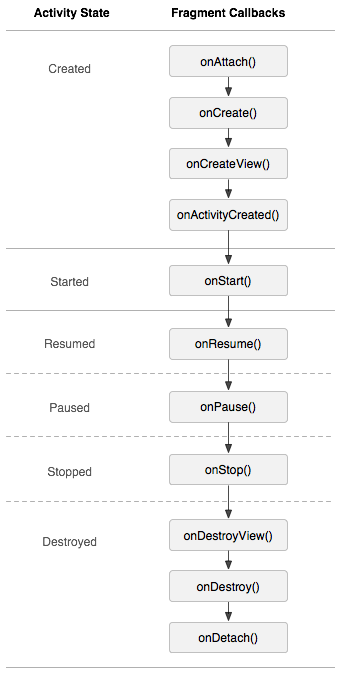
1.生命周期場景演示 : 切換到該Fragment11-29 14:26:35.095: D/AppListFragment(7649): onAttach11-29 1
 Android 網絡圖片查看顯示的實現方法
我們的應用或多或少都會從網絡獲取圖片數據然後進行顯示,下面就將實現一個這樣的例子,獲取網絡中的圖片!首先:我們來看一下效果圖界面中有三個控件,一個EditText,一個B