編輯:關於Android編程
這段時間在學習android,結果碰到了教學視頻中經常提到和使用aidl,隨後在網上找了一些資料,寫了一些案例來分析分析,假如我寫的和解釋的有些偏差,希望能被大家指點出來糾正自己的拙見。AIDL是一個接口描述文件,用於實現Android平台上面的RPC,aapt在編譯的時候會自動根據規則生成用於IPC的接口和對象,而作為使用者只需要:1.在服務端Service實現接口;2. 在客戶端bindService,onServiceConnected時獲取接口對象。這裡的接口都是AIDL中描述的接口,其他的細節則在由AIDL生成的同名源碼文件中
我所實現的案例是從服務端獲取一個書本的信息:
package com.edify.bluenfcserver.myservice;

import java.util.Date;

import android.annotation.SuppressLint;
import android.os.Parcel;
import android.os.Parcelable;
/**
 * @Description 寫一個實體類步驟:
 * 1. 實現Pracelable接口
 * 2. 需要定義一個Parcelable.Creator CREATOR對象
 * 3. 同時要建立一個aidl文件
  * @Author monkey
  * @Date 2014年9月4日下午5:22:02
 */
@SuppressLint("ParcelCreator")
public class BookInfo implements Parcelable {
	private int id;
	private String name;
	private String author;
	private float price;
	private Date product;

	public BookInfo(Parcel in) {

	}

	public int getId() {
		return id;
	}

	public void setId(int id) {
		this.id = id;
	}

	public String getName() {
		return name;
	}

	public void setName(String name) {
		this.name = name;
	}

	public Date getProduct() {
		return product;
	}

	public void setProduct(Date product) {
		this.product = product;
	}

	public String getAuthor() {
		return author;
	}

	public void setAuthor(String author) {
		this.author = author;
	}

	public float getPrice() {
		return price;
	}

	public void setPrice(float price) {
		this.price = price;
	}

	public BookInfo(int id, String name, String author, float price, Date product) {
		super();
		this.id = id;
		this.name = name;
		this.author = author;
		this.price = price;
		this.product = product;
	}

	@Override
	public int describeContents() {
		return 0;
	}
	/**
	 * 將對象序列號
	 * dest 就是對象即將寫入的目的對象
	 * flags 有關對象序列號的方式的標識
	 * 這裡要注意,寫入的順序要和在createFromParcel方法中讀出的順序完全相同。例如這裡先寫入的為name,
	 * 那麼在createFromParcel就要先讀name
	 */
	@Override
	public void writeToParcel(Parcel dest, int flags) {
		dest.writeInt(id);
		dest.writeString(name);
		dest.writeString(author);
		dest.writeFloat(price);
		dest.writeValue(product);// 寫一個date類型的數據
	}
	/**
	 * 在想要進行序列號傳遞的實體類內部一定要聲明該常量。常量名只能是CREATOR,類型也必須是
	 * Parcelable.Creator
	 */
	public static final Parcelable.Creator CREATOR = new Parcelable.Creator() {
		/***
		 * 根據序列號的Parcel對象,反序列號為原本的實體對象
		 * 讀出順序要和writeToParcel的寫入順序相同
		 */
		public BookInfo createFromParcel(Parcel in) {
			int id = in.readInt();
			String name = in.readString();
			String author = in.readString();
			float price = in.readFloat();
			Date product = (Date) in.readValue(this.getClass().getClassLoader());
			return new BookInfo(id, name, author, price, product);
		}

		public BookInfo[] newArray(int size) {
			return new BookInfo[size];
		}
	};

}
客戶端的代碼:
package com.edify.bluenfc;

import android.app.Activity;
import android.content.ComponentName;
import android.content.Context;
import android.content.Intent;
import android.content.ServiceConnection;
import android.os.Bundle;
import android.os.IBinder;
import android.os.RemoteException;
import android.util.Log;
import android.view.Menu;
import android.view.View;
import android.view.View.OnClickListener;
import android.widget.Button;
import android.widget.TextView;

import com.edify.bluenfcserver.Beauty;
import com.edify.bluenfcserver.RemoteBeauty;
import com.edify.bluenfcserver.myservice.BookInfo;
import com.edify.bluenfcserver.myservice.MyRemoteBookInfo;
import com.edify.bluenfcserver.myservice.MyRemoteBookInfo.Stub;

public class MainActivity extends Activity implements OnClickListener {
	TextView textView;
	Button button;
	String actionName = "com.edify.bluenfcserver.remoteservice";
	String actionName2 = "com.edify.bluenfcserver.myservice.myRemoteService";
	RemoteBeauty remoteBeauty;
	private MyRemoteBookInfo myRemoteBookInfo;
	private TextView textView2;
	private View button2;

	@Override
	protected void onCreate(Bundle savedInstanceState) {
		super.onCreate(savedInstanceState);
		setContentView(R.layout.activity_main);

		textView = (TextView) findViewById(R.id.textView1);
		textView2 = (TextView) findViewById(R.id.textView2);
		button = (Button) findViewById(R.id.button1);
		button2 = (Button) findViewById(R.id.button2);
		button.setOnClickListener(this);
		button2.setOnClickListener(this);
	}

	// service.queryLocalInterface("com.edify.bluenfcserver.RemoteBeauty");
	// getPackageManager():提供了方法可以對清單文件中的配置進行查詢
	private class MyServiceConnection implements ServiceConnection {

		@Override
		public void onServiceConnected(ComponentName name, IBinder service) {
			Log.i("通知", "鏈接成功!");
			remoteBeauty = RemoteBeauty.Stub.asInterface(service);
			try {
				Beauty beauty = remoteBeauty.getBeauty();
				textView.setText("美女  姓名:" + beauty.getName() + "  年齡:" + beauty.getAge() + " 性別:" + beauty.getSex());

			} catch (RemoteException e) {
				e.printStackTrace();
			}
		}

		@Override
		public void onServiceDisconnected(ComponentName name) {

		}

	}

	MyServiceConnection connection = new MyServiceConnection();

	@Override
	public void onClick(View v) {
		switch (v.getId()) {
		case R.id.button1:
			Intent intent = new Intent(actionName);
			bindService(intent, connection, Context.BIND_AUTO_CREATE);
			break;

		case R.id.button2:
			Intent intent2 = new Intent(actionName2);

			// 建立連接:第一步,向服務端發請求
			bindService(intent2, new MyBookInfoServiceConnection(), Context.BIND_AUTO_CREATE);
			break;
		}
	}

	// 建立與服務器鏈接對象,橋梁
	private class MyBookInfoServiceConnection implements ServiceConnection {
		// 建立連接:第三步
		@Override
		public void onServiceConnected(ComponentName name, IBinder service) {
			// 判斷是否是同一個進程內的進行通信,假如是那麼返回的是同一個對象,如果不是那麼返回的是代理對象
			/**
			 * 假如是一個進程內通信,就沒有必要進行aidl的機制來處理了
			 * 這實際上就是判斷此通訊是在同一進程中,還是跨進程,因為同一進程傳回的對象是Service
			 * .onBind()所返回的對象,而此對象必然實現了接口
			 * (要不然搞毛啊!)。所以,如果僅是在同一個進程之中,不會走Binder進程IPC
			 * ,而是直接返回Service所提供的對象,直接調用其方法,因此也就不會有對象必須Parcelable的限制!
			 * 也就是說,當在同一個進程中時AIDL實際上變成了這樣的:
			 * 也就是說它是直接返回了Service.onBind()的對象,這其實跟前面提到的第一種方式
			 * :直接實現Binder對象的方式是一樣一樣的
			 * ,其他的代碼全是多余的。因此,如前面建議的,如果僅是在同一個進程中,就直接使用Binder就好了,沒有必要創建AIDL文件。
			 * 當在不同的進程中時
			 * ,客戶端Stub.asInterface會返回一個Stub.Proxy對象,調用其上的print方法。而服務端僅會執行Stub
			 * .onTransact()方法,然後就調到Service的print方法了。
			 * 當跨進程的時候,就要使用Binder對象的IPC相關的方法和機制
			 * 。客戶端需要實現Binder.transact()方法來執行遠程的一個方法
			 * ,這是給客戶端來使用;而服務端則需要實現Binder.onTransact
			 * ()來響應客戶端所請求的方法。對於上層使用者來說,用transact
			 * ()把函數的信息(參數,標識和開關)發送出去,剩下的就是Binder的工作了
			 * ,內部還有大量的細節,但是最終會調用到服務端Binder的onTransact
			 * ()方法,這裡識別出函數的標識,然後調用具體的實現,再傳回返回值,這樣一個IPC的函數調用就完成了。
			 * 當跨進程時,僅以下代碼是各自所必須的,去掉了無關代碼:
			 *
			 * 其實AIDL的作用就是對Binder的二個方法:Binder.transact()和Binder.onTransact
			 * ()進行封裝,
			 * 以供Client端和Server端進行使用。因為實現transact()和onTransact()方法的方式基本上是相同的
			 * ,所以就可以用模板來生成具體的代碼
			 * 。理論上講只需要為Client端生成transact()相關代碼,為服務端生成onTransact
			 * ()代碼即可,但因為工具無法准確的確定某一個應用到底是Client端還是Server端
			 * ,所以它就生成所有的代碼,放在一個文件中。這就是你看到的自動生成的文件。
			 * 還需要注意的一點是Client端的Proxy是組合Binder對象
			 * ,調用其transact()方法;而服務端必須繼承Binder對象
			 * ,覆寫onTransact()方法。為蝦米呢?因為Client是主動發起IPC函數Call
			 * ,所以它可以直接調用Binder的方法來進行IPC。而Server是被動的,是要接收進來的IPC
			 * call,但Service自己無法得知啥時候Call會來
			 * ,因此必須實現回調(onTransact())給Binder,以讓Binder在有IPC Call進來的時候告訴Service。
			 * 原理和內幕 AIDL的角色是實現Android平台上面的RPC(Remote Procedure
			 * Call)也即遠程例程調用。RPC是IPC中的一種,但是它是以調用在本地或者另一個進程,甚至是另一個主機上的方法的機制。
			 * RPC的目的就是可以讓程序不用擔心方法具體是在哪個進程裡面或者哪以機器上面
			 * ,就像正常的本地方法那樣去調用即可,RPC機制會處理所有的具體細節。RPC一般用IDL(Interface Definition
			 * Language)來描述,實現則要看具體的平台和語言。可以參考Wikipedia來看RPC 和IDL 的更多信息。
			 * AIDL提供Android平台的RPC的支持:開發者僅需要要定義AIDL,做一些相關的適配工作,然後就可以使用這些方法了,
			 * 不用具體關心接口描述的方法空究竟是在同一個進程中還是在其他的進程中。這些RPC實現的細節由Binder和系統來處理。
			 */
			myRemoteBookInfo = MyRemoteBookInfo.Stub.asInterface(service);
			try {
				// 建立連接:第四步到服務端請求數據,@Override public BookInfo
				// getBookInfo(java.lang.String tagName)
				// 調用了這個方法去請求數據:mRemote.transact(Stub.TRANSACTION_getBookInfo,
				// _data, _reply, 0);
				BookInfo bookInfo = myRemoteBookInfo.getBookInfo("我是一個tagName");
				textView2.setText(bookInfo.toString());
			} catch (RemoteException e) {
				e.printStackTrace();
			}
		}

		@Override
		public void onServiceDisconnected(ComponentName name) {

		}

	}

}
package com.edify.bluenfcserver.myservice;

import java.util.Date;

import android.app.Service;
import android.content.Intent;
import android.os.IBinder;
import android.os.RemoteException;
import android.util.Log;

public class MyRemoteService extends Service {
	//建立連接:第二步,返回一個該提供給客戶端操作服務端的對象
	@Override
	public IBinder onBind(Intent intent) {
		return stub;
	}

	/**
	 * 實例化一個對象,該對象就是提供給客戶端的對象
	 */
	private MyRemoteBookInfo.Stub stub = new MyRemoteBookInfo.Stub() {
		/**
		 *實現接口未實現的方法
		 */
		//客戶端請求是通過這個方法來判斷具體請求那個操作@Override public boolean onTransact(int code, android.os.Parcel data, an
		//建立連接:第五步;通過調用該方法回去服務器端的數據信息,操作
		@Override
		public BookInfo getBookInfo(String tagName) throws RemoteException {

			return getBookInfoByTagName(tagName);
		}
	};

	/**
	 * @Description 服務的自身的方法
	 * @Author monkey
	 * @param tagName
	 * @return
	 * @Return BookInfo
	 */
	public BookInfo getBookInfoByTagName(String tagName){
		Log.i("getBookInfoByTagName--------------", tagName);
		if(tagName != null){
			return new BookInfo(1, "盡忠報國", "金庸", 100f, new Date());
		}else{
			return new BookInfo(1, "水浒傳", "未知", 200f, new Date());
		}
	}
}
 java/android 設計模式學習筆記(13)---享元模式
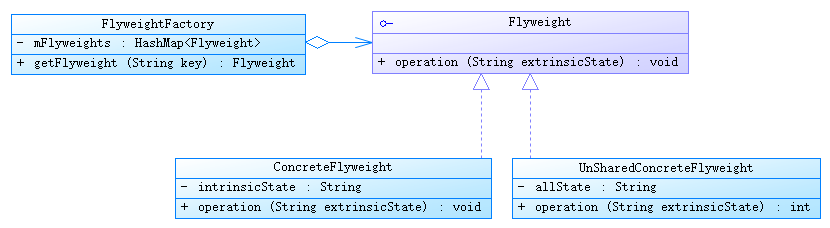
這篇我們來介紹一下享元模式(Flyweight Pattern),Flyweight 代表輕量級的意思,享元模式是對象池的一種實現。享元模式用來盡可能減少內存使用量,它適
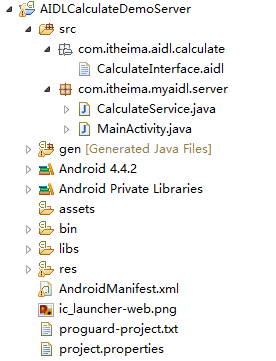 Android中如何利用AIDL機制調用遠程服務
在Android中,每個應用程序都有自己的進程,當需要在不同的進程之間傳遞對象時,該如何實現呢?顯然, Java中是不支持跨進程內存共享的。因此要傳遞對象,需要把
 android常見面試模塊
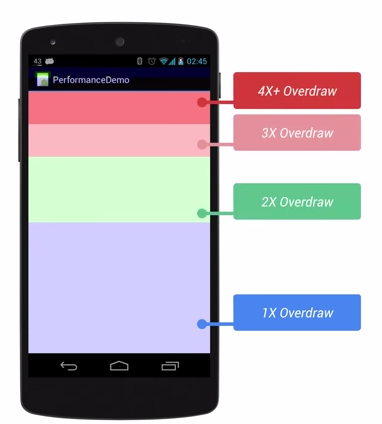
一、ANR異常(Application Not Responding)應用程序無響應ANR定義:一個流暢的合理的應用程序中不能出現anr,而讓用戶每次都要處理這個對話框。
 解決Android模擬器端口被占用問題的辦法
一、問題描述 今天在Eclipse中運行Android項目時遇到The connection to adb is down, and a severe error ha