編輯:關於Android編程
上一篇已經對ORMLite框架做了簡單的介紹:Android ORMLite 框架的入門用法~~本篇將介紹項目可能會使用到的一些用法,也為我們的使用ORMLite框架總結出一個較合理的用法。
通過上一篇的了解,我們使用ORMLite,需要自己寫一個DatabaseHelper去繼承OrmLiteSqliteOpenHelper,下面我們首先給出一個我認為比較靠譜的Helper的寫法:
package com.zhy.zhy_ormlite.db;

import java.sql.SQLException;
import java.util.HashMap;
import java.util.Map;

import android.content.Context;
import android.database.sqlite.SQLiteDatabase;

import com.j256.ormlite.android.apptools.OrmLiteSqliteOpenHelper;
import com.j256.ormlite.dao.Dao;
import com.j256.ormlite.support.ConnectionSource;
import com.j256.ormlite.table.TableUtils;
import com.zhy.zhy_ormlite.bean.Article;
import com.zhy.zhy_ormlite.bean.Student;
import com.zhy.zhy_ormlite.bean.User;

public  class DatabaseHelper extends OrmLiteSqliteOpenHelper
{
	private static final String TABLE_NAME = sqlite-test.db;

	private Map daos = new HashMap();

	private DatabaseHelper(Context context)
	{
		super(context, TABLE_NAME, null, 4);
	}

	@Override
	public void onCreate(SQLiteDatabase database,
			ConnectionSource connectionSource)
	{
		try
		{
			TableUtils.createTable(connectionSource, User.class);
			TableUtils.createTable(connectionSource, Article.class);
			TableUtils.createTable(connectionSource, Student.class);
		} catch (SQLException e)
		{
			e.printStackTrace();
		}
	}

	@Override
	public void onUpgrade(SQLiteDatabase database,
			ConnectionSource connectionSource, int oldVersion, int newVersion)
	{
		try
		{
			TableUtils.dropTable(connectionSource, User.class, true);
			TableUtils.dropTable(connectionSource, Article.class, true);
			TableUtils.dropTable(connectionSource, Student.class, true);
			onCreate(database, connectionSource);
		} catch (SQLException e)
		{
			e.printStackTrace();
		}
	}

	private static DatabaseHelper instance;

	/**
	 * 單例獲取該Helper
	 *
	 * @param context
	 * @return
	 */
	public static synchronized DatabaseHelper getHelper(Context context)
	{
		context = context.getApplicationContext();
		if (instance == null)
		{
			synchronized (DatabaseHelper.class)
			{
				if (instance == null)
					instance = new DatabaseHelper(context);
			}
		}

		return instance;
	}

	public synchronized Dao getDao(Class clazz) throws SQLException
	{
		Dao dao = null;
		String className = clazz.getSimpleName();

		if (daos.containsKey(className))
		{
			dao = daos.get(className);
		}
		if (dao == null)
		{
			dao = super.getDao(clazz);
			daos.put(className, dao);
		}
		return dao;
	}

	/**
	 * 釋放資源
	 */
	@Override
	public void close()
	{
		super.close();

		for (String key : daos.keySet())
		{
			Dao dao = daos.get(key);
			dao = null;
		}
	}

}
2、我們對每個Bean創建一個XXXDao來處理當前Bean的數據庫操作,當然真正去和數據庫打交道的對象,通過上面代碼中的getDao(T t)進行獲取
getDao為一個泛型方法,會根據傳入Class對象進行創建Dao,並且使用一個Map來保持所有的Dao對象,只有第一次調用時才會去調用底層的getDao()。
package com.zhy.zhy_ormlite.db;

import java.sql.SQLException;

import android.content.Context;

import com.j256.ormlite.dao.Dao;
import com.zhy.zhy_ormlite.bean.User;

public class UserDao
{
	private Context context;
	private Dao userDaoOpe;
	private DatabaseHelper helper;

	public UserDao(Context context)
	{
		this.context = context;
		try
		{
			helper = DatabaseHelper.getHelper(context);
			userDaoOpe = helper.getDao(User.class);
		} catch (SQLException e)
		{
			e.printStackTrace();
		}
	}

	/**
	 * 增加一個用戶
	 * @param user
	 */
	public void add(User user)
	{
		try
		{
			userDaoOpe.create(user);
		} catch (SQLException e)
		{
			e.printStackTrace();
		}

	}//...other operations


}
好了,基本了解了我們的代碼的結構~~ps:如果覺得不合理可以留言指出,如果覺得不能接收,直接忽略。。。
現在我們有兩張表一張User,一張Article;
Article中當然需要存儲User的主鍵,作為關聯~~那麼在ORMLite中如何做到呢?
可能有人會直接在Article中聲明一個int類型userId屬性,當作普通屬性處理搞定,這種做法並沒有做,但是沒有體現出面向對象的思想。
面向對象是這樣的:Article屬於某個User
類這麼定義:
package com.zhy.zhy_ormlite.bean;

import com.j256.ormlite.field.DatabaseField;
import com.j256.ormlite.table.DatabaseTable;

@DatabaseTable(tableName = tb_article)
public class Article
{
	@DatabaseField(generatedId = true)
	private int id;
	@DatabaseField
	private String title;
	@DatabaseField(canBeNull = true, foreign = true, columnName = user_id)
	private User user;

	public int getId()
	{
		return id;
	}

	public void setId(int id)
	{
		this.id = id;
	}

	public String getTitle()
	{
		return title;
	}

	public void setTitle(String title)
	{
		this.title = title;
	}

	public User getUser()
	{
		return user;
	}

	public void setUser(User user)
	{
		this.user = user;
	}

	@Override
	public String toString()
	{
		return Article [id= + id + , title= + title + , user= + user
				+ ];
	}

}
然後在User user屬性上添加: @DatabaseField(canBeNull = true, foreign = true, columnName = user_id)
canBeNull -表示不能為null;foreign=true表示是一個外鍵;columnName 列名
User類暫且就兩個屬性:
package com.zhy.zhy_ormlite.bean;

import com.j256.ormlite.field.DatabaseField;
import com.j256.ormlite.table.DatabaseTable;

@DatabaseTable(tableName = tb_user)
public class User
{
	@DatabaseField(generatedId = true)
	private int id;
	@DatabaseField(columnName = name)
	private String name;


	public User()
	{
	}

	public int getId()
	{
		return id;
	}

	public void setId(int id)
	{
		this.id = id;
	}

	public String getName()
	{
		return name;
	}

	public void setName(String name)
	{
		this.name = name;
	}

	@Override
	public String toString()
	{
		return User [id= + id + , name= + name
				+ ];
	}


}
package com.zhy.zhy_ormlite.db;

import java.sql.SQLException;
import java.util.List;

import android.content.Context;

import com.j256.ormlite.dao.Dao;
import com.zhy.zhy_ormlite.bean.Article;
import com.zhy.zhy_ormlite.bean.User;

public class ArticleDao
{
	private Dao articleDaoOpe;
	private DatabaseHelper helper;

	@SuppressWarnings(unchecked)
	public ArticleDao(Context context)
	{
		try
		{
			helper = DatabaseHelper.getHelper(context);
			articleDaoOpe = helper.getDao(Article.class);
		} catch (SQLException e)
		{
			e.printStackTrace();
		}
	}

	/**
	 * 添加一個Article
	 * @param article
	 */
	public void add(Article article)
	{
		try
		{
			articleDaoOpe.create(article);
		} catch (SQLException e)
		{
			e.printStackTrace();
		}
	}

	/**
	 * 通過Id得到一個Article
	 * @param id
	 * @return
	 */
	@SuppressWarnings(unchecked)
	public Article getArticleWithUser(int id)
	{
		Article article = null;
		try
		{
			article = articleDaoOpe.queryForId(id);
			helper.getDao(User.class).refresh(article.getUser());

		} catch (SQLException e)
		{
			e.printStackTrace();
		}
		return article;
	}

	/**
	 * 通過Id得到一篇文章
	 * @param id
	 * @return
	 */
	public Article get(int id)
	{
		Article article = null;
		try
		{
			article = articleDaoOpe.queryForId(id);

		} catch (SQLException e)
		{
			e.printStackTrace();
		}
		return article;
	}

	/**
	 * 通過UserId獲取所有的文章
	 * @param userId
	 * @return
	 */
	public List listByUserId(int userId)
	{
		try
		{
			return articleDaoOpe.queryBuilder().where().eq(user_id, userId)
					.query();
		} catch (SQLException e)
		{
			e.printStackTrace();
		}
		return null;
	}

}
public class OrmLiteDbTest extends AndroidTestCase
{
	public void testAddArticle()
	{
		User u = new User();
		u.setName(張鴻洋);
		new UserDao(getContext()).add(u);
		Article article = new Article();
		article.setTitle(ORMLite的使用);
		article.setUser(u);
		new ArticleDao(getContext()).add(article);

	}

	public void testGetArticleById()
	{
		Article article = new ArticleDao(getContext()).get(1);
		L.e(article.getUser() +  ,  + article.getTitle());
	}

	public void testGetArticleWithUser()
	{

		Article article = new ArticleDao(getContext()).getArticleWithUser(1);
		L.e(article.getUser() +  ,  + article.getTitle());
	}

	public void testListArticlesByUserId()
	{

		List
articles = new ArticleDao(getContext()).listByUserId(1); L.e(articles.toString()); }
主要看第三個:通過Id獲取一個Article且攜帶User,testGetArticleWithUser(id)
如何值傳一個Article的Id,然後能夠拿到Article對象,且內部的user屬性直接賦值呢?
兩種方式:
1、即上述寫法
article = articleDaoOpe.queryForId(id);
			helper.getDao(User.class).refresh(article.getUser());
添加foreignAutoRefresh =true,這樣;當調用queryForId時,拿到Article對象則直接攜帶了user;
每個User關聯一個或多個Article,如果我在User中聲明一個Collection
articles,我能否在查詢User的時候,一並能夠獲取到articles的值呢?
答案是可以的。在User中添加如下屬性,且注解如下:
@ForeignCollectionField
private Collection
我們在UserDao中書寫查詢User的代碼:
public User get(int id)
	{
		try
		{
			return userDaoOpe.queryForId(id);
		} catch (SQLException e)
		{
			e.printStackTrace();
		}
		return null ;
	}
public void testGetUserById()
	{
		User user = new UserDao(getContext()).get(1);
		L.e(user.getName());
		if (user.getArticles() != null)
			for (Article article : user.getArticles())
			{
				L.e(article.toString());
			}
	}
輸出:
09-07 22:49:06.484: E/zhy(7293): 張鴻洋
09-07 22:49:06.484: E/zhy(7293): Article [id=1, title=ORMLite的使用]
可以看到,我們通過一個queryForId,成功的獲取了User,以及User關聯的所有的Articles;
上述代碼其實已經用到了簡單的條件查詢了:
1、簡單的where等於
articleDaoOpe.queryBuilder().where().eq(user_id, userId).query();直接返回Article的列表
2、where and
	QueryBuilder queryBuilder = articleDaoOpe
					.queryBuilder();
			Where where = queryBuilder.where();
			where.eq(user_id, 1);
			where.and();
			where.eq(name, xxx);

			//或者
			articleDaoOpe.queryBuilder().//
					where().//
					eq(user_id, 1).and().//
					eq(name, xxx);
3、更復雜的查詢
where.or(
					//
					where.and(//
							where.eq(user_id, 1), where.eq(name, xxx)),
					where.and(//
							where.eq(user_id, 2), where.eq(name, yyy)));
好了,再復雜的查詢估計也能夠湊出來了~~
使用queryBuilder是因為我們希望執行完成查詢直接返回List
對於Update我們並不關注返回值,直接使用
articleDaoOpe.updateRaw(statement, arguments);傳入sql和參數即可~~
何必在那articleDaoOpe.updateBuilder().updateColumnValue(name,zzz).where().eq(user_id, 1);這樣的痛苦呢~~~
同理還有deleteBuilder還是建議直接拼寫sql,當然很簡單的除外,直接使用它的API~
在我們的Dao中直接寫如下代碼:
//事務操作
		TransactionManager.callInTransaction(helper.getConnectionSource(),
				new Callable()
				{

					@Override
					public Void call() throws Exception
					{
						return null;
					}
				});
1、當Bean繼承BaseDaoEnabled時,可以使用bean.create(bean);bean.update(bean)一類操作
例如:
Student extends BaseDaoEnabled
Dao dao = DatabaseHelper.getHelper(getContext()).getDao(Student.class);
Student student = new Student();
student.setDao(dao);
student.setName(張鴻洋);
student.create();
前提dao需要手動設置,如果dao為null會報錯,尼瑪,我覺得一點用沒有。。。
2、Join
QueryBuilder articleBuilder = articleDaoOpe
					.queryBuilder();
			QueryBuilder userBuilder = helper.getDao(User.class).queryBuilder();
			articleBuilder.join(userBuilder);
本篇主要想介紹在項目中如何寫DataBaseHelper已經如何寫BeanDao,以及列出了在項目中可能會用到的ORMLite的功能,如果需要詳細了解,還請看ORMLite官方文檔,源碼中也會提供~~
 Android控件之SlidingDrawer(滑動式抽屜)詳解與實例分享
SlidingDrawer效果想必大家也見到過,它就是1.5模擬器上進入應用程序列表的效果。下面是截圖一、簡介 SlidingDrawer隱藏屏外的內容,並允
 android仿IOS,滑動隱藏底部ScrollView
在我們開發android app時,會有很多效果都需要模仿IOS,最近在做一個頁面時,其中用到了 ScrollView,但要做成IOS那種在ScrollView滑動時,浮
 android圖像繪制(七)ClipRect局部繪圖/切割原圖繪制總結
雜語:看了很多程序猿都有寫博客的習慣,看來我也得練練,不管寫的好不好了,學到點什麼體會就寫寫吧。內容解說:這幾天開始學游戲地圖制作,今天小小的總結一下Canvas的cli
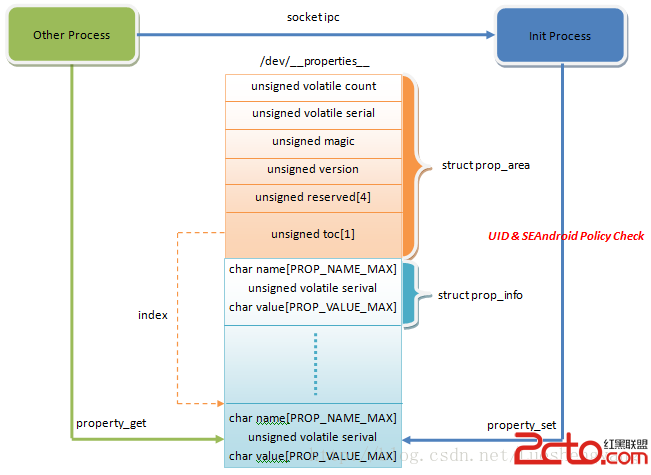 SEAndroid安全機制對Android屬性訪問的保護分析
Android系統通過屬性暴露設備和運行時信息,並且可以通過設置屬性來控制系統行為。因此,屬性也像文件一樣,是一種需要保護的資源。在啟用SEAndroid之前,敏感屬性只