編輯:關於Android編程
方法1:利用windows文本文件編碼特點。
windows下,Unicode、Unicode big endian和UTF-8編碼的txt文件的開頭會多出幾個字節,分別是FF、FE(Unicode),FE、FF(Unicode big endian),EF、BB、BF(UTF-8)。
public static String getCharset(File file) {
        String charset = "GBK";
        byte[] first3Bytes = new byte[3];
        try {
            boolean checked = false;
            BufferedInputStream bis = new BufferedInputStream(
                  new FileInputStream(file));
            bis.mark(0);
            int read = bis.read(first3Bytes, 0, 3);
            if (read == -1)
                return charset;
            if (first3Bytes[0] == (byte) 0xFF && first3Bytes[1] == (byte) 0xFE) {
                charset = "UTF-16LE";
                checked = true;
            } else if (first3Bytes[0] == (byte) 0xFE && first3Bytes[1]
                == (byte) 0xFF) {
                charset = "UTF-16BE";
                checked = true;
            } else if (first3Bytes[0] == (byte) 0xEF && first3Bytes[1]
                    == (byte) 0xBB
                    && first3Bytes[2] == (byte) 0xBF) {
                charset = "UTF-8";
                checked = true;
            }
            bis.reset();
            if (!checked) {
                int loc = 0;
                while ((read = bis.read()) != -1) {
                    loc++;
                    if (read >= 0xF0)
                        break;
                    //單獨出現BF以下的,也算是GBK
                    if (0x80 <= read && read <= 0xBF)
                        break;
                    if (0xC0 <= read && read <= 0xDF) {
                        read = bis.read();
                        if (0x80 <= read && read <= 0xBF)// 雙字節 (0xC0 - 0xDF)
                            // (0x80 -
                            // 0xBF),也可能在GB編碼內
                            continue;
                        else
                            break;
                     // 也有可能出錯,但是幾率較小
                    } else if (0xE0 <= read && read <= 0xEF) {
                        read = bis.read();
                        if (0x80 <= read && read <= 0xBF) {
                            read = bis.read();
                            if (0x80 <= read && read <= 0xBF) {
                                charset = "UTF-8";
                                break;
                            } else
                                break;
                        } else
                            break;
                    }
                }
                System.out.println(loc + " " + Integer.toHexString(read));
            }
            bis.close();
        } catch (Exception e) {
            e.printStackTrace();
        }
        return charset;
    }
方法2:開源工程 JCharDet
http://www.iteye.com/topic/266501
package org.mozilla.intl.chardet;

import java.io.BufferedInputStream;
import java.io.File;
import java.io.FileInputStream;
import java.io.FileNotFoundException;
import java.io.IOException;

/**
 * 借助JCharDet獲取文件字符集
 * @author icer
 * PS:
 * JCharDet 是mozilla自動字符集探測算法代碼的java移植,其官方主頁為:
 *      http://jchardet.sourceforge.net/
 * @date	2008/11/13
 */
public class FileCharsetDetector {

	private boolean found = false;

	/**
	 * 如果完全匹配某個字符集檢測算法, 則該屬性保存該字符集的名稱. 否則(如二進制文件)其值就為默認值 null, 這時應當查詢屬性
	 */
	private String encoding = null;

	public static void main(String[] argv) throws Exception {
		if (argv.length != 1 && argv.length != 2) {

			System.out
					.println("Usage: FileCharsetDetector  []");

			System.out.println("");
			System.out.println("Where  is d:/demo.txt");
			System.out.println("For optional . Use following...");
			System.out.println("		1 => Japanese");
			System.out.println("		2 => Chinese");
			System.out.println("		3 => Simplified Chinese");
			System.out.println("		4 => Traditional Chinese");
			System.out.println("		5 => Korean");
			System.out.println("		6 => Dont know (default)");

			return;
		} else {
			String encoding = null;
			if (argv.length == 2) {
				encoding = new FileCharsetDetector().guestFileEncoding(argv[0],
						Integer.valueOf(argv[1]));
			} else {
				encoding = new FileCharsetDetector().guestFileEncoding(argv[0]);
			}
			System.out.println("文件編碼:" + encoding);
		}
	}

	/**
	 * 傳入一個文件(File)對象,檢查文件編碼
	 *
	 * @param file
	 *            File對象實例
	 * @return 文件編碼,若無,則返回null
	 * @throws FileNotFoundException
	 * @throws IOException
	 */
	public String guestFileEncoding(File file) throws FileNotFoundException,
			IOException {
		return geestFileEncoding(file, new nsDetector());
	}

	/**
	 * 獲取文件的編碼
	 *
	 * @param file
	 *            File對象實例
	 * @param languageHint
	 *            語言提示區域代碼 eg:1 : Japanese; 2 : Chinese; 3 : Simplified Chinese;
	 *            4 : Traditional Chinese; 5 : Korean; 6 : Dont know (default)
	 * @return 文件編碼,eg:UTF-8,GBK,GB2312形式,若無,則返回null
	 * @throws FileNotFoundException
	 * @throws IOException
	 */
	public String guestFileEncoding(File file, int languageHint)
			throws FileNotFoundException, IOException {
		return geestFileEncoding(file, new nsDetector(languageHint));
	}

	/**
	 * 獲取文件的編碼
	 *
	 * @param path
	 *            文件路徑
	 * @return 文件編碼,eg:UTF-8,GBK,GB2312形式,若無,則返回null
	 * @throws FileNotFoundException
	 * @throws IOException
	 */
	public String guestFileEncoding(String path) throws FileNotFoundException,
			IOException {
		return guestFileEncoding(new File(path));
	}

	/**
	 * 獲取文件的編碼
	 *
	 * @param path
	 *            文件路徑
	 * @param languageHint
	 *            語言提示區域代碼 eg:1 : Japanese; 2 : Chinese; 3 : Simplified Chinese;
	 *            4 : Traditional Chinese; 5 : Korean; 6 : Dont know (default)
	 * @return
	 * @throws FileNotFoundException
	 * @throws IOException
	 */
	public String guestFileEncoding(String path, int languageHint)
			throws FileNotFoundException, IOException {
		return guestFileEncoding(new File(path), languageHint);
	}

	/**
	 * 獲取文件的編碼
	 *
	 * @param file
	 * @param det
	 * @return
	 * @throws FileNotFoundException
	 * @throws IOException
	 */
	private String geestFileEncoding(File file, nsDetector det)
			throws FileNotFoundException, IOException {
		// Set an observer...
		// The Notify() will be called when a matching charset is found.
		det.Init(new nsICharsetDetectionObserver() {
			public void Notify(String charset) {
				found = true;
				encoding = charset;
			}
		});

		BufferedInputStream imp = new BufferedInputStream(new FileInputStream(
				file));

		byte[] buf = new byte[1024];
		int len;
		boolean done = false;
		boolean isAscii = true;

		while ((len = imp.read(buf, 0, buf.length)) != -1) {
			// Check if the stream is only ascii.
			if (isAscii)
				isAscii = det.isAscii(buf, len);

			// DoIt if non-ascii and not done yet.
			if (!isAscii && !done)
				done = det.DoIt(buf, len, false);
		}
		det.DataEnd();

		if (isAscii) {
			encoding = "ASCII";
			found = true;
		}

		if (!found) {
			String prob[] = det.getProbableCharsets();
			if (prob.length > 0) {
				// 在沒有發現情況下,則取第一個可能的編碼
				encoding = prob[0];
			} else {
				return null;
			}
		}
		return encoding;
	}
}
方法3:開源工程juniversalcharde
http://code.google.com/p/juniversalchardet/
public static String getFileIncode(File file) {

		if (!file.exists()) {
			System.err.println("getFileIncode: file not exists!");
			return null;
		}

		byte[] buf = new byte[4096];
		FileInputStream fis = null;
		try {
			fis = new FileInputStream(file);
			// (1)
			UniversalDetector detector = new UniversalDetector(null);

			// (2)
			int nread;
			while ((nread = fis.read(buf)) > 0 && !detector.isDone()) {
				detector.handleData(buf, 0, nread);
			}
			// (3)
			detector.dataEnd();

			// (4)
			String encoding = detector.getDetectedCharset();
			if (encoding != null) {
				System.out.println("Detected encoding = " + encoding);
			} else {
				System.out.println("No encoding detected.");
			}

			// (5)
			detector.reset();
			fis.close();
			return encoding;
		} catch (Exception e) {
			e.printStackTrace();
		}

		return null;
	}
引入包的方法:
將包放入libs文件夾,
選中包,右鍵 --> build path--> add to build path。
jar包下載:http://download.csdn.net/detail/u012587637/8041181
說明:第三個方法要比第二個速度快些,也比較新,所以推薦使用第三個。
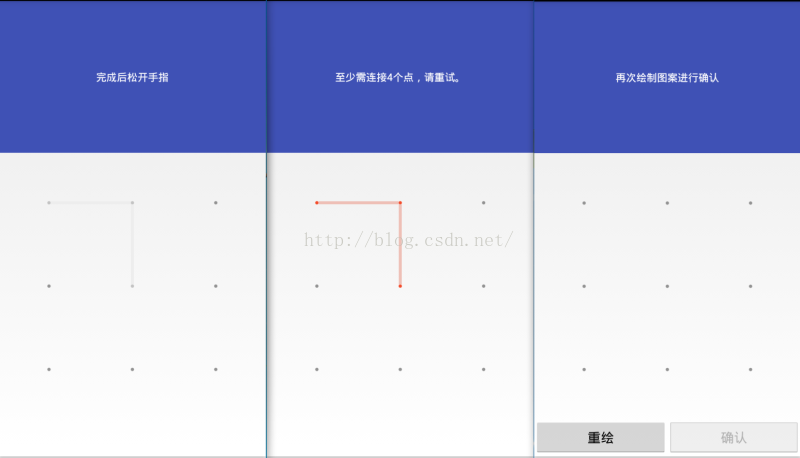 Android 仿小米鎖屏實現九宮格解鎖功能(無需圖片資源)
最近公司要求做個九宮格解鎖,本人用的是小米手機,看著他那個設置鎖屏九宮格很好看,就做了該組件,不使用圖片資源,純代碼實現。尊重每個辛苦的博主,在http://
 android實現百度地圖自定義彈出窗口功能
我們使用百度地圖的時候,點擊地圖上的Marker,會彈出一個該地點詳細信息的窗口,如下左圖所示,有時候,我們希望自己定義這個彈出窗口的內容,或者,干脆用自己的數據來構造這
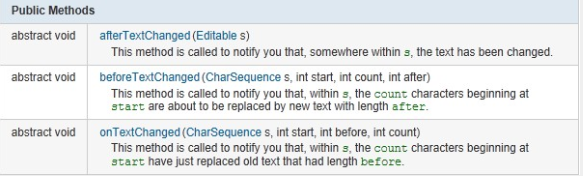 Android編程實現監聽EditText變化的方法
本文實例講述了Android編程實現監聽EditText變化的方法。分享給大家供大家參考,具體如下:監聽EditText中的內容的變化。在EditText沒有找到一個se
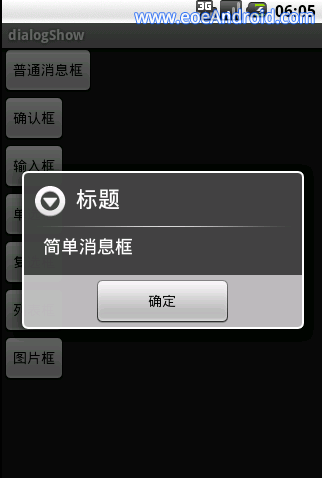 Android對話框AlertDialog.Builder使用方法詳解
我們在平時做開發的時候,免不了會用到各種各樣的對話框,相信有過其他平台開發經驗的朋友都會知道,大部分的平台都只提供了幾個最簡單的實現,如果我們想實現自己特定需求的對話框,