編輯:關於Android編程
Android多點觸控涉及到的知識點
1、ScaleGestureDetector
2、OnScaleGestureListener
3、Matrix
4、OnTouchListener
四個知識點需要了解一下,需要注意的是Matrix在內存中是一個一維數組,操控圖片的Matrxi是一個3X3的矩陣,在內存中也就是一個大小為9的一維數組。
實現多點觸控,自由變化圖片
1、 ImageView的基礎上繼承
2、因為要在圖片加載完成就獲取到相關的屬性,所以實現OnGlobalLayoutListener接口,並實現方法onGlobalLayout
注冊OnGlobalLayoutListener接口:
 @Override
protected void onAttachedToWindow() {
 super.onAttachedToWindow();
 //注冊 OnGlobalLayoutListener
 getViewTreeObserver().addOnGlobalLayoutListener(this);
}

@Override
protected void onDetachedFromWindow() {
 super.onDetachedFromWindow();
 //注銷 OnGlobalLayoutListener
 getViewTreeObserver().removeOnGlobalLayoutListener(this);
}
實現onGlobalLayout方法
 @Override
public void onGlobalLayout() {
 //因為要在加載完成的時候就獲取到圖片的寬高 然後讓圖片的寬高去適應控件的寬高大小 isOnce只在第一次加載到時候處理
 if (isOnce) {
  //下一步3 獲取相關屬性 並做處理
  isOnce = false;
 }
}
3、
//獲取控件的寬高
 int width = getWidth();
  int height = getHeight();
  //獲取圖片
  Drawable drawable = getDrawable();
  if (null == drawable) {
   return;
  }
  //獲取到圖片的寬高 **根據drawable的這兩個方法獲取
  int dw = drawable.getIntrinsicWidth();
  int dh = drawable.getIntrinsicHeight();

//定義一個圖片縮放值
 float scale = 1.0f;

接下來就是根據圖片的寬和高 控件的寬和高 去設置這個scale值

 //當圖片的寬大於了控件的寬 圖片的高小於控件的高
if (dw > width && dh < height) {
  scale = width * 1.0f / dw;
 }
 //當圖片的寬小於了控件的寬 圖片的高大於控件的高
if (dw < width && dh > height) {
  scale = height * 1.0f / dh;
 }

if ((dw > width && dh > height) || (dw < width && dh < height)) {
 scale = Math.min((width * 1.0f / dw), (height * 1.0f / dh));
}

//初始化三個縮放的值
  mInitScale = scale;//正常情況下的 縮放值
  mMidScale = scale * 2; //
  mMaxScale = scale * 4;//最大的縮放值


//將圖片初始化加載到控件的正中心位置
  //計算橫縱需要移動的偏移值
  float dx = getWidth() / 2f - dw / 2f;
  float dy = getHeight() / 2f - dh / 2f;
  //使用矩陣控制圖片的平移和縮放
  mMatrix.postTranslate(dx, dy);
  //縮放的時候要指定縮放基准點
  mMatrix.postScale(mInitScale, mInitScale, getWidth() / 2f, getHeight() / 2f);
  //通過設置Matrix改變ImageView
  setImageMatrix(mMatrix);
4、接下來就是ScaleGestureDetector
//初始化 this是OnScaleGestureListener 對象
 mScaleGestureDetector = new ScaleGestureDetector(context, this);
  //要通過ScaleGestureDetector去操控觸摸事件,那還要實現OnTouchListener接口並實現onTouch方法,在該方法中將觸摸事件傳遞給mScaleGestureDetector 對象。

@Override
public boolean onTouch(View view, MotionEvent motionEvent) {
 //將觸摸事件傳遞給ScaleGesture
 mScaleGestureDetector.onTouchEvent(motionEvent);
 return true;
}
 //設置監聽
 setOnTouchListener(this);
5、OnScaleGestureListener 中的重要方法了
 //使用ScaleGestureListener去實現多點觸控
@Override
public boolean onScale(ScaleGestureDetector scaleGestureDetector) {
 if (null == getDrawable()) {
  return true;
 }
//下一步6 處理

return true;
}
6、
 //縮放中
 //獲取當前圖片縮放scale
 float scale = getCurrentScale();

 //獲取縮放因子
 float scaleFactor = scaleGestureDetector.getScaleFactor();
 //縮放值達到最大和最小的情況 scaleFactor>1表示正在放大 <1表示正在縮小
 if ((scale < mMaxScale && scaleFactor > 1.0f) || scale > mInitScale && scaleFactor < 1.0f) {
  if (scale * scaleFactor < mInitScale) {
   scaleFactor = mInitScale / scale;
  } else if (scale * scaleFactor > mMaxScale) {
   scaleFactor = mMaxScale / scale;
  }
 }

 //根據縮放因子去設置圖片的縮放 根據多點的中心去縮放 scaleGestureDetector.getFocusX(), scaleGestureDetector.getFocusY()縮放中心點一定是手指觸摸的中心點

  mMatrix.postScale(scaleFactor, scaleFactor, scaleGestureDetector.getFocusX(), scaleGestureDetector.getFocusY());

 //因為縮放的中心點會改變 所以要控制圖片的邊界處理*** 如果不處理,中心點會根據你手指位置的不同發生改變,那麼圖片位置會錯亂
 checkoutBounds(); //下一步 7
 setImageMatrix(mMatrix);
7、checkoutBounds()
 private void checkoutBounds() {
 //通過矩陣要獲取到縮放後圖片的大小和坐標
 Drawable drawable = getDrawable();
 if (null != drawable) {
  RectF rectF = getScaleMatrix(drawable); //下一步 8

  //獲取控件的寬高
  int width = getWidth();
  int height = getHeight();
  //聲明 x y偏移值 如果偏離了控件需要移動回去
  float detalX = 0;
  float detalY = 0;

  if (rectF.width() >= width) {
   //圖片的寬大於等於了控件的寬,為了讓寬留白邊,計算出應該左右移動的偏移值
   if (0 < rectF.left) {
    //左邊留空白了 那就應該像左移動
    detalX = -rectF.left;
   } else if (rectF.right < width) {
    detalX = width - rectF.right;
   }
  }
  //高度控制
  if (rectF.height() >= height) {
   if (0 < rectF.top) {
    detalY = -rectF.top;
   } else if (rectF.bottom < height) {
    detalY = height - rectF.bottom;
   }
  }

  //圖片寬和高小於控件寬高的情況,讓圖片居中顯示
  if (rectF.width() < width) {
   //計算偏移值
   detalX = width / 2f - rectF.right + rectF.width() / 2f;
  }

  if (rectF.height() < height) {
   detalY = height / 2f - rectF.bottom + rectF.height() / 2f;
  }
  mMatrix.postTranslate(detalX, detalY);
}
8、getScaleMatrix(drawable) 該方法其他地方也可以效仿
//通過矩陣 去獲取到縮放後的圖片的四個頂點坐標
public RectF getScaleMatrix(Drawable drawable) {
 Matrix matrix = mMatrix;
 //圖片的四個點坐標
 RectF rectF = new RectF(0, 0, drawable.getIntrinsicWidth(), drawable.getIntrinsicHeight());
 matrix.mapRect(rectF);
 return rectF;
}
通過該控件可以熟悉一下多點觸控的實現 和圖形矩陣的知識
Demo地址:ZoomImageView
以上就是本文的全部內容,希望對大家的學習有所幫助,也希望大家多多支持本站。
 基於facebook atc搭建企業級弱網絡模擬平台
背景為了提升產品在復雜網絡環境下的體驗,性能,所以搭建了一套模擬網絡的環境來提高效率,主要通過Ubuntu分享小范圍Ap,使用Facebook的開源項目ATC(argum
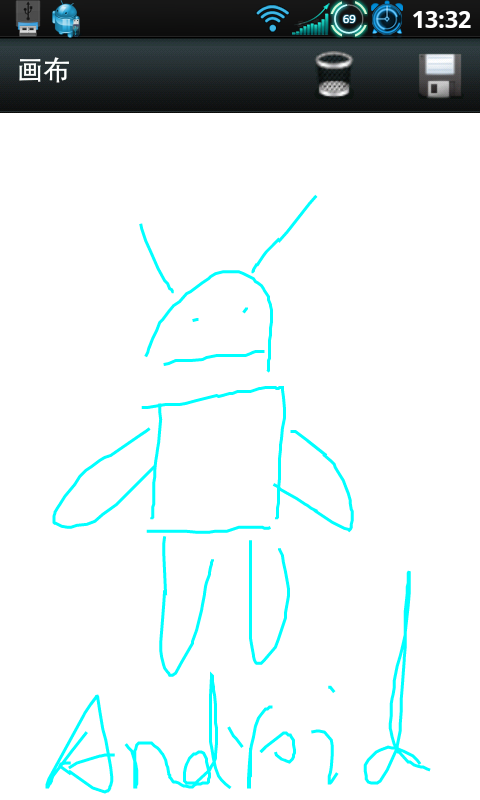 Android編程實現手繪及保存為圖片的方法(附demo源碼下載)
本文實例講述了Android編程實現手繪及保存為圖片的方法。分享給大家供大家參考,具體如下:運行效果圖預覽:應 yzuo_08 要求做了此Demo,跟以前那個手寫板Dem
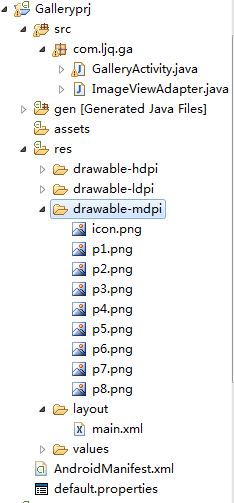 Android控件之Gallery用法實例分析
本文實例講述了Android控件之Gallery用法。分享給大家供大家參考。具體如下:Gallery組件主要用於橫向顯示圖像列表,不過按常規做法。Gallery組件只能有
 Android Alertdialog(實現警告對話框)
在Android開發中,我們經常會需要在Android界面上彈出一些對話框,比如詢問用戶或者讓用戶選擇。這些功能我們叫它Android Dialog對話框,AlertDi