編輯:關於Android編程
《Android 4.4 KitKat NotificationManagerService使用詳解與原理分析(一)__使用詳解》
在上一篇文章《Android 4.4 KitKat NotificationManagerService使用詳解與原理分析(一)__使用詳解》中詳細介紹了NotificationListenerService的使用方法,以及在使用過程中遇到的問題和規避方案。本文主要分析NotificationListenerService實現原理,以及詳細分析在上一篇文章中提到的相關問題和產生的根本原因。在原理分析前,先看看NotificationListenerService涉及到的類以及基本作用,如圖1所示:
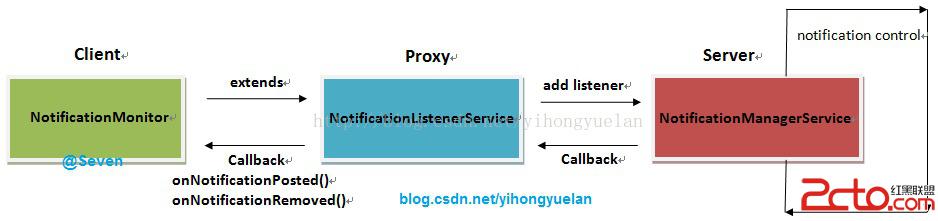
圖 1 NLS注冊及回調過程
通過圖1可以看到,整個通知狀態獲取分為三部分:
①. 監聽器注冊;新建一個類NotificationMonitor繼承自NotificationListenerService。
②. 系統通知管理;系統通知管理由NotificationManagerService負責。
③. 通知狀態回調;當系統通知狀態改變之後,NotificationManagerService會通知NotificationListenerService,最後再由NotificationListenerService通知其所有子類。
在整個系統中,通知管理是由NotificationManagerService完成的,NotificationListenerService只是在通知改變時,會獲得相應的通知消息,這些消息最終會回調到NotificationListenerService的所有子類中。
NotificationListenerService雖然繼承自Service,但系統中實際上啟動的是其子類,為了表述方便,後文統一使用NotificationListenerService啟動來指代。其子類的啟動有三個途徑,分別是:開機啟動、接收PACKAGE相關廣播(安裝、卸載等)啟動、SettingsProvider數據變更啟動。
既然NotificationListenerService是一個service,那其子類啟動方式自然就是bindService或者startService,在SourceCode/frameworks/base/services/java/com/android/server/NotificationManagerService.java中可以找到,實際上NotificationListenerService的啟動是通過bindServiceAsUser來實現的,而bindServiceAsUser與bindService作用一致。
因為NotificationListenerService最終是在NotificationManagerService中啟動的,因此當系統在開機第一次啟動時,會進行NotificationManagerService初始化,之後會調用其SystemReady方法,繼而調用rebindListenerServices以及registerListenerService(),最後使用bindServiceAsUser實現NotificationListenerService的啟動。rebindListenerServices代碼如下:
void rebindListenerServices() {
final int currentUser = ActivityManager.getCurrentUser();
//獲取系統中哪些應用開啟了Notification access
String flat = Settings.Secure.getStringForUser(
mContext.getContentResolver(),
Settings.Secure.ENABLED_NOTIFICATION_LISTENERS,
currentUser);
NotificationListenerInfo[] toRemove = new NotificationListenerInfo[mListeners.size()];
final ArrayList toAdd;
synchronized (mNotificationList) {
// unbind and remove all existing listeners
toRemove = mListeners.toArray(toRemove);
toAdd = new ArrayList();
final HashSet newEnabled = new HashSet();
final HashSet newPackages = new HashSet();
// decode the list of components
if (flat != null) {
String[] components = flat.split(ENABLED_NOTIFICATION_LISTENERS_SEPARATOR);
for (int i=0; i在該方法中將獲取系統中所有NotificationListenerService,並進行registerListenerService操作,代碼如下:private void registerListenerService(final ComponentName name, final int userid) {
//... ...省略
Intent intent = new Intent(NotificationListenerService.SERVICE_INTERFACE);
intent.setComponent(name);
intent.putExtra(Intent.EXTRA_CLIENT_LABEL,
R.string.notification_listener_binding_label);
intent.putExtra(Intent.EXTRA_CLIENT_INTENT, PendingIntent.getActivity(
mContext, 0, new Intent(Settings.ACTION_NOTIFICATION_LISTENER_SETTINGS), 0));
try {
if (DBG) Slog.v(TAG, binding: + intent);
//使用bindService啟動NotificationListenerService
if (!mContext.bindServiceAsUser(intent,
new ServiceConnection() {
INotificationListener mListener;
@Override
public void onServiceConnected(ComponentName name, IBinder service) {
synchronized (mNotificationList) {
mServicesBinding.remove(servicesBindingTag);
try {
mListener = INotificationListener.Stub.asInterface(service);
NotificationListenerInfo info = new NotificationListenerInfo(
mListener, name, userid, this);
service.linkToDeath(info, 0);
//service啟動成功之後將相關信息添加到mListeners列表中,後續通過該列表觸發回調
mListeners.add(info);
} catch (RemoteException e) {
// already dead
}
}
}
@Override
public void onServiceDisconnected(ComponentName name) {
Slog.v(TAG, notification listener connection lost: + name);
}
},
Context.BIND_AUTO_CREATE,
new UserHandle(userid)))
//... ...省略
}
}
整個啟動流程如圖2所示:
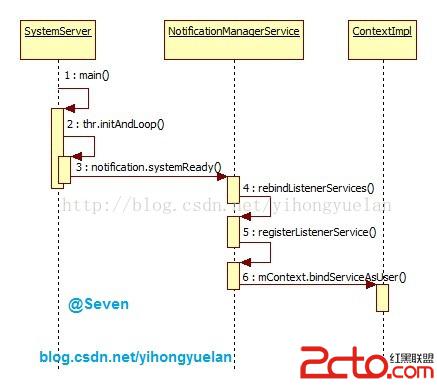
圖 2 NLS開機啟動時序圖
廣播啟動
當系統安裝或者卸載應用的時候,也會觸發NotificationListenerService的啟動。當一個使用NotificationListenerService的應用被卸載掉後,需要在Notification access界面清除相應的選項,或者當多用戶切換時,也會更新NotificationListenerService的狀態。在NotificationManagerService中監聽了以下廣播:
Intent.ACTION_PACKAGE_ADDED
Intent.ACTION_PACKAGE_REMOVED
Intent.ACTION_PACKAGE_RESTARTED
Intent.ACTION_PACKAGE_CHANGED
Intent.ACTION_QUERY_PACKAGE_RESTART
Intent.ACTION_USER_SWITCHED
這些廣播在應用變更時由系統發出,比如安裝、卸載、覆蓋安裝應用等等。當NotificationManagerService接收這些廣播後編會調用rebindListenerServices,之後的流程就與前面一樣。啟動流程如下:
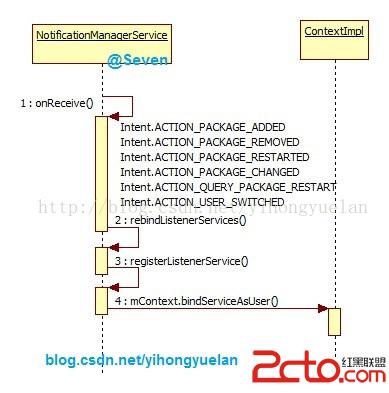
圖 3 NLS廣播啟動
數據庫變更啟動
在NotificationManagerService中使用了ContentObserver監聽SettingsProvider數據庫變化,當Notification access有更新時,會更新NotificationListenerService的狀態。例如,當用戶進入Notification access界面,手動開啟或關閉相關應用的Notification access權限時便會觸發這種啟動方式。當數據庫中NotificationListenerService關聯的信息改變後,會觸發ContentObserver的onChange方法,繼而調用update方法更新系統中NotificationListenerService的服務狀態,最後調用到rebindListenerServices中。整個流程如下:
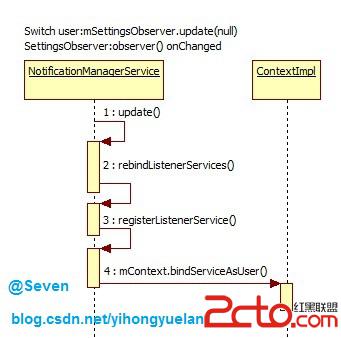
圖 4 NLS數據庫變更啟動
NotificationListenerService啟動小結
在系統中實際上運行的是NotificationListenerService的子類,這些子類的啟動方式分為三種:開機啟動時NotificationManagerService初始化回調;接收相關廣播後執行;數據庫變更後執行。這些啟動方式歸根到底還是bindService的操作。
NotificationListenerService調用流程
前面提到了NotificationListenerService的啟動流程,當啟動完成之後就是調用,整個調用流程分為兩種情況,即:新增通知和刪除通知。
新增通知
當系統收到新的通知消息時,會調用NotificationManager的notify方法用以發起系統通知,在notify方法中則調用關鍵方法enqueueNotificationWithTag:
service.enqueueNotificationWithTag(......)
這裡的service是INotificationManager的對象,而NotificationManagerService繼承自INotificationManager.Stub。也就是說NotificationManager與NotificationManagerService實際上就是client與server的關系,這裡的service最終是NotificationManagerService的對象。這裡便會跳轉到NotificationManagerService的enqueueNotificationWithTag方法中,實際調用的是enqueueNotificationInternal方法。在該方法中就涉及到Notification的組裝,之後調用關鍵方法notifyPostedLocked():
private void notifyPostedLocked(NotificationRecord n) {
final StatusBarNotification sbn = n.sbn.clone();
//這裡觸發mListeners中所有的NotificationListenerInfo回調
for (final NotificationListenerInfo info : mListeners) {
mHandler.post(new Runnable() {
@Override
public void run() {
info.notifyPostedIfUserMatch(sbn);
}});
}
}
到這裡就開始准備回調了,因為前面通知已經組裝完畢准備顯示到狀態欄了,之後就需要將相關的通知消息告訴所有監聽者。繼續看到notifyPostedIfUserMatch方法:
public void notifyPostedIfUserMatch(StatusBarNotification sbn) {
//... ...省略
try {
listener.onNotificationPosted(sbn);
} catch (RemoteException ex) {
Log.e(TAG, unable to notify listener (posted): + listener, ex);
}
}
上面的listener對象是NotificationListenerInfo類的全局變量,那是在哪裡賦值的呢?還記得前面注冊NotificationListenerService的時候bindServiceAsUser,其中new了一個ServiceConnection對象,並在其onServiceConnected方法中有如下代碼:
public void onServiceConnected(ComponentName name, IBinder service) {
synchronized (mNotificationList) {
mServicesBinding.remove(servicesBindingTag);
try {
//mListener就是NotificationListenerService子類的對象
//service是INotificationListenerWrapper的對象,INotificationListenerWrapper
//繼承自INotificationListener.Stub,是NotificationListenerService的內部類
mListener = INotificationListener.Stub.asInterface(service);
//使用mListener對象生成對應的NotificationListenerInfo對象
NotificationListenerInfo info = new NotificationListenerInfo(
mListener, name, userid, this);
service.linkToDeath(info, 0);
mListeners.add(info);
} catch (RemoteException e) {
// already dead
}
}
}
也就是說在NotificationListenerService啟動並連接的時候,將binder對象保存到了NotificationListenerInfo中。這裡就得看看NotificationListenerService的onBind方法返回了,代碼如下:
@Override
public IBinder onBind(Intent intent) {
if (mWrapper == null) {
mWrapper = new INotificationListenerWrapper();
}
//這裡返回的是INotificationListenerWrapper對象
return mWrapper;
}
private class INotificationListenerWrapper extends INotificationListener.Stub {
@Override
public void onNotificationPosted(StatusBarNotification sbn) {
try {
//onNotificationPosted是抽象方法之一
NotificationListenerService.this.onNotificationPosted(sbn);
} catch (Throwable t) {
Log.w(TAG, Error running onNotificationPosted, t);
}
}
@Override
public void onNotificationRemoved(StatusBarNotification sbn) {
try {
//onNotificationRemoved是另一個抽象方法
NotificationListenerService.this.onNotificationRemoved(sbn);
} catch (Throwable t) {
Log.w(TAG, Error running onNotificationRemoved, t);
}
}
}
通過以上代碼可以知道,當在notifyPostedIfUserMatch執行listener.onNotificationPosted方法時,實際上會調用到NotificationListenerService.INotificationListenerWrapper的onNotificationPosted方法。
NotificationListenerService是一個Abstract類,其中的Abstract方法是onNotificationPosted和onNotificationRemoved。當觸發NotificationListenerService.INotificationListenerWrapper的onNotificationPosted方法時,繼續調用了NotificationListenerService.this.onNotificationPosted(sbn)。這樣會繼續調用所有NotificationListenerService子類中的onNotificationPosted方法,系統通知新增的消息便傳到了所有NotificationListenerService中。
從整個流程來看,新增通知的發起點是NotificationManager,處理通知則是由NotificationManagerService完成,傳輸過程是通過NotificationListenerService,最後回調方法是各個繼承自NotificationListenerService的子類。整個過程的調用時序圖如下:
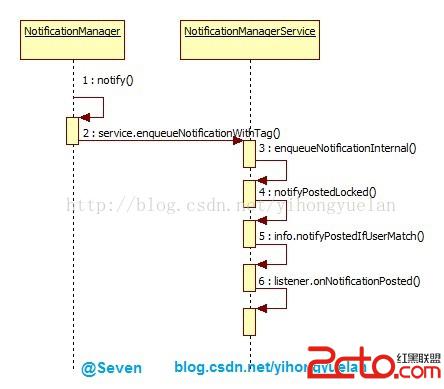
圖 5 onNotificationPosted觸發流程
刪除通知
與新增通知類似的流程是刪除通知,發起點在NotificationManager,之後經由NotificationManagerService處理和NotificationListenerService傳遞,最後到達各個繼承自NotificationListenerService的子類中,只不過最後的處理方法變成了onNotificationRemoved。調用時序圖下:
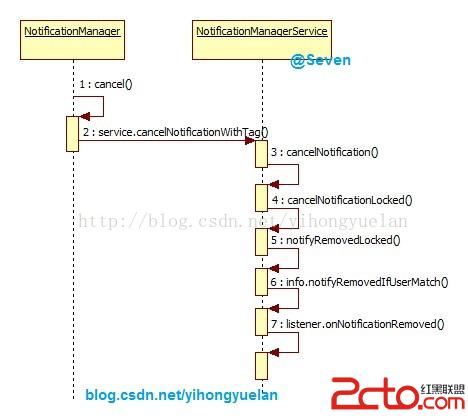
圖 6 onNotificationRemoved觸發流程
NotificationListenerService調用流程小結
簡單來看,NotificationListenerService在系統通知的消息傳遞過程中,起到了代理的作用。繼承自NotificationListenerService的類作為client端,真正的server端則是NotificationManagerService,由它負責整個Notification的控制與管理。NotificationManagerService將處理之後的結果通過NotificationListenerService返回給client端,最終各個client端通過onNotificationPosted和onNotificationRemoved方法拿到系統通知狀態變更的相關信息。
NotificationListenerService重點分析
前文分析了整個NotificationListenerService的啟動和調用,通過以上分析可以很清楚的了解NotificationListenerService的工作流程。在上一篇文章《Android 4.4 KitKat NotificationManagerService使用詳解與原理分析(一)__使用詳解》中,文末分析了在NotificationListenerService在使用過程中的遇到的一些問題,但並沒有深究出現這些問題的根本原因,下文會對這些問題進行詳細分析。
Notification access頁面不存在
當手機上沒有安裝任何使用NotificationListenerService的應用時,系統默認不會顯示Notification access選項。只有手機中安裝了使用NotificationListenerService的應用,才可以在Settings > Security > Notification access 找到對應的設置頁面。在SourceCode/packages/apps/Settings/src/com/android/settings/SecuritySettings.java中可以看到如下初始化代碼:
//... ...省略
mNotificationAccess = findPreference(KEY_NOTIFICATION_ACCESS);
if (mNotificationAccess != null) {
final int total = NotificationAccessSettings.getListenersCount(mPM);
if (total == 0) {
if (deviceAdminCategory != null) {
//如果系統中沒有安裝使用NLS的應用則刪除顯示
deviceAdminCategory.removePreference(mNotificationAccess);
}
} else {
//獲取系統中有多少啟動了Notification access的應用
final int n = getNumEnabledNotificationListeners();
//根據啟用的數量顯示不同的Summary
if (n == 0) {
mNotificationAccess.setSummary(getResources().getString(
R.string.manage_notification_access_summary_zero));
} else {
mNotificationAccess.setSummary(String.format(getResources().getQuantityString(
R.plurals.manage_notification_access_summary_nonzero,
n, n)));
}
}
}
//... ...省略
getActiveNotifications()方法返回為null
有很多人在使用getActiveNotifications方法時返回為null,多數情況下是因為在onCreate或者在onBind中調用了getActiveNotifications方法。比如NotificaionMonitor extends NotificationListenerService:
public class NotificationMonitor extends NotificationListenerService {
@Override
public void onCreate() {
//getActiveNotifications();
super.onCreate();
}
@Override
public IBinder onBind(Intent intent) {
getActiveNotifications();
return super.onBind(intent);
}
}
找到NotificationListenerService中的getActiveNotifications方法實現,代碼如下:
public StatusBarNotification[] getActiveNotifications() {
try {
//getActiveNotifications成功執行的兩個關鍵點:
//1.getNotificationInterface方法返回正常
//2.mWrapper對象不為null
return getNotificationInterface().getActiveNotificationsFromListener(mWrapper);
} catch (android.os.RemoteException ex) {
Log.v(TAG, Unable to contact notification manager, ex);
}
return null;
}
//通過查看可以知道,getNotificationInterface沒有問題,如果為null會進行初始化
private final INotificationManager getNotificationInterface() {
if (mNoMan == null) {
mNoMan = INotificationManager.Stub.asInterface(
ServiceManager.getService(Context.NOTIFICATION_SERVICE));
}
return mNoMan;
}
//如果mWrapper為null則進行初始化
@Override
public IBinder onBind(Intent intent) {
if (mWrapper == null) {
mWrapper = new INotificationListenerWrapper();
}
return mWrapper;
}
通過上面的代碼可以知道getActiveNotifications方法調用失敗的原因:
1. service的生命周期會先從onCraete->onBind逐步執行;
2. 此時調用getActiveNotifications方法會使用NotificationListenerService中的mWrapper對象;
3. mWrapper對象必須在NotificationMonitor完成super.onBind方法之後才會初始化;
綜上所述,當在onCreate或者onBind方法中使用getActiveNotifications方法時,會導致mWrapper沒有初始化,即mWrapper == null。解決方案可以在onCreate或者onBind方法中使用handler異步調用getActiveNotification方法,具體可參考《Android 4.4 KitKat NotificationManagerService使用詳解與原理分析(一)__使用詳解》。
NotificationListenerService失效
如果NotificationMonitor在onCreate或onBind方法中出現crash,則該NotificationMonitor已經失效。就算修改了NotificationMonitor的代碼不會再crash,但NotificationMonitor還是不能收到onNotificationPosted和onNotificationRemoved回調,除非重啟手機。
這個問題是google設計上的缺陷導致,出現NotificationListenerService失效的必要條件: 在NotificationMonitor的onCreate或者onBind中出現異常,導致service crash,也就是說service還沒有完全啟動的情況下出現了異常導致退出。
這裡需要回到NotificationManagerService中,NotificationListenerService的注冊方法registerListenerService中:
private void registerListenerService(final ComponentName name, final int userid) {
//servicesBindingTag可以理解為需要啟動的service的標簽
final String servicesBindingTag = name.toString() + / + userid;
//如果mServicesBinding中已經包含正在處理的service則直接return退出
if (mServicesBinding.contains(servicesBindingTag)) {
// stop registering this thing already! we're working on it
return;
}
//將准備啟動的service標簽添加到mServicesBinding中
mServicesBinding.add(servicesBindingTag);
//... ...省略
//使用bindServiceAsUser啟動service
Intent intent = new Intent(NotificationListenerService.SERVICE_INTERFACE);
intent.setComponent(name);
intent.putExtra(Intent.EXTRA_CLIENT_LABEL,
R.string.notification_listener_binding_label);
intent.putExtra(Intent.EXTRA_CLIENT_INTENT, PendingIntent.getActivity(
mContext, 0, new Intent(Settings.ACTION_NOTIFICATION_LISTENER_SETTINGS), 0));
try {
if (DBG) Slog.v(TAG, binding: + intent);
if (!mContext.bindServiceAsUser(intent,
new ServiceConnection() {
INotificationListener mListener;
@Override
public void onServiceConnected(ComponentName name, IBinder service) {
synchronized (mNotificationList) {
//服務成功啟動之後刪除標簽
mServicesBinding.remove(servicesBindingTag);
try {
mListener = INotificationListener.Stub.asInterface(service);
NotificationListenerInfo info = new NotificationListenerInfo(
mListener, name, userid, this);
service.linkToDeath(info, 0);
mListeners.add(info);
} catch (RemoteException e) {
// already dead
}
}
}
@Override
public void onServiceDisconnected(ComponentName name) {
Slog.v(TAG, notification listener connection lost: + name);
}
},
Context.BIND_AUTO_CREATE,
new UserHandle(userid)))
{
//綁定服務失敗後刪除標簽
mServicesBinding.remove(servicesBindingTag);
Slog.w(TAG, Unable to bind listener service: + intent);
return;
}
} catch (SecurityException ex) {
Slog.e(TAG, Unable to bind listener service: + intent, ex);
return;
}
}
}
當調用registerListenerService方法時,使用了一個mServicesBinding的ArrayList用來記錄當前正在啟動的服務。在啟動之前會判斷當前service是否在mServicesBinding之中,如果是則表明正在執行bindServiceAsUser操作,直接退出,否則就繼續執行bindServiceAsUser流程。調用bindServiceAsUser之前會在mServicesBinding中會添加標簽,當連接成功之後也就是onServiceConnected返回後,以及綁定失敗後會在mServicesBinding中刪除標簽。
google這樣設計的目的可能是為了避免同一個service多次啟動,因此在執行bindServiceAsUser之前就打上標簽,當處理完成之後(onServiceConnected回調)就刪掉這個標簽,表明這個service 綁定完成。但是,如果執行bindServiceAsUser之後,NotificationMonitor在onCreate或者onBind的時候crash了,也就是NotificationMonitor還沒有完成啟動,因此就不會去調用onServiceConnected方法,並最終導致不會調用 mServicesBinding.remove(servicesBindingTag)方法,從而使得NotificationMonitor的標簽被一致記錄在mServicesBinding中。那麼當下一次想再次注冊該服務的時候,系統發現該服務已經在mServicesBinding中了,所以直接return,後面的bindServiceAsUser就不會被調用了。
雖然代碼已經更新,但service無法正常啟動,那麼onNotificationPosted和onNotificationRemoved的回調自然就無法使用,此時的解決辦法就只能重啟手機,清空mServicesBinding的值。
總結
NotificationListenerService在系統通知獲取的流程中,自身並沒有啟動,而是起到了一個代理的作用,每一個繼承自NotificationListenerService的類,當系統通知變化後最終都會收到onNotificationPosted和onNotificationRemoved的回調。
bindService方法的返回與service是否成功啟動無關,因此才會導致NotificationListenerService失效。
最後再看一下整個NotificationListenerService的關系類圖:
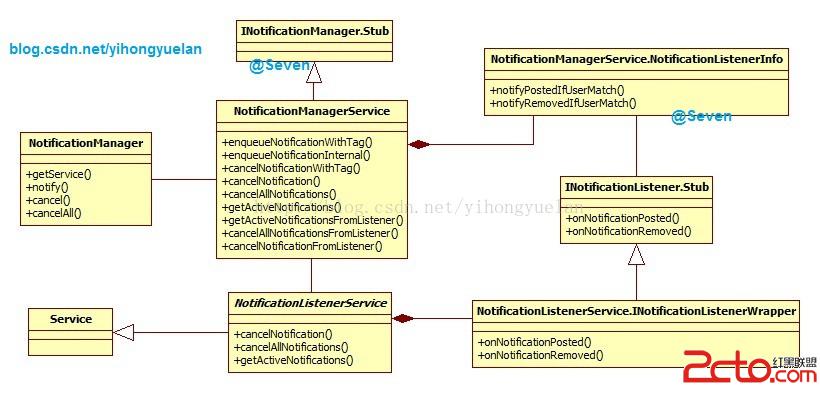
圖 7 NLS關系類圖
文中圖片資源,免積分下載:戳這裡
 Android - Earthquake(地震顯示器) 項目 詳解
Earthquake(地震顯示器) 項目 詳解 環境: Android Studio 0.5.2, Gradle 1.11, kindle f
 Android WebSocket協議
首先明確一下概念,WebSocket協議是一種建立在TCP連接基礎上的全雙工通信的協議。概念強調了兩點內容:TCP基礎上 全雙工通信那麼什麼是全雙工通信呢? 全雙工就是指
 (干貨) Android Volley框架源碼詳細解析
前言 經常接觸Android網絡編程的我們,對於Volley肯定不陌生,但我們不禁要問,對於Volley我們真的很了解嗎?Volley的內部是怎樣實現的?為什麼幾行代碼
 從搶紅包插件談AccessibilityService
微信紅包自打出世以來就極其受歡迎,搶紅包插件可謂紅極一時.今天,我們重新談談搶紅包插件的哪些事兒.本質上,搶紅包插件的原理不難理解,其過程就是在收到紅包時,自動模擬點擊.