在工作中,曾多次碰到ScrollView嵌套ListView的問題,網上的解決方法有很多種,但是雜而不全。我試過很多種方法,它們各有利弊。
在這裡我將會從使用ScrollView嵌套ListView結構的原因、這個結構碰到的問題、幾種解決方案和優缺點比較,這4個方面來為大家闡述、分析、總結。
實際上不光是ListView,其他繼承自AbsListView的類也適用,包括ExpandableListView、GridView等等,為了方便說明,以下均用ListView來代表。
一、 為什麼要使用ScrollView嵌套ListView的奇怪的結構
ScrollView和ListView都是滾動結構,按理說,這兩個控件在UI上的功能是一樣的,但是看看下面這個設計:
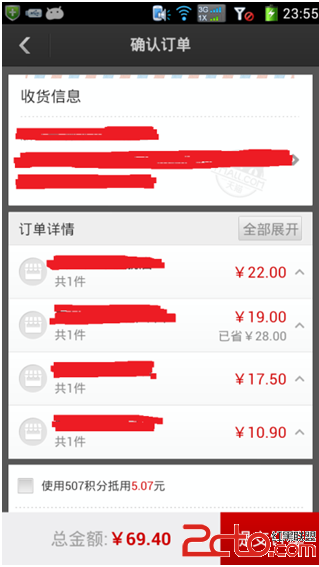
這是天貓商城的確認訂單的頁面,ScrollView中嵌套了ExpandableListView,ExpandableListView上面有固定的一些控件,下面也有固定的一些控件,整體又要能夠滾動。
列表數據要嵌在固定數據中間,並且作為整體一起滾動,有了這樣的設計需求,於是就有了ScrollView嵌套ListView的奇怪結構。
二、 ScrollView、ListView嵌套結構碰到的問題
不多說,直接看失敗例子:
-
-
-
android:id="@+id/act_solution_1_sv"
-
android:layout_width="fill_parent"
-
android:layout_height="fill_parent">
-
-
android:layout_width="fill_parent"
-
android:layout_height="wrap_content"
-
android:orientation="vertical">
-
-
android:layout_width="fill_parent"
-
android:layout_height="wrap_content"
-
android:text="\nListView上方數據\n" />
-
-
-
android:id="@+id/act_solution_1_lv"
-
android:layout_width="fill_parent"
-
android:layout_height="wrap_content">
-
-
-
-
-
android:layout_width="fill_parent"
-
android:layout_height="wrap_content"
-
android:text="\nListView下方數據\n" />
-
-
復制代碼
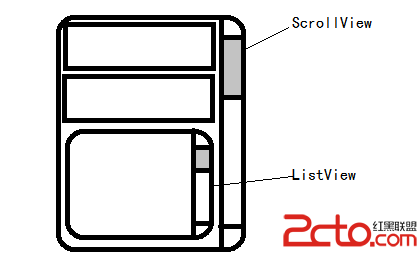
ScrollView中只能放一個控件,一般都放LinearLayout,orientation屬性值為vertical。在LinearLayout中放需要呈現的內容。ListView也在其中,ListView的高度設為適應自身內容(wrap_content)。粗略一看,應該沒有什麼問題。但是看下面的實際效果圖:
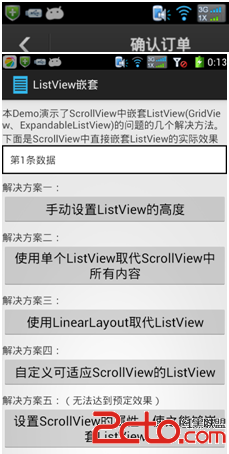 圖中黑框的部分就是ListView,裡面放了20條數據,但是卻只顯示了1條。
控件的屬性設置上沒有問題,但是為什麼沒有按照我的想法走呢?
看看下面這個圖:
是否有點明白了呢?原因就是scroll事件的消費處理以及ListView控件的高度設定問題。
雖然我看源碼也看了不少,但是要說出來卻不知到該怎麼下手,我是大概知道原因,但是不知道怎麼整理完全。求高手賜教…
三、問題解決方案
1、手動設置ListView高度
經過測試發現,在xml中直接指定ListView的高度,是可以解決這個問題的,但是ListView中的數據是可變的,實際高度還需要實際測量。於是手動代碼設置ListView高度的方法就誕生了。
-
/**
-
* 動態設置ListView的高度
-
* @param listView
-
*/
-
public static void setListViewHeightBasedOnChildren(ListView listView) {
-
if(listView == null) return;
-
-
ListAdapter listAdapter = listView.getAdapter();
-
if (listAdapter == null) {
-
// pre-condition
-
return;
-
}
-
-
int totalHeight = 0;
-
for (int i = 0; i < listAdapter.getCount(); i++) {
-
View listItem = listAdapter.getView(i, null, listView);
-
listItem.measure(0, 0);
-
totalHeight += listItem.getMeasuredHeight();
-
}
-
-
ViewGroup.LayoutParams params = listView.getLayoutParams();
-
params.height = totalHeight + (listView.getDividerHeight() * (listAdapter.getCount() - 1));
-
listView.setLayoutParams(params);
-
}
復制代碼
上面這個方法就是設定ListView的高度了,在為ListView設置了Adapter之後使用,就可以解決問題了。
但是這個方法有個兩個細節需要注意:
一是Adapter中getView方法返回的View的必須由LinearLayout組成,因為只有LinearLayout才有measure()方法,如果使用其他的布局如RelativeLayout,在調用listItem.measure(0, 0);時就會拋異常,因為除LinearLayout外的其他布局的這個方法就是直接拋異常的,沒理由…。我最初使用的就是這個方法,但是因為子控件的頂層布局是RelativeLayout,所以一直報錯,不得不放棄這個方法。
二是需要手動把ScrollView滾動至最頂端,因為使用這個方法的話,默認在ScrollView頂端的項是ListView,具體原因不了解,求大神解答…可以在Activity中設置:
-
sv = (ScrollView) findViewById(R.id.act_solution_1_sv);
復制代碼
2、使用單個ListView取代ScrollView中所有內容
這個方法是我在試了幾個方法都失敗的情況下自己琢磨出來的。
用一張圖來解釋這個方法的思想:
 vcr9vt2jrLa81/fOqs/WTGlzdFZpZXe1xNK7uPZpdGVtVmlld6Osus3UrUxpc3RWaWV31tC1xLWlzPXK/b7dysfGvby2tcS52M+1oaM8YnI+CiAgICB4bWyyvL7Wt73D5squt9a88rWlo7o8YnI+CgoKCjxvbD4KPGxpPgo8TGlzdFZpZXcgPGJyPgo8bGk+CiAgICBhbmRyb2lkOmlkPQ=="@+id/act_solution_2_lv"
-
android:layout_width="fill_parent"
-
android:layout_height="wrap_content">
-
-
-
復制代碼
一個單獨的ListView就可以了。
原ListView上方數據和下方數據,都寫進兩個xml布局文件中:

Java代碼方面,需要自定義一個Adapter,在Adapter中的getView方法中進行position值的判斷,根據position值來決定inflate哪個布局:
-
public View getView(int position, View convertView, ViewGroup parent) {
-
//列表第一項
-
if(position == 0){
-
convertView = inflater.inflate(R.layout.item_solution2_top, null);
-
return convertView;
-
}
-
//列表最後一項
-
else if(position == 21){
-
convertView = inflater.inflate(R.layout.item_solution2_bottom, null);
-
return convertView;
-
}
-
-
//普通列表項
-
ViewHolder h = null;
-
if(convertView == null "| convertView.getTag() == null){
-
convertView = inflater.inflate(R.layout.item_listview_data, null);
-
h = new ViewHolder();
-
h.tv = (TextView) convertView.findViewById(R.id.item_listview_data_tv);
-
convertView.setTag(h);
-
}else{
-
h = (ViewHolder) convertView.getTag();
-
}
-
-
h.tv.setText("第"+ position + "條數據");
-
-
return convertView;
-
}
-
復制代碼
在Activty中,只需要直接為ListView設置自定義的Adapter就行了。
-
lv = (ListView) findViewById(R.id.act_solution_2_lv);
-
adapter = new AdapterForListView2(this);
-
lv.setAdapter(adapter);
-
復制代碼
3、使用LinearLayout取代ListView
既然ListView不能適應ScrollView,那就換一個可以適應ScrollView的控件,干嘛非要吊死在ListView這一棵樹上呢?而LinearLayout是最好的選擇。但如果我仍想繼續使用已經定義好的Adater呢?我們只需要自定義一個類繼承自LinearLayout,為其加上對BaseAdapter的適配。
-
import android.content.Context;
-
import android.util.AttributeSet;
-
import android.util.Log;
-
import android.view.View;
-
import android.widget.BaseAdapter;
-
import android.widget.LinearLayout;
-
-
/**
-
* 取代ListView的LinearLayout,使之能夠成功嵌套在ScrollView中
-
* @author terry_龍
-
*/
-
public class LinearLayoutForListView extends LinearLayout {
-
-
private BaseAdapter adapter;
-
private OnClickListener onClickListener = null;
-
-
/**
-
* 綁定布局
-
*/
-
public void bindLinearLayout() {
-
int count = adapter.getCount();
-
this.removeAllViews();
-
for (int i = 0; i < count; i++) {
-
View v = adapter.getView(i, null, null);
-
-
v.setOnClickListener(this.onClickListener);
-
addView(v, i);
-
}
-
Log.v("countTAG", "" + count);
-
}
-
-
public LinearLayoutForListView(Context context) {
-
super(context);
復制代碼
上面的代碼拷貝保存為LinearLayoutForListView.class,或者直接拷貝Demo中的這個類在自己的工程裡。我們只需要把原來xml布局文件中的ListView替換為這個類就行了:
-
-
android:id="@+id/act_solution_3_mylinearlayout"
-
android:layout_width="fill_parent"
-
android:layout_height="wrap_content"
-
android:orientation="vertical" >
-
-
復制代碼
在Activity中也把ListView改成LinearLayoutForListView,就能成功運行了。
-
mylinearlayout = (LinearLayoutForListView) findViewById(R.id.act_solution_3_mylinearlayout);
-
adapter = new AdapterForListView(this);
-
mylinearlayout.setAdapter(adapter);
-
復制代碼
4、自定義可適應ScrollView的ListView
這個方法和上面的方法是異曲同工,方法3是自定義了LinearLayout以取代ListView的功能,但如果我脾氣就是倔,就是要用ListView怎麼辦?那就只好自定義一個類繼承自ListView,通過重寫其onMeasure方法,達到對ScrollView適配的效果。
下面是繼承了ListView的自定義類:
-
import android.content.Context;
-
import android.util.AttributeSet;
-
import android.widget.ListView;
-
-
public class ListViewForScrollView extends ListView {
-
public ListViewForScrollView(Context context) {
-
super(context);
-
}
-
-
public ListViewForScrollView(Context context, AttributeSet attrs) {
-
super(context, attrs);
-
}
-
-
public ListViewForScrollView(Context context, AttributeSet attrs,
-
int defStyle) {
-
super(context, attrs, defStyle);
-
}
-
-
@Override
-
/**
-
* 重寫該方法,達到使ListView適應ScrollView的效果
-
*/
-
protected void onMeasure(int widthMeasureSpec, int heightMeasureSpec) {
-
int expandSpec = MeasureSpec.makeMeasureSpec(Integer.MAX_VALUE >> 2,
-
MeasureSpec.AT_MOST);
-
super.onMeasure(widthMeasureSpec, expandSpec);
-
}
-
}
-
復制代碼
三個構造方法完全不用動,只要重寫onMeasure方法,需要改動的地方比起方法3少了不是一點半點…
在xml布局中和Activty中使用的ListView改成這個自定義ListView就行了。代碼就省了吧…
這個方法和方法1有一個同樣的毛病,就是默認顯示的首項是ListView,需要手動把ScrollView滾動至最頂端。
-
sv = (ScrollView) findViewById(R.id.act_solution_4_sv);
-
sv.smoothScrollTo(0, 0);
-
復制代碼
5、設置ScrollView的屬性,使ListView能夠成功嵌套(無法達到預定效果)
這個方法是我在寫Demo的時候找到的,第一反應是有這個方法我還寫這個Demo干嘛,只要在布局文件中添加一個屬性就搞定了。不過結果確實是ListView的大小把ScrollView的剩余部分填滿了,但卻不能滾動,真是個致命的問題…
不廢話了,布局文件中:
-
-
android:id="@+id/act_solution_5_sv"
-
android:layout_width="fill_parent"
-
android:layout_height="fill_parent"
-
android:layout_below="@+id/act_solution_5_vg_top"
-
android:fillViewport="true">
-
復制代碼
設置fillViewport的屬性為true即可。簡單吧?
但是不能滾動這個致命的問題我卻不知道該怎麼解決了,繼續求大神解答…
四、幾種種方法的優缺點比較
上面一共給出了4中親測可用的方法,各自有使用條件,復雜程度也各不相同。
下面我來從幾個方面來分析幾種方法的優勢和劣勢。
方法1的優點是不用對使用的控件做任何修改,只需要使用一個現成的方法就好了,而最大的限制是ListView的item只能由LinearLayout這一個布局組成,對於一些復雜的布局就不適用了。如果你的工程急需解決這個問題,而且滿足方法的使用條件,即ListView的item布局簡單,完全有LinearLayout組成,你就只需要把setListViewHeightBasedOnChildren方法拿過去就行了。
方法2的優點是布局文件設計簡單、Activity中的代碼也很少,而缺點卻是自定義Adapter變得十分復雜,而且執行效率會變低,因為findViewById是十分費時的操作,而使用ViewHolder結構可以解決費時的問題(有興趣的童鞋可以去搜一艘ViewHolder結構),然而使用了方法2的話,會破壞這種結構。如果你的工程設計上偏簡單,ListView子項相對少、ListView上下方數據少、子項間交互少的話,可以嘗試一下。
方法3的優點是完全解決了ScrollView嵌套ListView的問題,同時代碼較少,你甚至可以直接使用LinearLayout,而在Activity中手動為LinearLayout添加子項控件,不過需要注意的是,在添加前需要調用其removeAllViews的方法,否則可能會出現預想不到的事情,那時你會想念天國的ListView的。缺點不是很明顯,但還是有兩個:一是使用的不是系統控件,不能在xml布局的Graphical Layout視圖中直接看到效果;二是不能向ListView那樣可以使用ViewHolder結構,在加載大量子項時會費很多時間在findViewById中。如果你的列表數據比較少的話,不妨試試這個方法,除了不能使用ViewHolder結構,使用方法幾乎和ListView一樣。
方法4…比方法3更簡單,代碼更少,同時保留了ListView原有的所有方法,包括notifyDataSetChanged方法,相比其他方法是最趨近於完美的方法,只是需要在Activity中設定ScrollView滾動至頂端。如果你還在猶豫不決的話就選這個方法吧,我想我以後是只會用這個方法了…
 Android RxJava使用介紹(二) RxJava的操作符上
 Android支付開發(微信)
 Android應用Preference相關及源碼淺析(Preference組件家族篇)
 Android應用中加入微信分享簡單方法