編輯:關於Android編程
public interface SensorEventListener {

    /**
     * Called when sensor values have changed.
     * See {@link android.hardware.SensorManager SensorManager}
     * for details on possible sensor types.
     * See also {@link android.hardware.SensorEvent SensorEvent}.
     *
     * NOTE: The application doesn't own the
     * {@link android.hardware.SensorEvent event}
     * object passed as a parameter and therefore cannot hold on to it.
     * The object may be part of an internal pool and may be reused by
     * the framework.
     *
     * @param event the {@link android.hardware.SensorEvent SensorEvent}.
     */
    public void onSensorChanged(SensorEvent event);

    /**
     * Called when the accuracy of a sensor has changed.
     * See {@link android.hardware.SensorManager SensorManager}
     * for details.
     *
     * @param accuracy The new accuracy of this sensor
     */
    public void onAccuracyChanged(Sensor sensor, int accuracy);
}
import android.app.Activity;
import android.app.Service;
import android.os.Vibrator;

public class VibratorHelper {
	public static void Vibrate(final Activity activity, long milliseconds) {
		Vibrator vibrator = (Vibrator) activity
				.getSystemService(Service.VIBRATOR_SERVICE);
		vibrator.vibrate(milliseconds);
	}

	public static void Vibrate(final Activity activity, long[] pattern,
			boolean isRepeat) {
		Vibrator vibrator = (Vibrator) activity
				.getSystemService(Service.VIBRATOR_SERVICE);
		vibrator.vibrate(pattern, isRepeat ? 1 : -1);
	}
}
同時,還需要在AndroidManifest.xml裡增加振動權限:
解釋一下Vibrate方法的參數: 1. long milliseconds:振動的時長,單位是毫秒。 2. long[] pattern:自定義振動模式。數組中數字的含義依次是[靜止時長, 振動時長, 靜止時長, 振動時長, ......]。振動時長的單位是毫秒。 3. repeat:是否重復振動,1為重復,-1為只振動一次。
import android.app.Activity;
import android.app.AlertDialog;
import android.content.Context;
import android.content.DialogInterface;
import android.content.DialogInterface.OnClickListener;
import android.hardware.Sensor;
import android.hardware.SensorEvent;
import android.hardware.SensorEventListener;
import android.hardware.SensorManager;
import android.os.Bundle;
import android.util.Log;
import android.widget.Toast;
public class MainActivity extends Activity {
private SensorManager sensorManager;
private SensorEventListener shakeListener;
private AlertDialog.Builder dialogBuilder;
private boolean isRefresh = false;
@Override
protected void onCreate(Bundle savedInstanceState) {
super.onCreate(savedInstanceState);
setContentView(R.layout.activity_main);
sensorManager = (SensorManager) getSystemService(Context.SENSOR_SERVICE);
shakeListener = new ShakeSensorListener();
dialogBuilder = new AlertDialog.Builder(this);
dialogBuilder.setPositiveButton("確定", new OnClickListener() {
@Override
public void onClick(DialogInterface dialog, int which) {
isRefresh = false;
dialog.cancel();
}
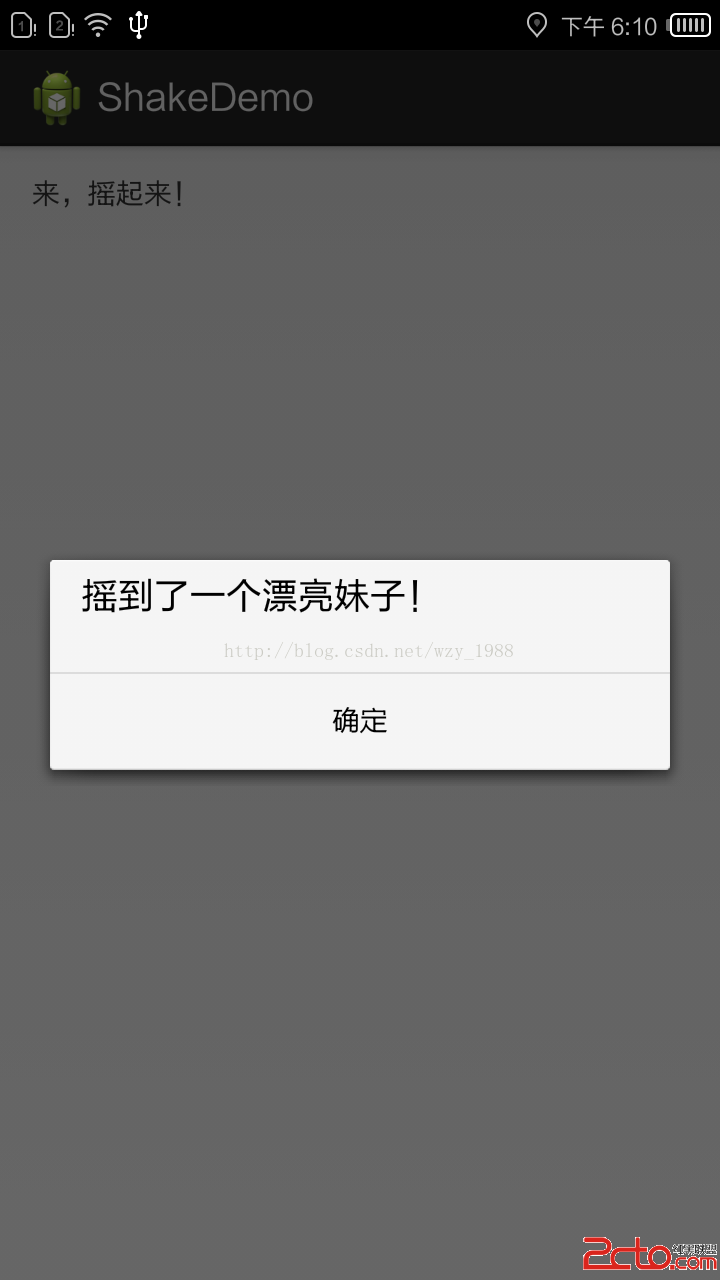
}).setMessage("搖到了一個漂亮妹子!").create();
}
@Override
protected void onResume() {
sensorManager.registerListener(shakeListener,
sensorManager.getDefaultSensor(Sensor.TYPE_ACCELEROMETER),
SensorManager.SENSOR_DELAY_FASTEST);
super.onResume();
}
@Override
protected void onPause() {
// acitivity後台時取消監聽
sensorManager.unregisterListener(shakeListener);
super.onPause();
}
private class ShakeSensorListener implements SensorEventListener {
private static final int ACCELERATE_VALUE = 20;
@Override
public void onSensorChanged(SensorEvent event) {
// Log.e("zhengyi.wzy", "type is :" + event.sensor.getType());
// 判斷是否處於刷新狀態(例如微信中的查找附近人)
if (isRefresh) {
return;
}
float[] values = event.values;
/**
* 一般在這三個方向的重力加速度達到20就達到了搖晃手機的狀態 x : x軸方向的重力加速度,向右為正 y :
* y軸方向的重力加速度,向前為正 z : z軸方向的重力加速度,向上為正
*/
float x = Math.abs(values[0]);
float y = Math.abs(values[1]);
float z = Math.abs(values[2]);
Log.e("zhengyi.wzy", "x is :" + x + " y is :" + y + " z is :" + z);
if (x >= ACCELERATE_VALUE || y >= ACCELERATE_VALUE
|| z >= ACCELERATE_VALUE) {
Toast.makeText(
MainActivity.this,
"accelerate speed :"
+ (x >= ACCELERATE_VALUE ? x
: y >= ACCELERATE_VALUE ? y : z),
Toast.LENGTH_SHORT).show();
VibratorHelper.Vibrate(MainActivity.this, 300);
isRefresh = true;
dialogBuilder.show();
}
}
@Override
public void onAccuracyChanged(Sensor sensor, int accuracy) {
// TODO Auto-generated method stub
}
}
}
 Android初級教程:RatingBar的使用
記得淘寶裡面買家給賣家評分的時候會有一個星星狀的評分條,其實就是基於RatingBar做了自定義使用了。那麼本篇文章就對RatingBar的使用做一個基本的認識。接下來就
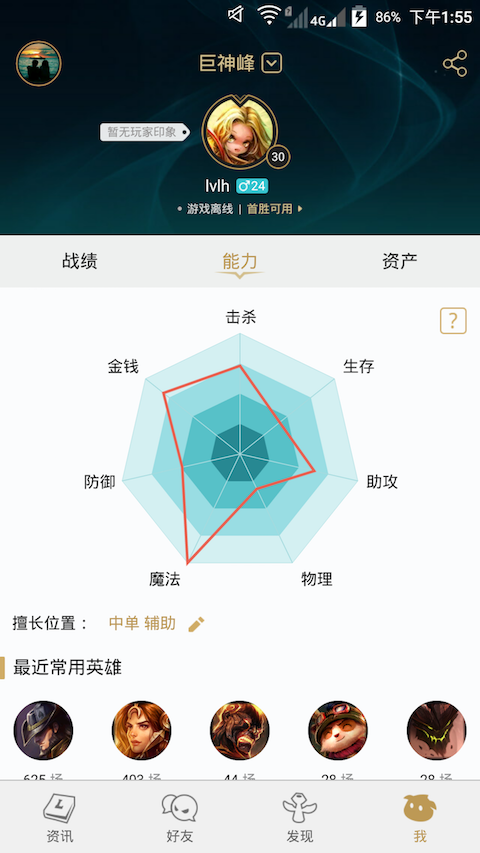 android開發自定義View(四)仿掌上英雄聯盟能力值分析效果
原始圖效果 模仿效果PNGGIF 流程繪制中心線,用於計算外層多邊形各點的坐標 繪制最外層多邊形 分析原型圖算出每個多邊形之間的間距 繪制裡三層多邊形
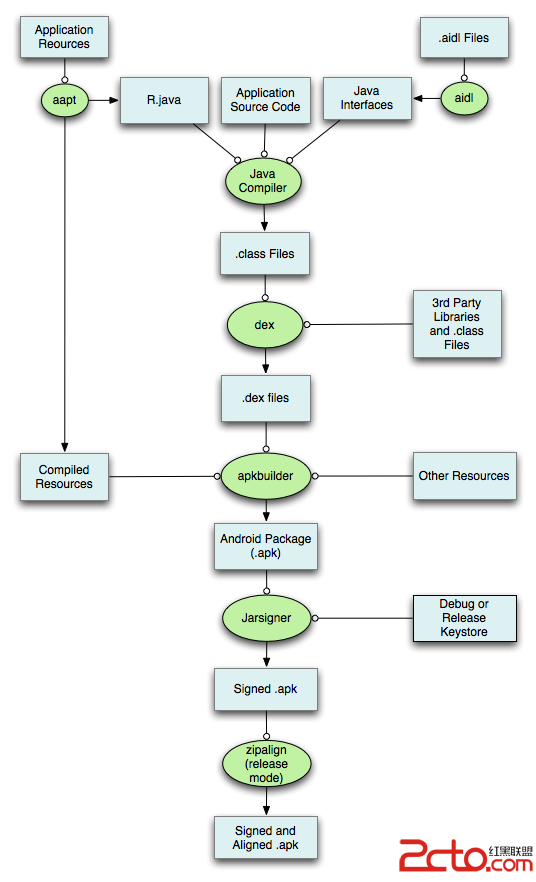 關於 Android Dex 方法限制的一些總結
Android的編譯過程 在了解這個問題之前我們先要來看看Android 應用編譯的過程: IDE中的資源打包工具 (Android As
 使用ViewPager實現android軟件使用向導功能實現步驟
首先需要一個布局文件,是FlameLayout組成的,裡面包含了一個ViewPager和一個RelativeLayout,RelativeLayout裡面是一個Linea