編輯:關於Android編程

  /**
     * Set the scrolled position of your view. This will cause a call to
     * {@link #onScrollChanged(int, int, int, int)} and the view will be
     * invalidated.
     * @param x the x position to scroll to
     * @param y the y position to scroll to
     */
    public void scrollTo(int x, int y) {
        if (mScrollX != x || mScrollY != y) {
            int oldX = mScrollX;
            int oldY = mScrollY;
            mScrollX = x;
            mScrollY = y;
            invalidateParentCaches();
            onScrollChanged(mScrollX, mScrollY, oldX, oldY);
            if (!awakenScrollBars()) {
                postInvalidateOnAnimation();
            }
        }
    }
還有一個是
   /**
     * Move the scrolled position of your view. This will cause a call to
     * {@link #onScrollChanged(int, int, int, int)} and the view will be
     * invalidated.
     * @param x the amount of pixels to scroll by horizontally
     * @param y the amount of pixels to scroll by vertically
     */
    public void scrollBy(int x, int y) {
        scrollTo(mScrollX + x, mScrollY + y);
    }
我們仔細的來解讀一下上面的函數。這個源碼我是摘自5.0的源碼。我們看到ScrollBy這個函數也是調用的ScrollTo我們就來分析一下ScrollTo這個函數到底做了什麼工作?很簡單的幾句代碼,最重要的一句就是這一句 postInvalidateOnAnimation();這一句代碼會去回調我們的ondraw函數,在ondraw函數裡面繪制我們的可見區域,然後我們在來看看VIew的draw的方法
  * Manually render this view (and all of its children) to the given Canvas.
     * The view must have already done a full layout before this function is
     * called.  When implementing a view, implement
     * {@link #onDraw(android.graphics.Canvas)} instead of overriding this method.
     * If you do need to override this method, call the superclass version.
     *
     * @param canvas The Canvas to which the View is rendered.
     */
    public void draw(Canvas canvas) {
        if (mClipBounds != null) {
            canvas.clipRect(mClipBounds);
        }
        final int privateFlags = mPrivateFlags;
        final boolean dirtyOpaque = (privateFlags & PFLAG_DIRTY_MASK) == PFLAG_DIRTY_OPAQUE &&
                (mAttachInfo == null || !mAttachInfo.mIgnoreDirtyState);
        mPrivateFlags = (privateFlags & ~PFLAG_DIRTY_MASK) | PFLAG_DRAWN;

        /*
         * Draw traversal performs several drawing steps which must be executed
         * in the appropriate order:
         *
         *      1. Draw the background
         *      2. If necessary, save the canvas' layers to prepare for fading
         *      3. Draw view's content
         *      4. Draw children
         *      5. If necessary, draw the fading edges and restore layers
         *      6. Draw decorations (scrollbars for instance)
         */

        // Step 1, draw the background, if needed
        int saveCount;

        if (!dirtyOpaque) {
            final Drawable background = mBackground;
            if (background != null) {
                final int scrollX = mScrollX;
                final int scrollY = mScrollY;

                if (mBackgroundSizeChanged) {
                    background.setBounds(0, 0,  mRight - mLeft, mBottom - mTop);
                    mBackgroundSizeChanged = false;
                }

                if ((scrollX | scrollY) == 0) {
                    background.draw(canvas);
                } else {
                    canvas.translate(scrollX, scrollY);
                    background.draw(canvas);
                    canvas.translate(-scrollX, -scrollY);
                }
            }
        }

        // skip step 2 & 5 if possible (common case)
        final int viewFlags = mViewFlags;
        boolean horizontalEdges = (viewFlags & FADING_EDGE_HORIZONTAL) != 0;
        boolean verticalEdges = (viewFlags & FADING_EDGE_VERTICAL) != 0;
        if (!verticalEdges && !horizontalEdges) {
            // Step 3, draw the content
            if (!dirtyOpaque) onDraw(canvas);

            // Step 4, draw the children
            dispatchDraw(canvas);

            // Step 6, draw decorations (scrollbars)
            onDrawScrollBars(canvas);

            if (mOverlay != null && !mOverlay.isEmpty()) {
                mOverlay.getOverlayView().dispatchDraw(canvas);
            }

            // we're done...
            return;
        }

        /*
         * Here we do the full fledged routine...
         * (this is an uncommon case where speed matters less,
         * this is why we repeat some of the tests that have been
         * done above)
         */

        boolean drawTop = false;
        boolean drawBottom = false;
        boolean drawLeft = false;
        boolean drawRight = false;

        float topFadeStrength = 0.0f;
        float bottomFadeStrength = 0.0f;
        float leftFadeStrength = 0.0f;
        float rightFadeStrength = 0.0f;

        // Step 2, save the canvas' layers
        int paddingLeft = mPaddingLeft;

        final boolean offsetRequired = isPaddingOffsetRequired();
        if (offsetRequired) {
            paddingLeft += getLeftPaddingOffset();
        }

        int left = mScrollX + paddingLeft;
        int right = left + mRight - mLeft - mPaddingRight - paddingLeft;
        int top = mScrollY + getFadeTop(offsetRequired);
        int bottom = top + getFadeHeight(offsetRequired);

        if (offsetRequired) {
            right += getRightPaddingOffset();
            bottom += getBottomPaddingOffset();
        }

        final ScrollabilityCache scrollabilityCache = mScrollCache;
        final float fadeHeight = scrollabilityCache.fadingEdgeLength;
        int length = (int) fadeHeight;

        // clip the fade length if top and bottom fades overlap
        // overlapping fades produce odd-looking artifacts
        if (verticalEdges && (top + length > bottom - length)) {
            length = (bottom - top) / 2;
        }

        // also clip horizontal fades if necessary
        if (horizontalEdges && (left + length > right - length)) {
            length = (right - left) / 2;
        }

        if (verticalEdges) {
            topFadeStrength = Math.max(0.0f, Math.min(1.0f, getTopFadingEdgeStrength()));
            drawTop = topFadeStrength * fadeHeight > 1.0f;
            bottomFadeStrength = Math.max(0.0f, Math.min(1.0f, getBottomFadingEdgeStrength()));
            drawBottom = bottomFadeStrength * fadeHeight > 1.0f;
        }

        if (horizontalEdges) {
            leftFadeStrength = Math.max(0.0f, Math.min(1.0f, getLeftFadingEdgeStrength()));
            drawLeft = leftFadeStrength * fadeHeight > 1.0f;
            rightFadeStrength = Math.max(0.0f, Math.min(1.0f, getRightFadingEdgeStrength()));
            drawRight = rightFadeStrength * fadeHeight > 1.0f;
        }

        saveCount = canvas.getSaveCount();

        int solidColor = getSolidColor();
        if (solidColor == 0) {
            final int flags = Canvas.HAS_ALPHA_LAYER_SAVE_FLAG;

            if (drawTop) {
                canvas.saveLayer(left, top, right, top + length, null, flags);
            }

            if (drawBottom) {
                canvas.saveLayer(left, bottom - length, right, bottom, null, flags);
            }

            if (drawLeft) {
                canvas.saveLayer(left, top, left + length, bottom, null, flags);
            }

            if (drawRight) {
                canvas.saveLayer(right - length, top, right, bottom, null, flags);
            }
        } else {
            scrollabilityCache.setFadeColor(solidColor);
        }

        // Step 3, draw the content
        if (!dirtyOpaque) onDraw(canvas);

        // Step 4, draw the children
        dispatchDraw(canvas);

        // Step 5, draw the fade effect and restore layers
        final Paint p = scrollabilityCache.paint;
        final Matrix matrix = scrollabilityCache.matrix;
        final Shader fade = scrollabilityCache.shader;

        if (drawTop) {
            matrix.setScale(1, fadeHeight * topFadeStrength);
            matrix.postTranslate(left, top);
            fade.setLocalMatrix(matrix);
            canvas.drawRect(left, top, right, top + length, p);
        }

        if (drawBottom) {
            matrix.setScale(1, fadeHeight * bottomFadeStrength);
            matrix.postRotate(180);
            matrix.postTranslate(left, bottom);
            fade.setLocalMatrix(matrix);
            canvas.drawRect(left, bottom - length, right, bottom, p);
        }

        if (drawLeft) {
            matrix.setScale(1, fadeHeight * leftFadeStrength);
            matrix.postRotate(-90);
            matrix.postTranslate(left, top);
            fade.setLocalMatrix(matrix);
            canvas.drawRect(left, top, left + length, bottom, p);
        }

        if (drawRight) {
            matrix.setScale(1, fadeHeight * rightFadeStrength);
            matrix.postRotate(90);
            matrix.postTranslate(right, top);
            fade.setLocalMatrix(matrix);
            canvas.drawRect(right - length, top, right, bottom, p);
        }

        canvas.restoreToCount(saveCount);

        // Step 6, draw decorations (scrollbars)
        onDrawScrollBars(canvas);

        if (mOverlay != null && !mOverlay.isEmpty()) {
            mOverlay.getOverlayView().dispatchDraw(canvas);
        }
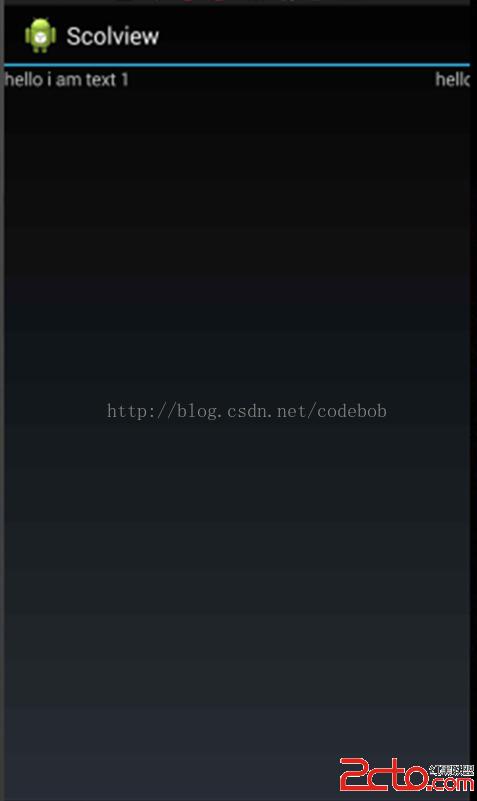
} LinearLayout linearLayout = new LinearLayout(this);
linearLayout.setLayoutParams(new LayoutParams(2000, 2000));//這裡我把寬高設置大點好做測試因為我的手機是1920*1080所以設置得大一點
linearLayout.setOrientation(LinearLayout.HORIZONTAL);
TextView textView1 = new TextView(this);
textView1.setText("hello i am text 1");
textView1.setLayoutParams(new LayoutParams(1000, 2000));
linearLayout.addView(textView1);
TextView textView2 = new TextView(this);
textView2.setText("hello i am text 2");
textView2.setLayoutParams(new LayoutParams(1000, 2000));
linearLayout.addView(textView2);
setContentView(linearLayout); 可以很清晰的看到我們的TextView2沒有顯示出來,這裡也就很明了了,因為超出了屏幕,然後我們重新加一句代碼。
LinearLayout linearLayout = new LinearLayout(this);
		linearLayout.setLayoutParams(new LayoutParams(2000, 2000));//這裡我把寬高設置大點好做測試因為我的手機是1920*1080所以設置得大一點
		linearLayout.setOrientation(LinearLayout.HORIZONTAL);
		TextView textView1 = new TextView(this);
		textView1.setText("hello i am text 1");
		textView1.setLayoutParams(new LayoutParams(1000, 2000));
		linearLayout.addView(textView1);
		TextView textView2 = new TextView(this);
		textView2.setText("hello i am text 2");
		textView2.setLayoutParams(new LayoutParams(1000, 2000));
		linearLayout.addView(textView2);
		linearLayout.scrollTo(1000, 0);//我們加了這一句代碼
		setContentView(linearLayout);
可以看到text2顯示完全了,這也很明顯因為我們把視圖向左滾動了。在後面講的UI控件的系列教程這兩個scrollTo和scrollBy函數用得很頻繁,所以這裡從源頭把它給分析了一次,幫助我們後面好理解。
 Android 高仿微信實時聊天 基於百度雲推送
一直在仿微信界面,今天終於有幸利用百度雲推送仿一仿微信聊天了~~~ 首先特別感謝:weidi1989分享的Android之基於百度雲推送IM ,大家可以直接
 Android自定義View基礎開發之圖片加載進度條
學會了Paint,Canvas的基本用法之後,我們就可以動手開始實踐了,先寫個簡單的圖片加載進度條看看。 按照慣例,先看效果圖,再決定要不要往下看:既然看到這裡了,應該是
 關於Android端配置極光推送
因為業務需要,android客戶端需要加推送,原來采用的百度推送,但是小米手機有時候收不到,後來換成了極光推送,極光的話所有設備都能收到推送,但是在高峰的時候會推遲,博主
 android 在有 簽名文件的情況下,找回 password 和 alias
哈哈,這種需求我也是醉了。今天有個搞ios的朋友(以前公司同事,現在是Leader)問我他們公司安卓要做版本升級,然後簽名文件有但是password 和 alias忘記