編輯:關於Android編程
使用SharedPreferences
File存儲
SQLite數據庫
使用SharedPreferences
1.1 SharedPreferences與Editor簡介
應用程序有少量的數據需要保存,而且這些數據的格式很簡單,都是普通的字符串、標量類型的值等,比如應用程序的各種配置信息,對於這種數據,Android提供了SharedPreferences。
SharedPreferences保存的數據主要是類似於配置信息格式的數據,因此它保存的數據主要是簡單類型的key-value對。 SharedPreferences接口主要負責讀取應用程序的Preferences數據,它提供了如下常方法來訪問SharedPreferences中的key-value對。
boolean contains(String key):判斷SharedPreferences是否包含特定key的數據。
abstract Map
boolean getXxx(String key,xxx defValue):獲取SharedPreferences數據裡指定的key對應的value。如果key值不存在,返回默認值defValue。其中xxx可以是boolean、float、int、long、String等各種基本類型的值。
SharedPreferences接口本身並沒有提供寫入數據的能力,而是通過SharedPreferences的內部接口, SharedPreferences調用edit()方法即可獲取它所對應的Editor對象,提供了如下方法向SharedPreferences寫入數據。
SharedPreferences.Editor clear():清空SharedPreferences裡所有數據。
SharedPreferences.Editor putXxx(String key, xxx value):向SharedPreferences存入指定key對應的數據。其中xxx可以是boolean、float、int、long、String等各種基本類型的值。
SharedPreferences.Editor remove(String key):刪除SharedPreferences裡指定的key對應的數據項。
boolean commit() :當Editor編輯完成後,調用該方法提交修改。
SharedPreferences是一個接口,程序無法直接創建其實例,只能通過Context提供的getSharedPreferences(String name,int mode) 方法來獲取SharedPreferences實例。該方法的第二個參數支持如下幾個值。
Context.MODE_PRIVATE:指定SharedPreferences數據只能被本應用程序讀、寫。
Context.MODE_WORLD_READABLE:指定SharedPreferences數據能被其他應用程讀,但不能寫。
Context.MODE_WORLD_WRITEABLE:指定SharedPreferences數據能被其他應用程讀、寫。
例:SharedPreferences的存儲位置和格式:
SharedPreferencesDemo.java
public class SharedPreferencesDemo extends Activity
{
	SharedPreferences preferences;
	SharedPreferences.Editor editor;

	@Override
	public void onCreate(Bundle savedInstanceState)
	{
		super.onCreate(savedInstanceState);
		setContentView(R.layout.main);
		// 獲取只能被本應用程序讀、寫的SharedPreferences對象
		preferences = getSharedPreferences("hello", MODE_WORLD_READABLE);
		editor = preferences.edit();
		Button read = (Button) findViewById(R.id.read);
		Button write = (Button) findViewById(R.id.write);
		read.setOnClickListener(new OnClickListener()
		{
			@Override
			public void onClick(View arg0)
			{
				//讀取字符串數據
				String time = preferences.getString("time", null);
				//讀取int類型的數據
				int randNum = preferences.getInt("random", 0);
				String result = time == null ? "您暫時還未寫入數據"
					: "寫入時間為:" + time
					+ "\n上次生成的隨機數為:" + randNum;
				//使用Toast提示信息
				Toast.makeText(SharedPreferencesTest.this ,
					result , 5000)
					.show();
			}
		});
		write.setOnClickListener(new OnClickListener()
		{
			@Override
			public void onClick(View arg0)
			{
				SimpleDateFormat sdf = new SimpleDateFormat("yyyy年MM月dd日 "
					+ "hh:mm:ss");
				// 存入當前時間
				editor.putString("time", sdf.format(new Date()));
				// 存入一個隨機數
				editor.putInt("random", (int) (Math.random() * 100));
				// 提交所有存入的數據
				editor.commit();
			}
		});
	}
}
運行程序後,點擊“寫入數據”,程序將完成SharedPreferences寫入寫入完成後,打開DDMS的File Explorer面板,SharedPreferences數據保存在/data/datta/com.whq/shared_prefs目錄下, SharedPreferences數據是以XML格式保存。
1.2 要讀、寫其他應用的SharedPreferences
要讀、寫其他應用的SharedPreferences,前提是創建該SharedPreferences的應用程序指定相應的訪問權限,例如指定了MODE_WORLD_READABLE,這表明該SharedPreferences可被其他應用程序讀取;指定MODE_WORLD_WRITEABLE,這表明該SharedPreferences可被其他程序寫入。
為了讀取其他程序的SharedPreferences,可按如下步驟進行。
需要創建其他程序對應的Context。
調用其他應用程序的Context的getSharedPreferences(String name,int mode) 即可獲取相應的SharedPreferences對象。
如果需要向其他應用的SharedPreferences數據寫入數據,調用SharedPreferences的edit()方法獲取相應的Editor即可。
例:讀取其他應用程序的SharedPreferences數據:
UseCount .java
package com.Xxx;
public class UseCount extends Activity
{
	SharedPreferences preferences;
	@Override
	public void onCreate(Bundle savedInstanceState)
	{
		super.onCreate(savedInstanceState);
		setContentView(R.layout.main);
		preferences = getSharedPreferences("count", MODE_WORLD_READABLE);
		//讀取SharedPreferences裡的count數據
		int count = preferences.getInt("count" , 0);
		//顯示程序以前使用的次數
		Toast.makeText(this ,
			"程序以前被使用了" + count + "次。", 10000)
			.show();
		Editor editor = preferences.edit();
		//存入數據
		editor.putInt("count" , ++count);
		//提交修改
		editor.commit();
	}
}
ReadOtherPreferences.java
public class ReadOtherPreferences extends Activity
{
	Context useCount;
	@Override
	public void onCreate(Bundle savedInstanceState)
	{
		super.onCreate(savedInstanceState);
		setContentView(R.layout.main);
		//Context useCount = null;
		try
		{
		   // 獲取其他程序所對應的Context(com.Xxx:UseCount所在包名)
			useCount = createPackageContext("com.Xxx",
				Context.CONTEXT_IGNORE_SECURITY);
		}
		catch (NameNotFoundException e)
		{
			e.printStackTrace();
		}
		// 使用其他程序的Context獲取對應的SharedPreferences
		SharedPreferences prefs = useCount.getSharedPreferences("count",
			Context.MODE_WORLD_READABLE);
		// 讀取數據
		int count = prefs.getInt("count", 0);
		TextView show = (TextView) findViewById(R.id.show);
		// 顯示讀取的數據內容
		show.setText("UseCount應用程序以前被使用了" + count + "次。");
	}
}
File存儲
2.1 openFileOutput和openFileInput
Context提供了如下兩個方法來打開本應用程序的數據文件夾裡的文件IO流。
FileInputStream openFileInput(String name):打開應用程序的數據文件夾下的name文件對應的輸入流。
FileOutputStream openFileOutput(String name,int mode):打開應用程序的數據文件夾下的name文件對應輸出流。
上面兩個方法分別用於打開文件輸入流、輸出流。其中第二個方法的第二個參數指定打開文件夾的模式,該模式支持如下值。
MODE_PRIVATE:該文件只能被當前程序讀寫。
MODE_APPEND:以追加方式打開該文件,應用程序可以向該文件追加內容。
MODE_WORLD_READABLE:該文件的內容可以被其他程序讀取。
MODE_WORLD_WRITEABLE:該文件的內容可由其他程序讀寫。
Context還提供了如下幾個方法來訪問應用程序的數據文件夾。
getDir(String name,int mode):在應用程序的數據文件夾下獲取或創建name對應的子目錄。
File getFilesDir():獲取該應用程序的數據文件夾的絕對路徑。
String[] fileList():返回該應用程序的數據文件夾下的全部文件。
deleteFile(String):刪除該應用程序的數據文件夾下的指定內容。
例:讀寫應用程序數據文件夾下內容:
Main.xml
FileTest.java
public class FileTest extends Activity
{
	final String FILE_NAME = "test.txt";

	@Override
	public void onCreate(Bundle savedInstanceState)
	{
		super.onCreate(savedInstanceState);
		setContentView(R.layout.main);
		System.out.println(new StringBuilder("a").append("b").append("c")
			.toString());
		// 獲取兩個按鈕
		Button read = (Button) findViewById(R.id.read);
		Button write = (Button) findViewById(R.id.write);
		// 獲取兩個文本框
		final EditText edit1 = (EditText) findViewById(R.id.edit1);
		final EditText edit2 = (EditText) findViewById(R.id.edit2);
		// 為write按鈕綁定事件監聽器
		write.setOnClickListener(new OnClickListener()
		{
			@Override
			public void onClick(View source)
			{
				// 將edit1中的內容寫入文件中
				write(edit1.getText().toString());
				edit1.setText("");
			}
		});

		read.setOnClickListener(new OnClickListener()
		{
			@Override
			public void onClick(View v)
			{
				// 讀取指定文件中的內容,並顯示出來
				edit2.setText(read());
			}
		});
	}

	private String read()
	{
		try
		{
			// 打開文件輸入流
			FileInputStream fis = openFileInput(FILE_NAME);
			byte[] buff = new byte[1024];
			int hasRead = 0;
			StringBuilder sb = new StringBuilder("");
			while ((hasRead = fis.read(buff)) > 0)
			{
				sb.append(new String(buff, 0, hasRead));
			}
			return sb.toString();
		}
		catch (Exception e)
		{
			e.printStackTrace();
		}
		return null;
	}

	private void write(String content)
	{
		try
		{
			// 以追加模式打開文件輸出流
			FileOutputStream fos = openFileOutput(FILE_NAME, MODE_APPEND);
			// 將FileOutputStream包裝成PrintStream
			PrintStream ps = new PrintStream(fos);
			// 輸出文件內容
			ps.println(content);
			ps.close();
		}
		catch (Exception e)
		{
			e.printStackTrace();
		}
	}
}
注:test.txt所在位置:打開File Explorer:data/data/com.Xxx包名/file/test.txt
2.2 讀寫SD卡上的文件
當程序通過Context的openFileInput或openFileOutput來打開文件輸入流、輸出流時,程序所打開的都是應用程序的數據文件夾裡的文件,這樣所存儲的文件大小可能比較有限。為了更好的存、取應用程序的大文件數據,應用程序需要讀、寫SD卡上的文件。步驟如下:
調用Environment的getExternalStorageState()方法判斷手機上是否插入了SD卡,並且應用程序具有讀寫SD卡的權限。
調用Environment的getExternalStorageDirectory()方法來獲取SD卡的目錄。
使用FileInputStream、FileOutputStream、FileReader或FileWriter讀寫SD卡裡的文件。
例:讀寫SD卡的內容:
SDCardTest.java
public class SDCardTest extends Activity
{
	final String FILE_NAME = "/test.txt";

	@Override
	public void onCreate(Bundle savedInstanceState)
	{
		super.onCreate(savedInstanceState);
		setContentView(R.layout.main);
		// 獲取兩個按鈕
		Button read = (Button) findViewById(R.id.read);
		Button write = (Button) findViewById(R.id.write);
		// 獲取兩個文本框
		final EditText edit1 = (EditText) findViewById(R.id.edit1);
		final EditText edit2 = (EditText) findViewById(R.id.edit2);
		// 為write按鈕綁定事件監聽器
		write.setOnClickListener(new OnClickListener()
		{
			@Override
			public void onClick(View source)
			{
				// 將edit1中的內容寫入文件中
				write(edit1.getText().toString());
				edit1.setText("");
			}
		});

		read.setOnClickListener(new OnClickListener()
		{
			@Override
			public void onClick(View v)
			{
				// 讀取指定文件中的內容,並顯示出來
				edit2.setText(read());
			}
		});
	}

	private String read()
	{
		try
		{
			//如果手機插入了SD卡,而且應用程序具有訪問SD的權限
			if (Environment.getExternalStorageState()
				.equals(Environment.MEDIA_MOUNTED))
			{
				//獲取SD卡對應的存儲目錄
				File sdCardDir = Environment.getExternalStorageDirectory();
				//獲取指定文件對應的輸入流
				FileInputStream fis = new FileInputStream(sdCardDir
					.getCanonicalPath()	+ FILE_NAME);
				//將指定輸入流包裝成BufferedReader
				BufferedReader br = new BufferedReader(new
					InputStreamReader(fis));
				StringBuilder sb = new StringBuilder("");
				String line = null;
				while((line = br.readLine()) != null)
				{
					sb.append(line);
				}
				return sb.toString();
			}
		}
		catch (Exception e)
		{
			e.printStackTrace();
		}
		return null;
	}

	private void write(String content)
	{
		try
		{
			//如果手機插入了SD卡,而且應用程序具有訪問SD的權限
			if (Environment.getExternalStorageState()
				.equals(Environment.MEDIA_MOUNTED))
			{
				//獲取SD卡的目錄
				File sdCardDir = Environment.getExternalStorageDirectory();
				File targetFile = new File(sdCardDir.getCanonicalPath()
					+ FILE_NAME);
				//以指定文件創建	RandomAccessFile對象
				RandomAccessFile raf = new RandomAccessFile(
					targetFile , "rw");
				//將文件記錄指針移動到最後
				raf.seek(targetFile.length());
				// 輸出文件內容
				raf.write(content.getBytes());
				raf.close();
			}
		}
		catch (Exception e)
		{
			e.printStackTrace();
		}
	}
}
應用程序讀、寫SD卡文件請注意:
Android模擬器可通過mksdcard命令來創建虛擬存儲卡
為了讀寫SD卡上的數據,必須在應用程序的AndroidManifest.xml中添加讀寫SD卡的權限。配置內容如下:
SQLite數據庫
Android系統集成了一個輕量級的數據庫:SQLite,SQLite只是一個嵌入式的數據庫引擎,專門適用於資源有限的設備上(如手機、PDA等)適量數據存取。 SQLite數據庫只是一個文件,不需要安裝、啟動服務器進程。
3.1 簡介SQLiteDatabase
Android提供了SQLiteDatabase代表一個數據庫(底層就是一個數據庫文件),一旦應用程序獲得了代表指定數據庫的SQLiteDatabase對象,接下來就可以管理、操作數據庫了。
SQLiteDatabase提供了如下靜態方法來打開一個文件對應的數據庫
SQLiteDatabase openDatabase(String path, SQLiteDatabase. CursorFactory factroy, int flags):打開path文件所代表SQLite數據庫。
SQLiteDatabase openOrCreateDatabase(String path,SQLiteDatabase.CursorFactory factory):打開或創建(如果 不存在)path文件所代表SQLite數據庫。
在程序中獲取SQLiteDatabase對象後,接下來就可調用其如下方法來操作數據庫。
execSQL(String sql,Object[] bindArgs):執行帶占位符的SQL語句。
execSQL(String sql):執行SQL語句。
insert(String table,String nullColumnHack,ContentValues values):向執行表中插入數據。
update(String table,ContentValues values,String whereClause,String[] whereArgs):更新指定數據庫。
delete(String table,String whereClause,String[] whereArgs):刪除指定表中的特定數據。
Cursor query(String table,String[] columns,String selection, String[] selectionArgs,String groupBy,String having,String orderBy):對執行數據表執行查詢。
Cursor query(String table,String[] columns,String selection, String[] selectionArgs,String groupBy,String having,String orderBy,String limit):對執行數據表執行查詢,limit對數控制最多查詢幾條記錄。
rawQuery(String sql,String[] selectionArgs):執行帶占位符的SQL查詢。
begin Transaction():開始事務。
end Transaction():結束事務。
上面查詢方法都是返回一個Cursor對象,Android中的Cursor類似於JDBC的ResultSet,Cursor提供如下方法來移動查詢結果的記錄指針。
move(int offset):將記錄指針向上或向下移動指定的行數.
boolean moveToFirst():將記錄指針移到到第一行。
boolean moveToLast():將記錄指針移到到最後一行。
boolean moveToNext():將記錄指針移到到下一行。
boolean moveToPosition(int position):將記錄指針移到到指定行。
boolean moveToPrevious():將記錄指針移到到上一行。
一旦記錄指針移到到指定行後,接下來就可以調用Cursor的getXxx()方法來獲取該行的指定列的數據。
3.2 創建數據庫和表
使用SQLiteDatabase的靜態方法即可打開或創建數據庫,例如如下代碼:
SQLiteDatabase.openOrCreateDatabase(“/mt/db/temp.db3”,null);
上面的代碼即可返回一個SQLiteDatabase對象,該對象的execSQL可執行任意的SQL語句,因此程序可通過如下代碼在程序中創建數據表:
//定義建表語句
sql=“create table user_inf(user_id integer primary key,”+” user_name varchar(255),”+”user_pass varchar(255))”
//執行SQL語句
db.execSQL(sql);
在程序中執行上面的代碼即可在數據庫中創建一個數據表。
3.3使用SQL語句操作SQLite數據庫
使用SQLiteDatabase進行數據庫操作的步驟如下:
獲取SQLiteDatabase對象,進行與數據庫連接。
調用SQLiteDatabase的方法來執行SQL語句。
操作SQL語句的執行結果,比如用SimpleCursorAdapter封裝成Cursor。
調用close()方法,關閉SQLiteDatabase數據庫,回收資源。
例:
DBTest.java
public class DBTest extends Activity
{
	SQLiteDatabase db;
	Button bn = null;
	ListView listView;
	@Override
	public void onCreate(Bundle savedInstanceState)
	{
		super.onCreate(savedInstanceState);
		setContentView(R.layout.main);
		//創建或打開數據庫(此處需要使用絕對路徑)
		db = SQLiteDatabase.openOrCreateDatabase(this.getFilesDir()
			.toString() + "/test.db3" , null);
		listView = (ListView)findViewById(R.id.show);
		bn = (Button)findViewById(R.id.ok);
		bn.setOnClickListener(new OnClickListener()
		{
			@Override
			public void onClick(View source)
			{
		//獲取用戶輸入
		String title = ((EditText)findViewById(R.id.title))
			.getText().toString();
		String content = ((EditText)findViewById(R.id.content))
			.getText().toString();
		try
		{
			insertData(db , title , content);
			Cursor cursor = db.rawQuery("select * from news_inf", null);
			inflateList(cursor);
		}
		catch(SQLiteException  se)
		{
			//執行DDL創建數據表
		db.execSQL("create table news_inf(_id integer primary key autoincrement,"
			+ " news_title varchar(50),"
			+ " news_content varchar(255))");
		//執行insert語句插入數據
		insertData(db , title , content);
		//執行查詢
		Cursor cursor = db.rawQuery("select * from news_inf", null);
		inflateList(cursor);
		}
	}
		});
	}
	private void insertData(SQLiteDatabase db
		, String title , String content)
	{
		//執行插入語句
		db.execSQL("insert into news_inf values(null , ? , ?)"
			, new String[]{title , content});
	}
	private void inflateList(Cursor cursor)
	{
		//填充SimpleCursorAdapter
		SimpleCursorAdapter adapter = new SimpleCursorAdapter(
			DBTest.this , R.layout.line, cursor
			, new String[]{"news_title" , "news_content"}
			, new int[]{R.id.my_title , R.id.my_content});
		//顯示數據
		listView.setAdapter(adapter);
	}
	@Override
	public void onDestroy()
	{
		super.onDestroy();
		//退出程序時關閉SQLiteDatabase
		if (db != null && db.isOpen())
		{
			db.close();
		}
	}
}
Main.xml
3.4使用sqlite3工具
在Android SDK的tools目錄下提供了一個sqlite.exe,它是一個簡單的SQLite數據庫管理工具,利用該工具可以來查詢、管理數據庫。
SQLilte內部只支持NULL、INTEGER、REAL、TEXT和BLOB這5種數據類型。
它允許把各種類型的數據保存到任務類型的字段中,不必關心聲明該字段所使用的數據類型。
SQLilte允許存入數據時忽略底層數據列實際的數據類型。
3.5 使用特定方法操作數據庫
1.使用insert方法插入記錄。
SQLiteDatabase的insert方法long insert(String table,String nullCoumnHack,ContentValues values)
table:代表要插入數據的表名
nullCoumnHack:代表強行插入null值的數據列的列名。
values:代表一行記錄的數據。
insert方法插入的一條記錄使用ContentValues存放,ContentValues類似於Map,提供了put(String key,Xxx value)方法存入數據。getAsXxx(String key)方法取出數據。
2.使用update方法更新記錄
SQLiteDatabase的update方法為update(String table,ContentValues values,String whereClause,String[] whereArgs),該方法返回受此update語句影響的記錄的條數。
table:代表要更新數據的表名
values:代表想更新的數據。
whereClause:滿足該whereClause子句的記錄將會被更新。
whereArgs:用於為whereClause子句傳入參數。
3.使用delete方法刪除記錄
SQLiteDatabase的delete方法為delete(String table,String whereClause,String[] whereArgs),該方法返回受此delete語句影響的記錄的條數。
table:代表要刪除數據的表名
whereClause:滿足該whereClause子句的記錄將會被刪除。
whereArgs:用於為whereClause子句傳入參數。
4.使用query方法查詢記錄
SQLiteDatabase的query方法的簽名為Cusor query(boolean distinct,String table,String[] columns,String selection, String[] selectionArgs,String groupBy,String having,String orderBy,String limit):參數說明如下。
distinct:指定是否去除重復記錄。
table:代表查詢數據的表名。
columns:要查詢出來的列名。
selection:查詢條件子句。
selectionArgs:占位符傳入參數值。
groupBy:用於控制分組。
having:用於對分組進行過濾。
orderBy:用於對記錄進行排序。
limit:用於進行分頁。
3.6 SQLiteOpenHelper
SQLiteOpenHelper是一個輔助類,可用於管理數據庫的創建和版本更新。SQLiteOpenHelper是個抽象類,一般的用法是創建SQLiteOpenHelper的子類,並重寫它的onCreate(SQLiteDatabase db)和onUpgrade(SQLiteDatabase db,int oldVersion,int newVersion)方法。
SQLiteOpenHelper包含如下常用方法:
getReadableDatabase():以讀寫的方法打開數據庫對應SQLiteDatabase對象。
getWritableDatabase():以寫的方法打開數據庫對應SQLiteDatabase對象。
onCreate():當第一次創建數據庫時回調該方法。
onUpgrade():當數據庫版本更新時回調該方法。
close():關閉所打開的SQLiteDatabase對象
例子:簡單生詞本
MyDatabaseHelper.java
public class MyDatabaseHelper extends SQLiteOpenHelper
{
	final String CREATE_TABLE_SQL =
		"create table dict(_id integer primary key autoincrement , word , detail)";
	public MyDatabaseHelper(Context context, String name, int version)
	{
		super(context, name, null, version);
	}
	@Override
	public void onCreate(SQLiteDatabase db)
	{
		// 第一個使用數據庫時自動建表
		db.execSQL(CREATE_TABLE_SQL);
	}
	@Override
	public void onUpgrade(SQLiteDatabase db, int oldVersion, int newVersion)
	{
		System.out.println("--------onUpdate Called--------"
			+ oldVersion + "--->" + newVersion);
	}
}
Dict.java
public class Dict extends Activity
{
	MyDatabaseHelper dbHelper;
	Button insert = null;
	Button search = null;
	@Override
	public void onCreate(Bundle savedInstanceState)
	{
		super.onCreate(savedInstanceState);
		setContentView(R.layout.main);
		// 創建MyDatabaseHelper對象,指定數據庫版本為1,此處使用相對路徑即可,
		// 數據庫文件自動會保存在程序的數據文件夾的databases目錄下。
		dbHelper = new MyDatabaseHelper(this
			, "myDict.db3" , 1);
		insert = (Button)findViewById(R.id.insert);
		search = (Button)findViewById(R.id.search);
		insert.setOnClickListener(new OnClickListener()
		{
			@Override
			public void onClick(View source)
			{
				//獲取用戶輸入
				String word = ((EditText)findViewById(R.id.word))
					.getText().toString();
				String detail = ((EditText)findViewById(R.id.detail))
					.getText().toString();
				//插入生詞記錄
				insertData(dbHelper.getReadableDatabase() , word , detail);
				//顯示提示信息
				Toast.makeText(Dict.this, "添加生詞成功!" , 8000)
					.show();
			}
		});

		search.setOnClickListener(new OnClickListener()
		{
			@Override
			public void onClick(View source)
			{
				// 獲取用戶輸入
				String key = ((EditText) findViewById(R.id.key)).getText()
					.toString();
				// 執行查詢
				Cursor cursor = dbHelper.getReadableDatabase().rawQuery(
					"select * from dict where word like ? or detail like ?",
					new String[]{"%" + key + "%" , "%" + key + "%"});
		//創建一個Bundle對象
		Bundle data = new Bundle();
		data.putSerializable("data", converCursorToList(cursor));
		//創建一個Intent
		Intent intent = new Intent(Dict.this
			, ResultActivity.class);
		intent.putExtras(data);
		//啟動Activity
		startActivity(intent);
			}
		});
	}
	protected ArrayList>
		converCursorToList(Cursor cursor)
	{
		ArrayList> result =
			new ArrayList>();
		//遍歷Cursor結果集
		while(cursor.moveToNext())
		{
			//將結果集中的數據存入ArrayList中
			Map map = new
				HashMap();
			//取出查詢記錄中第2列、第3列的值
			map.put("word" , cursor.getString(1));
			map.put("detail" , cursor.getString(2));
			result.add(map);
		}
		return result;
	}
	private void insertData(SQLiteDatabase db
		, String word , String detail)
	{
		//執行插入語句
		db.execSQL("insert into dict values(null , ? , ?)"
			, new String[]{word , detail});
	}
	@Override
	public void onDestroy()
	{
		super.onDestroy();
		//退出程序時關閉MyDatabaseHelper裡的SQLiteDatabase
		if (dbHelper != null)
		{
			dbHelper.close();
		}}}
ResultActivity.java
public class ResultActivity extends Activity
{
	@Override
	public void onCreate(Bundle savedInstanceState)
	{
		super.onCreate(savedInstanceState);
		setContentView(R.layout.popup);
		ListView listView = (ListView)findViewById(R.id.show);
		Intent intent = getIntent();
		//獲取該intent所攜帶的數據
		Bundle data = intent.getExtras();
		//從Bundle數據包中取出數據
		@SuppressWarnings("unchecked")
		List> list =
			(List>)data.getSerializable("data");
		//將List封裝成SimpleAdapter
		SimpleAdapter adapter = new SimpleAdapter(
			ResultActivity.this , list
			, R.layout.line , new String[]{"word" , "detail"}
			, new int[]{R.id.word , R.id.detail});
		//填充ListView
		listView.setAdapter(adapter);
	}
}
Main.xml
string.xml
	生詞本
	添加生詞
	查找
	解釋
	請輸入...
	暫無
 Android Handler 消息機制的日常開發運用與代碼測試
很多時候我們需要對每個組件或者所有的UI線程要去負責View的創建並且維護它,例如更新冒個TextView的顯示,都必須在主 線程中去做,我們不能直接在UI線程中去創建子
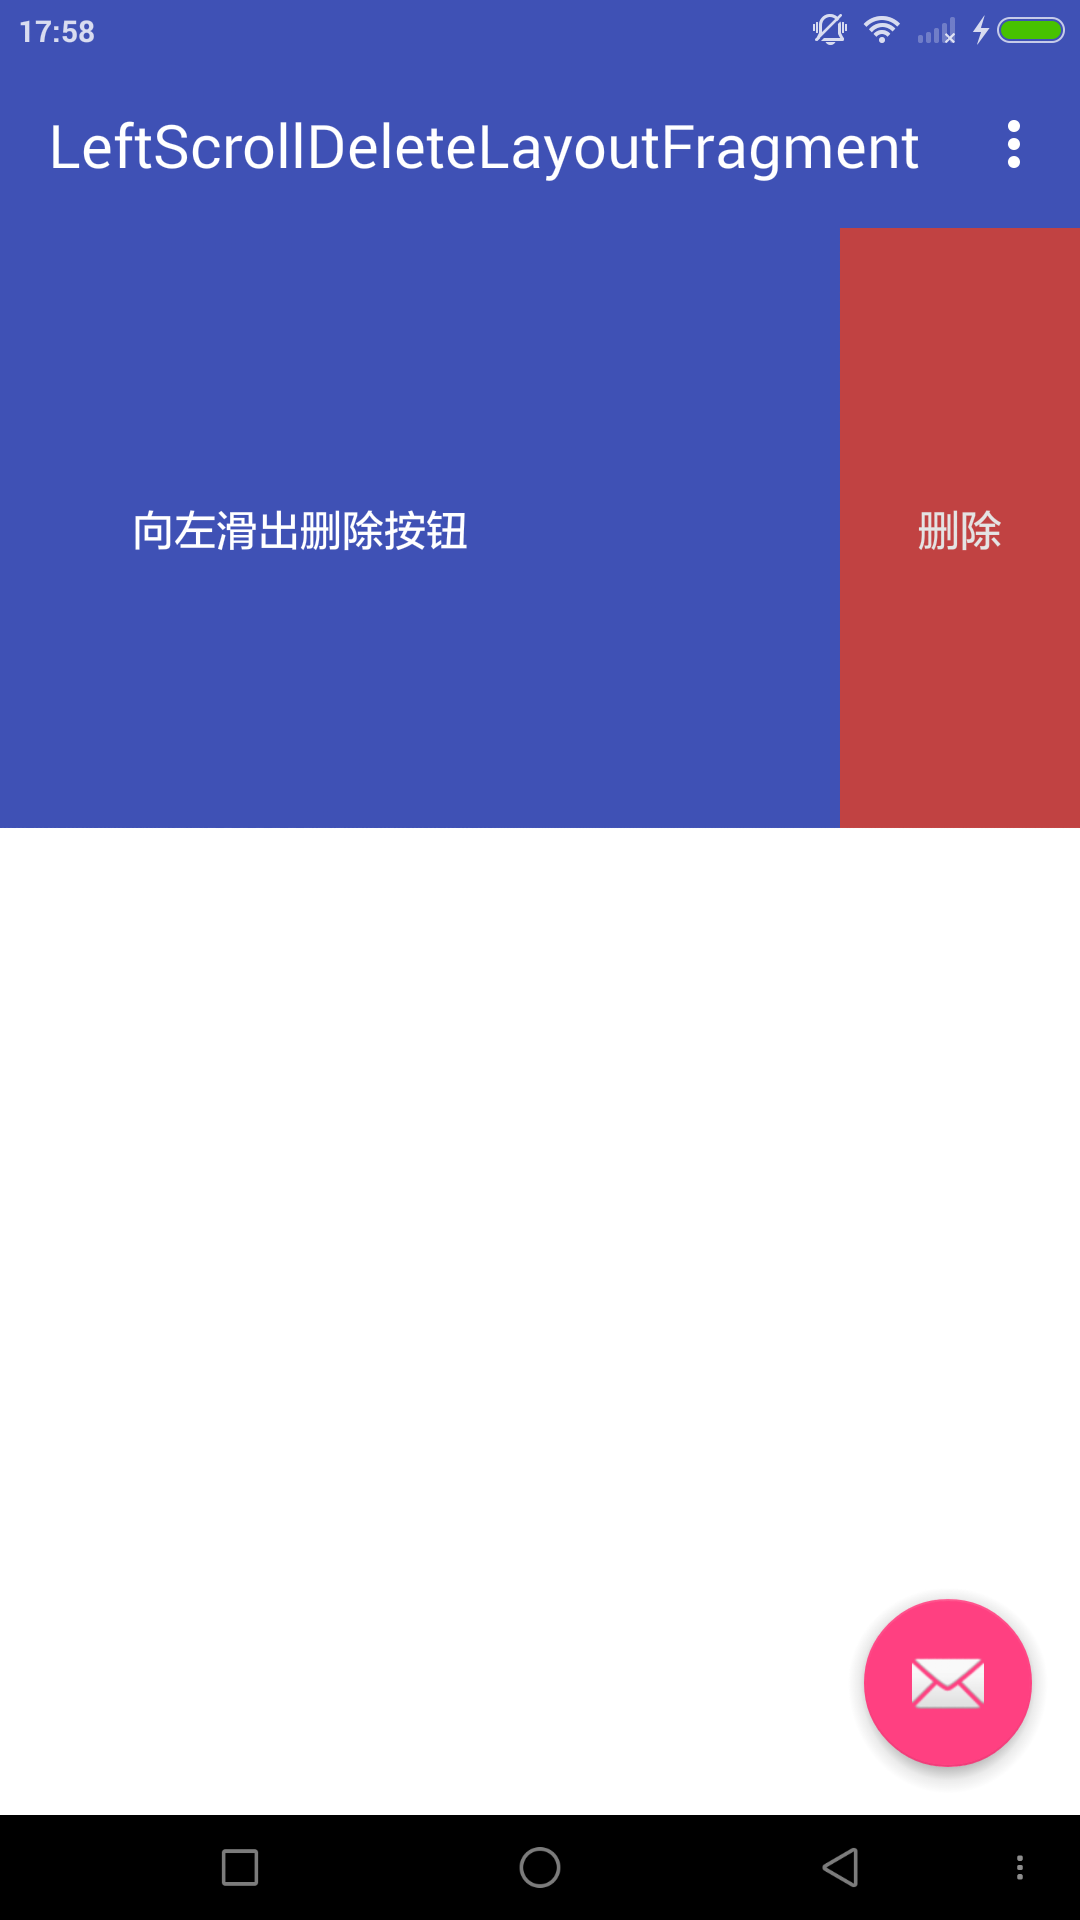
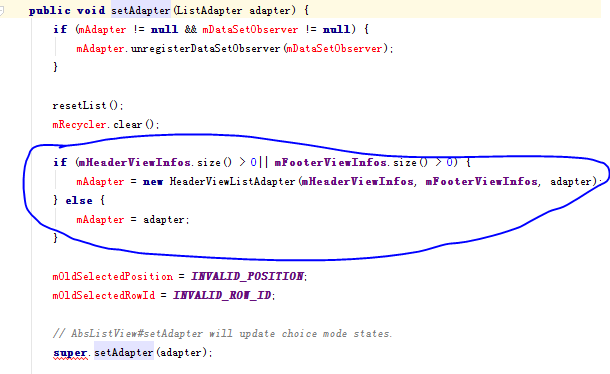 當ListView有Header時 onItemClick裡的position不正確的原因
當ListView實例addheaderView()或者addFooterView後,再通過setAdapter來添加適配器,此時在ListView實例變量裡保存的適配器
 Android自定義View實現彈性小球效果
照例先看效果圖自定義代碼示例public class BezierView extends View { Paint paint;//畫筆 Path path;//路徑
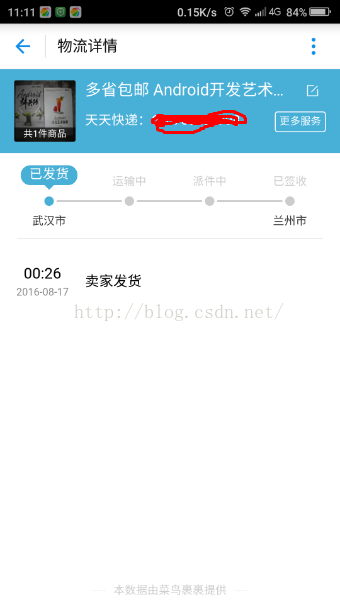 自定義View系列(1)--仿支付寶中物流狀態效果
國際慣例,先上支付寶中的原效果圖: 再來一張自定義view的效果圖 看到兩個效果圖的對比,可能會有人問為啥物流狀態被選中時的背景沒有?其實是有的,只不