編輯:關於Android編程
照例先看效果圖
自定義代碼示例
public class BezierView extends View {

 Paint paint;//畫筆
 Path path;//路徑

 int radius = 50;//圓的半徑
 int time = 100;//計數時長

 int index;
 int offsetIndex;
 float viewX, viewY;//圖形中心點坐標

 float width;//屏幕寬度
 float partWidth;//屏幕寬度的1/4
 int paddingLeft, paddingRight;//圖形內邊距
 float x1, y1, x2, y2, x3, y3, x4, y4;//圓形左上右下四個點

 float x12, y12, x23, y23, x34, y34, x41, y41;//圓形左上右下四個點之間的漸變點

 public BezierView(Context context) {
  this(context, null);
 }

 public BezierView(Context context, AttributeSet attrs) {
  this(context, attrs, 0);
 }

 public BezierView(Context context, AttributeSet attrs, int defStyleAttr) {
  super(context, attrs, defStyleAttr);

  paint = new Paint();
  paint.setColor(ResourcesCompat.getColor(getResources(), R.color.colorPrimary, null));
  paint.setAntiAlias(true);
 }


 @Override
 protected void onDraw(Canvas canvas) {
  paddingLeft = getPaddingLeft();
  paddingRight = getPaddingRight();
  width = getWidth() - paddingLeft - paddingRight;
  partWidth = width / 4;

  path = new Path();
  path.moveTo(x1, y1);
  path.cubicTo(x1, y1, x12, y12, x2, y2);
  path.cubicTo(x2, y2, x23, y23, x3, y3);
  path.cubicTo(x3, y3, x34, y34, x4, y4);
  path.cubicTo(x4, y4, x41, y41, x1, y1);
  canvas.drawPath(path, paint);

  move();
 }


 public void move() {
  new Timer().schedule(new TimerTask() {
   @Override
   public void run() {
    if (index < time - 1) {
     index++;
     viewX = width / time * index + paddingLeft;
     viewY = 400;

     x1 = viewX - radius;
     x2 = viewX;
     x3 = viewX + radius;
     x4 = viewX;

     y1 = viewY;
     y2 = viewY - radius;
     y3 = viewY;
     y4 = viewY + radius;

     offsetIndex = index % (time / 4) + 1;

     //根據圖形移動到的區域進行曲線變化
     float position = (viewX - paddingLeft) / partWidth;

     //右邊半圓
     if (position >= 0 && position < 1) {
      x3 = viewX + radius + radius / (time / 4) * offsetIndex;
     } else if (position >= 1 && position < 2) {
      x3 = viewX + radius + radius;
     } else if (position >= 2 && position < 3) {
      x3 = viewX + radius + radius - radius / (time / 4) * offsetIndex;
     } else {
      x3 = viewX + radius;
     }
     x23 = x34 = x3;
     y12 = y23 = y2;

     //左邊半圓
     if (position >= 1 && position < 2) {
      x1 = viewX - radius - radius / (time / 4) * offsetIndex;
     } else if (position >= 2 && position < 3) {
      x1 = viewX - radius - radius;
     } else if (position >= 3) {
      x1 = viewX - radius - radius + radius / (time / 4) * offsetIndex;
     } else {
      x1 = viewX - radius;
     }
     x12 = x41 = x1;
     y34 = y41 = y4;

     postInvalidate();
    } else {
     cancel();
    }
   }
  }, 0, 5000);
 }

}
總結
以上就是Android自定義View實現彈性小球效果的全部內容,希望對大家開發Android能帶來一定的幫助,如果有疑問大家可以留言交流。謝謝大家對本站的支持。
 android源碼解析(二十八)--)電源開關機按鍵事件流程
前面我們講解了系統截屏按鍵處理流程,HOME按鍵處理流程,今天再來講解一下電源開關機按鍵事件流程,當然這也是系統按鍵處理流程方面的最後一篇博客了。和截屏按鍵、HOME按鍵
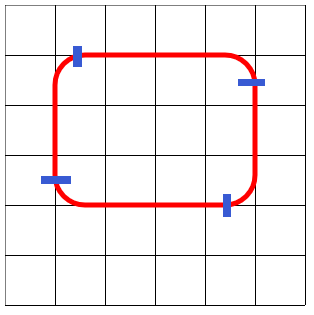 詳述Canvas(五)/繪制圓角矩形
Canvas並沒有提供繪制圓角矩形的方法,但是通過觀察,我們可以發現,其實我們可以將圓角矩形分為四段,可以通過使用arcTo來實現。現在再看下第二段曲線:因此我們直接使用
 Android中基於XMPP協議實現IM聊天程序與多人聊天室
簡單的IM聊天程序由於項目需要做一個基於XMPP協議的Android通訊軟件。故開始研究XMPP。XMPP協議采用的是客戶端-服務器架構,所有從一個客戶端發到另一個客戶端
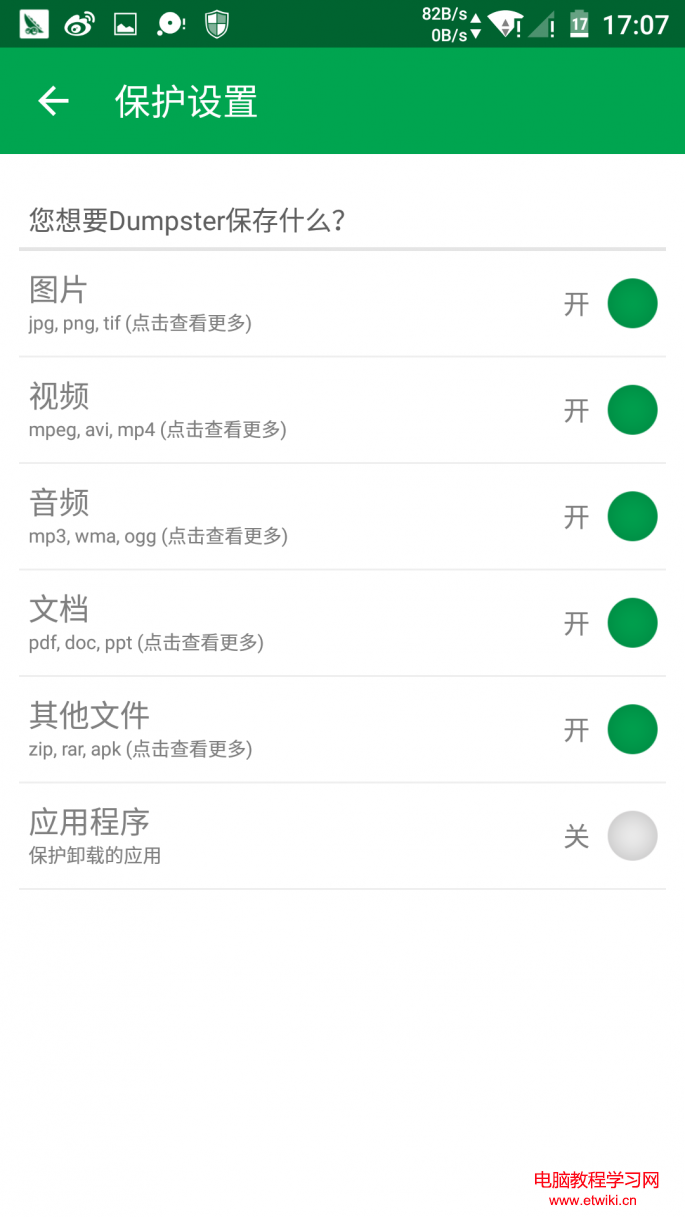 擔心手欠誤刪?趕緊給安卓手機建立個回收站
在PC上,如果我們誤刪了圖片或其他文件,都能通過回收站找回,從而避免重要信息的遺失。那麼,我們如何才能為Android手機也添加個回收站?此外,像微信、QQ