編輯:關於Android編程
在總結鎖屏代碼之前,有兩個中心思想要銘記於心
A) KeyguardHostView就是我們最終所要展示的界面,所以不論用什麼方法手段,都要將這個KeyguardHostView添加到窗口中,後續填充它,都是細節問題
B) 那麼問題來了,通常我們將一個view添加到窗口中會用什麼方法呢?
答案有兩種 1 WindowManager.addView() 2 LayoutInflater.inflate(resID, parentView, true); 而在鎖屏代碼中這兩種方法都有用到
-----------------------------------------------華麗麗的分割線-------------------------------------------------------------------
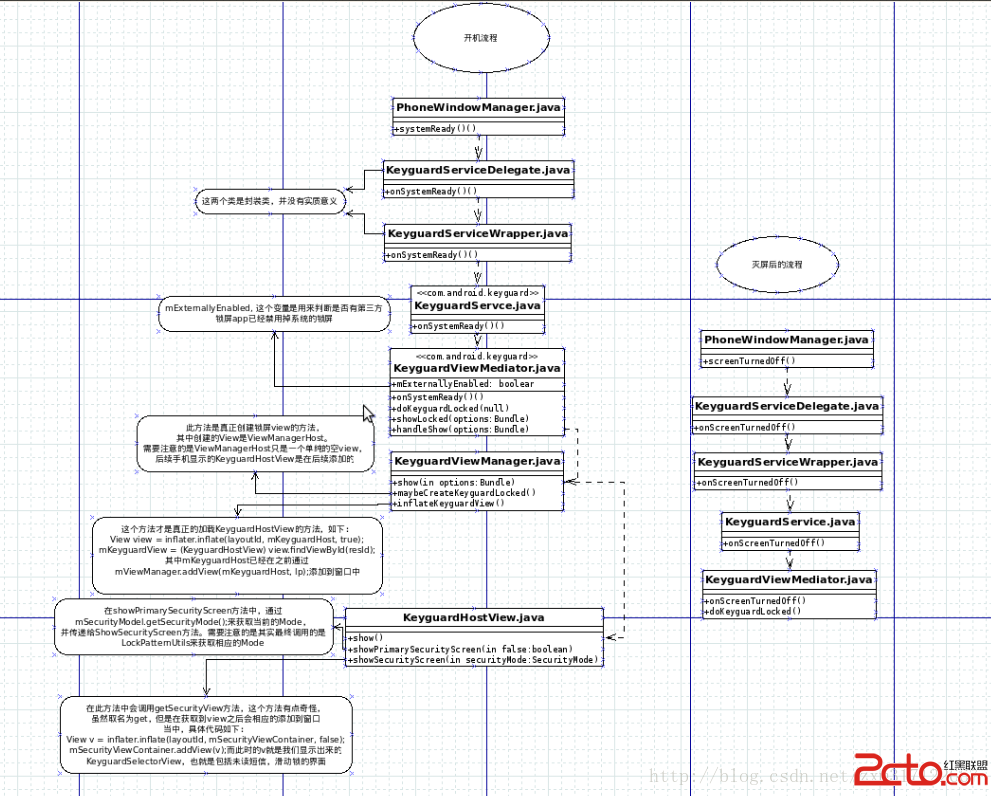
接下來用一張圖來解釋流程
-------------------------------又是可愛的分割線--------------------------------------------------------
從圖中可以看到, 開機後首先從PhoneWindowManager的systemReady方法調用兩個包裝類(KeyguardServiceDelegate.java KeyguardServiceWrapper.java)之後會調用到KeyguardService.java中的onSystemReady,進而調用鎖屏代碼的總調度使KeyguardViewMediator.java。它就是鎖屏的CEO。做我們軟件的都知道,CEO一般不會太牽涉代碼問題,只管分配,協調工作,客戶/供應鏈的溝通。在KeyguardViewMediatZ喎?/kf/ware/vc/" target="_blank" class="keylink">vci5qYXZh1tC1xG1FeHRlcm5hbGx5RW5hYmxlZLHkwb++zcrH19y84NPrv827p8y4xdC1xLPvwuujrMjnufu/zbuntdrI/be9zai5/UtleWd1YXJkTWFuYWdlci5kaWFibGVLZXlndWFyZCgpt723qL3708PPtc2zy/jGwbrzo6y0y7Hkwb+74dbDzqpmYWxzZaOstNO2+LK7u+G75tbGz7XNs8v4xsG958Pmo6xvdGhlcndpc2WjrL2ryM7O8bTzytbSu8um1rG907aquPjX3L6twO1LZXlndWFyZFZpZXdNYW5hZ2VyLmphdmEuvt/M5bT6wuvI58/Co7o8L3A+CjxwcmUgY2xhc3M9"brush:java;"> /** * Enable the keyguard if the settings are appropriate. */ private void doKeyguardLocked(Bundle options) { boolean isSimSecure = mUpdateMonitor.isSimPinSecure(); ///M: if another app is disabling us (except Sim Secure), then don't show if ((!mExternallyEnabled && !isSimSecure)|| PowerOffAlarmManager.isAlarmBoot()) { if (DEBUG) KeyguardUtils.xlogD(TAG, "doKeyguard: not showing because externally disabled"); return; } 。。。 showLocked(options); } private void handleShow(Bundle options) { 。。。 mKeyguardViewManager.show(options); 。。。 } 通過以上代碼,所有的任務都已經落實到KeyguardViewManager.java的頭上,接下來看看這個總經理是如何工作的 /** * Show the keyguard. Will handle creating and attaching to the view manager * lazily. */ public synchronized void show(Bundle options) { if (DEBUG) Log.d(TAG, "show(); mKeyguardView=" + mKeyguardView); boolean enableScreenRotation = KeyguardUtils.shouldEnableScreenRotation(mContext); if (DEBUG) Log.d(TAG, "show() query screen rotation after"); /// M: Incoming Indicator for Keyguard Rotation @{ KeyguardUpdateMonitor.getInstance(mContext).setQueryBaseTime(); /// @} maybeCreateKeyguardLocked(enableScreenRotation, false, options); if (DEBUG) Log.d(TAG, "show() maybeCreateKeyguardLocked finish"); maybeEnableScreenRotation(enableScreenRotation); // Disable common aspects of the system/status/navigation bars that are not appropriate or // useful on any keyguard screen but can be re-shown by dialogs or SHOW_WHEN_LOCKED // activities. Other disabled bits are handled by the KeyguardViewMediator talking // directly to the status bar service. int visFlags = View.STATUS_BAR_DISABLE_HOME; if (shouldEnableTranslucentDecor()) { mWindowLayoutParams.flags |= WindowManager.LayoutParams.FLAG_TRANSLUCENT_STATUS | WindowManager.LayoutParams.FLAG_TRANSLUCENT_NAVIGATION; } if (DEBUG) Log.d(TAG, "show:setSystemUiVisibility(" + Integer.toHexString(visFlags)+")"); mKeyguardHost.setSystemUiVisibility(visFlags); mViewManager.updateViewLayout(mKeyguardHost, mWindowLayoutParams); mKeyguardHost.setVisibility(View.VISIBLE); mKeyguardView.show(); mKeyguardView.requestFocus(); if (DEBUG) Log.d(TAG, "show() exit; mKeyguardView=" + mKeyguardView); } 關鍵代碼所以全部貼出來分析分析吧, //有一點需要提前注意mKeyguardHost只是一個空View,mKeyguardView才是真正的KeyguardHostView boolean enableScreenRotation用來判斷是否允許屏幕旋轉, KeyguardUpdateMonitor.getInstance(mContext).setQueryBaseTime();此行代碼是為了重新設置query的時間,比如未接來電,未讀短信等,之所以重新set是為了仿照 iphone手機,繪制鎖屏時,查詢未讀信息/未接電話的數目是針對本次鎖屏後收到的未讀信息/未接電話
maybeCreateKeyguardLocked(enableScreenRotation, false, options); 我擦~終於到關鍵代碼了,此方法就是真正創建鎖屏的方法,來一睹芳容吧
    private void maybeCreateKeyguardLocked(boolean enableScreenRotation, boolean force,
            Bundle options) {
        if (mKeyguardHost != null) {
            mKeyguardHost.saveHierarchyState(mStateContainer);
        }

        if (mKeyguardHost == null) {
            if (DEBUG) Log.d(TAG, "keyguard host is null, creating it...");

            mKeyguardHost = new ViewManagerHost(mContext);

            int flags = WindowManager.LayoutParams.FLAG_LAYOUT_IN_SCREEN
                    | WindowManager.LayoutParams.FLAG_LAYOUT_INSET_DECOR
                    | WindowManager.LayoutParams.FLAG_FORCE_NOT_FULLSCREEN
                    | WindowManager.LayoutParams.FLAG_SHOW_WALLPAPER;

            if (!mNeedsInput) {
                flags |= WindowManager.LayoutParams.FLAG_ALT_FOCUSABLE_IM;
            }

            final int stretch = ViewGroup.LayoutParams.MATCH_PARENT;
            final int type = WindowManager.LayoutParams.TYPE_KEYGUARD;
            WindowManager.LayoutParams lp = new WindowManager.LayoutParams(
                    stretch, stretch, type, flags, PixelFormat.TRANSLUCENT);
            lp.softInputMode = WindowManager.LayoutParams.SOFT_INPUT_ADJUST_RESIZE;
            lp.windowAnimations = R.style.Animation_LockScreen;
            lp.screenOrientation = enableScreenRotation ?
                    ActivityInfo.SCREEN_ORIENTATION_USER : ActivityInfo.SCREEN_ORIENTATION_NOSENSOR;

            if (ActivityManager.isHighEndGfx()) {
                lp.flags |= WindowManager.LayoutParams.FLAG_HARDWARE_ACCELERATED;
                lp.privateFlags |=
                        WindowManager.LayoutParams.PRIVATE_FLAG_FORCE_HARDWARE_ACCELERATED;
            }
            lp.privateFlags |= WindowManager.LayoutParams.PRIVATE_FLAG_SET_NEEDS_MENU_KEY;
            /// M: Poke user activity when operating Keyguard
            //lp.inputFeatures |= WindowManager.LayoutParams.INPUT_FEATURE_DISABLE_USER_ACTIVITY;
            lp.setTitle("Keyguard");
            mWindowLayoutParams = lp;
            ///M: skip add KeyguardHost into viewManager in AT case
            if (!KeyguardViewMediator.isKeyguardInActivity) {
                mViewManager.addView(mKeyguardHost, lp);
            } else {
                if (DEBUG) Log.d(TAG, "skip add mKeyguardHost into mViewManager for testing");
            }
            KeyguardUpdateMonitor.getInstance(mContext).registerCallback(mBackgroundChanger);
        }

       /// M: If force and keyguardView is not null, we should relase memory hold by old keyguardview
        if (force && mKeyguardView != null) {
            mKeyguardView.cleanUp();
        }
        if (force || mKeyguardView == null) {
                mKeyguardHost.setCustomBackground(null);
                mKeyguardHost.removeAllViews();
                inflateKeyguardView(options);
                mKeyguardView.requestFocus();
        }
        updateUserActivityTimeoutInWindowLayoutParams();
        mViewManager.updateViewLayout(mKeyguardHost, mWindowLayoutParams);

        mKeyguardHost.restoreHierarchyState(mStateContainer);
    }
此處紅色代碼中通過mViewManager.addView(mKeyguardHost, lp);將初始話的mKeyguardHost(空view)通過WindowManager.addView的方式添加到窗口之中 MIUI8指紋支付怎麼使用?小米MIUI8怎麼指紋支付?
MIUI 8公測之後,MIUI官方微博隔一段時間就會將米粉集中反饋的問題以長微博的形式進行解答,同時爆料一些MIUI的新功能。繼上次透露MIUI 8將新增手
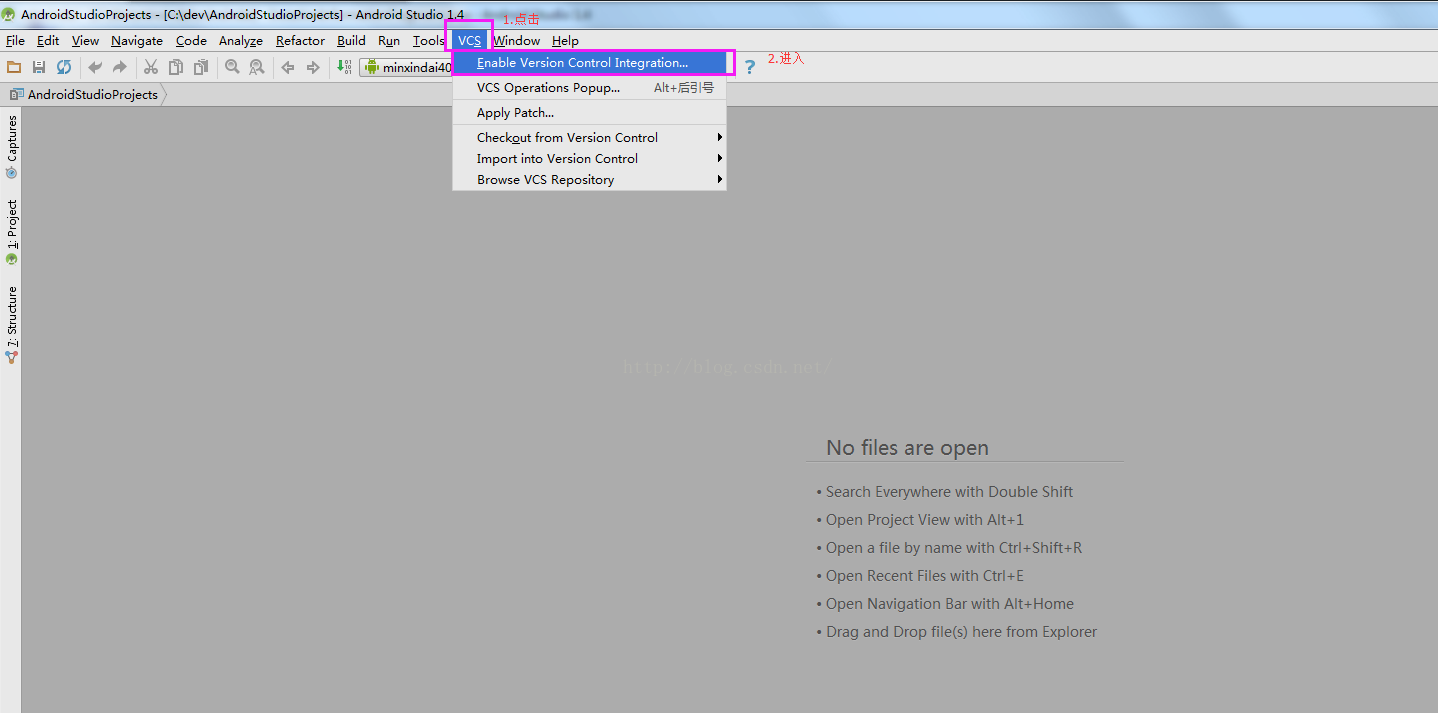 Android開發之Android studio使用git gitlab(二)
1)首先先將gitlab上的開發項目clone到本地(可以使用命令行或者管理工具,具體操作在GitLab中已經涉及,這裡不再贅述),然後導入到AndroidStudio中
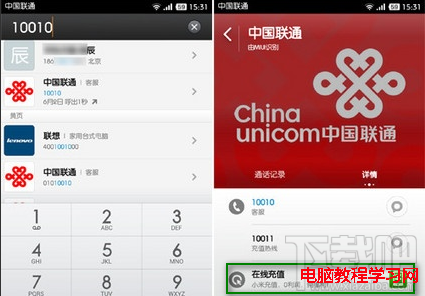 小米手機(MIUI系統)怎麼在撥號界面直接充值話費
如果你是小米手機或小米MIUI系統的用戶,充值話費可以很簡單,你知道嗎?還在打開電腦、登陸淘寶,搜索充值話費的店嗎?看看小米MIUI系統是怎麼在撥號界面輕松
 WebService理解和代碼解析
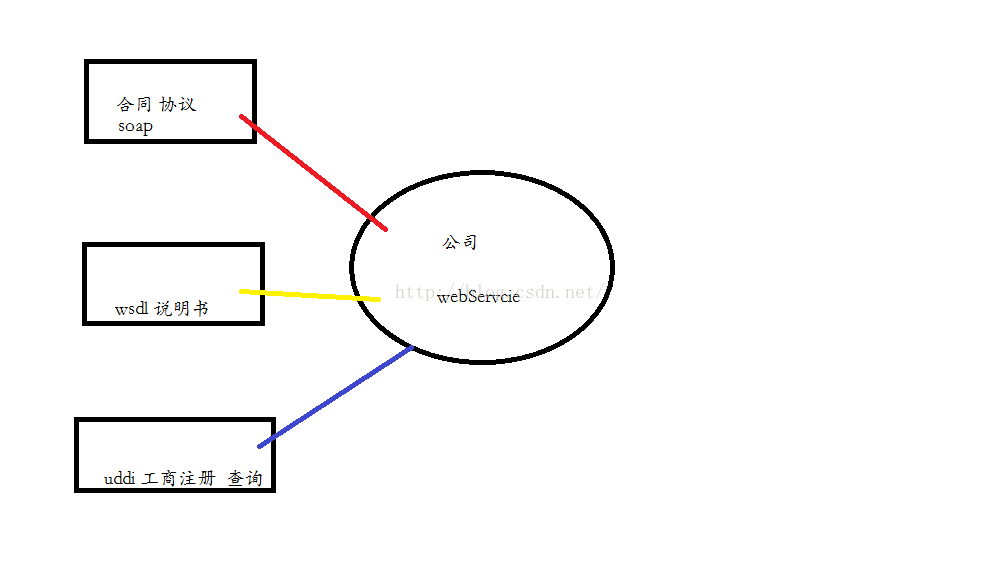
/** WebServcie 概念 多個系統數據交換: 跨平台語言的相互通信; 如:java 的客戶端 和dotnet的服務器端的接口調用: 得到接口和方法 : 基於