編輯:關於Android編程
WebView可以很好地幫助我們展示html頁面,但是webview使用不當的話還是可能產生一定問題的,下面就以下幾個方面說說我的優化技巧
1、展示webview的activity可以另開一個進程,這樣就能和我們app的主進程分開了,即使webview產生了oom崩潰等問題也不會影響到主程序,如何實現呢,其實很簡單,在androidmanifest.xml的activity標簽裡加上android:process="packagename.web"就可以了,代碼如下:
2、webview的創建也是有技巧的,最好不要在layout.xml中使用webview,可以通過一個viewgroup容器,使用代碼動態往容器裡addview(webview),這樣可以在onDestory()裡銷毀掉webview及時清理內存,另外需要注意創建webview需要使用applicationContext而不是activity的context,銷毀時不再占有activity對象,這個大家應該都知道了,最後離開的時候需要及時銷毀webview,onDestory()中應該先從viewgroup中remove掉webview,再調用webview.removeAllViews();webview.destory(); 代碼如下:
創建:
                ll = new LinearLayout(getApplicationContext());
		ll.setOrientation(LinearLayout.VERTICAL);
		wv = new WebView(getApplicationContext());
        @Override
	protected void onDestroy() {
		ll.removeAllViews();
		wv.stopLoading();
		wv.removeAllViews();
		wv.destroy();
		wv = null;
		ll = null;
		super.onDestroy();
	}
保存狀態:
        @Override
	protected void onSaveInstanceState(Bundle outState) {
		super.onSaveInstanceState(outState);
		wv.saveState(outState);
		Log.e(TAG, "save state...");
	}
恢復狀態:
在activity的onCreate(bundle savedInstanceState)裡,這麼吊用:
                if(null!=savedInstanceState){
			wv.restoreState(savedInstanceState);
			Log.i(TAG, "restore state");
		}else{
			wv.loadUrl("http://3g.cn");
		}
但是,我還是有一個疑問,朋友圈打開網頁back之後再打開也能恢復到原來位置,不知道他們怎麼做到的,正常back的話是不會調用onSaveInstanceState(bundle)的,我們正常就沒法保存狀態了,希望知道的朋友可以回復我一下,謝謝。
好了,先寫這麼多。
下面貼出完整的代碼,希望對大家有個幫助。
package com.example.test;
import android.app.Activity;
import android.graphics.Bitmap;
import android.os.Bundle;
import android.util.Log;
import android.webkit.WebSettings;
import android.webkit.WebView;
import android.webkit.WebViewClient;
import android.widget.LinearLayout;
public class WebViewActivityextends Activity {
private staticfinal String TAG = WebViewActivity.class.getName();
WebView wv;
LinearLayout ll;
@Override
protected void onCreate(Bundle savedInstanceState) {
super.onCreate(savedInstanceState);
ll = new LinearLayout(getApplicationContext());
ll.setOrientation(LinearLayout.VERTICAL);
wv = new WebView(getApplicationContext());
WebSettings setting = wv.getSettings();
setting.setJavaScriptEnabled(true);
setting.setBuiltInZoomControls(true);
setting.setAppCacheEnabled(true);
setting.setDisplayZoomControls(true);
ll.addView(wv);
setContentView(ll);
if(null!=savedInstanceState){
wv.restoreState(savedInstanceState);
Log.i(TAG,"restore state");
}else{
wv.loadUrl("http://3g.cn");
}
wv.setWebViewClient(new WebViewClient(){
@Override
publicboolean shouldOverrideUrlLoading(WebView view, String url) {
Log.d(TAG,"jump to :"+url);
wv.loadUrl(url);
returntrue;
}
@Override
publicvoid onPageStarted(WebView view, String url, Bitmap favicon) {
super.onPageStarted(view, url, favicon);
Log.d(TAG,"pageStarted:"+url);
}
@Override
publicvoid onPageFinished(WebView view, String url) {
//TODO Auto-generated method stub
super.onPageFinished(view, url);
Log.d(TAG,"pageFinished:"+url);
}
@Override
publicvoid onReceivedError(WebView view, int errorCode,
String description, String failingUrl) {
//TODO Auto-generated method stub
super.onReceivedError(view, errorCode, description, failingUrl);
Log.e(TAG,"onReceivedError code :"+errorCode+" , failingUrl:"+failingUrl);
}
});
}
@Override
protected void onSaveInstanceState(Bundle outState) {
super.onSaveInstanceState(outState);
wv.saveState(outState);
Log.e(TAG,"save state...");
}
@Override
public void onBackPressed() {
if(wv.canGoBack())
wv.goBack();
else{
super.onBackPressed();
// Process.killProcess(Process.myPid());
}
}
@Override
protected void onDestroy() {
ll.removeAllViews();
wv.stopLoading();
wv.removeAllViews();
wv.destroy();
wv = null;
ll = null;
super.onDestroy();
}
}
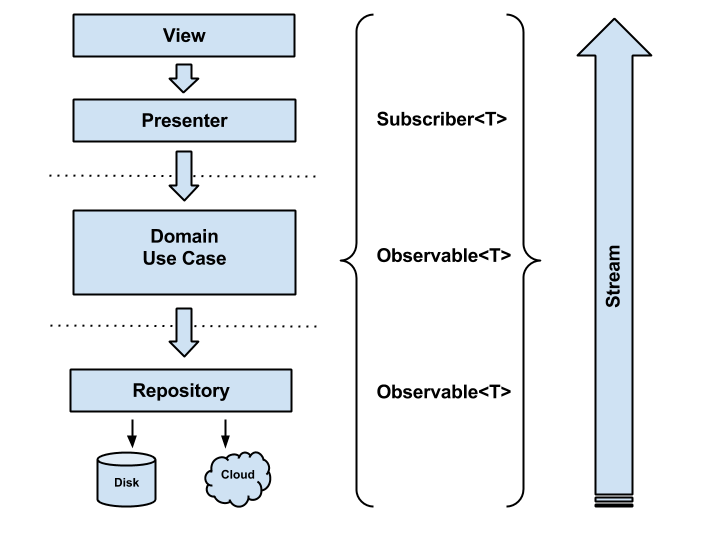 Android-CleanArchitecture實戰
概述關於Retrofit,Rxjava,MVP等的使用現在已經成為了Android項目開發的標配,而Clean架構都能很好的兼顧這些方面,使得代碼結構清晰,而且在一般在項
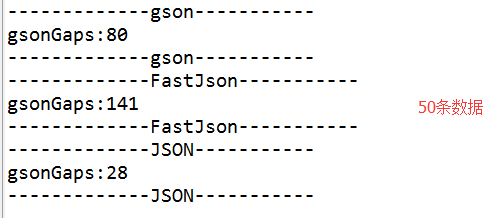 Gson、FastJson、org.JSON到底哪一個效率更高,速度更快
今天無意中再安卓巴士上看到了一片文章《Android開發者應該使用FlatBuffers替代JSON》,嚇得我趕緊看了看,突然感覺自己用了好長時間的JSON解析似乎落伍了
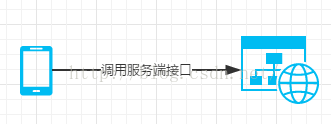 使用AOP開發android 遠程調用SDK
“什麼是spring aop?”,我頓時大腦浮想聯翩,我想到了事物管理、SDK、代碼監控、spring remoting,這麼多東西,我從哪裡回答
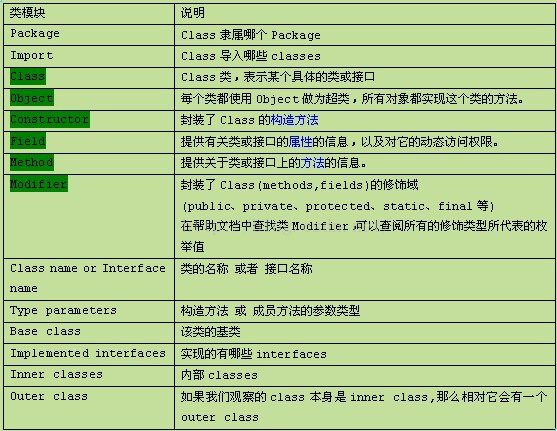 Java反射機制的原理及在Android下的簡單應用
花了幾天時間,研究了一下Java的反射機制。在這裡總結一下這幾天學習的成果,一來分享自己的學習過程和在學習中遇到的問題,二來是給像我一樣不太了解Java反射機制的同學做一