編輯:關於Android編程
隨著安卓手機在市場上的普及,安卓開發的需求也越來越大。但是在安卓開發過程中,其實很多操作都是較為繁瑣,且沒有必要的,雖然一天下來看看寫的代碼很多,但是可能也就一個界面,幾個功能點。所以對於安卓開發中代碼的簡化和重用是十分有必要的。
昨天偶然在網易雲課堂上看到了AndroidAnnotation這個第三方框架,據說能夠大幅度簡化安卓編程,提高編程效率。懷著一顆好東西都要嘗試一下的心態,今天將之配置並嘗試了一下。
AndroidAnnotation的官網為http://androidannotations.org/。但是事實上,在這個網站上只有一個例子代碼展示它能夠如何如何簡化代碼,實際的內容主要還是在github上。
通過連接打開git,進入它的git wiki。在這裡可以下載jar包,並由一些如何使用的guide。包括如何在Eclipse和IntelliJ上配置。不過在這裡它講的比較簡單,如果按照它的方法配置,可能會遇到很多問題。另外bz用的時AndroidStudio,雖然是基於IntelliJ,但是不知為何在細節上還是有些差距的,比如AndroidStudio上就沒有Annotation Processing這個設置項。所以我們需要找尋一種適用於AndroidStudio且更為簡潔的方式。
得益於Gradle,我們可以直接使用build文件引入AndroidAnnotation。這裡需要五步。
1.引入對android-apt的依賴。在app module的build文件中添加以下代碼。
buildscript {
    repositories {
        mavenCentral()
    }
    dependencies {
        classpath 'com.neenbedankt.gradle.plugins:android-apt:1.2+'
    }
}

apply plugin: 'android-apt'  //添加android-apt插件
2.設置android-apt參數 。注意把包名換成你的應用的。另外outputs[0]是在新的android-studio的版本中才需要加的。
apt {
    arguments {
        androidManifestFile variant.outputs[0].processResources.manifestFile
        resourcePackageName 你的包名
    }
}
3.使用apt引入對androidannotation的依賴。
dependencies {
    apt org.androidannotations:androidannotations:3.0+
    compile org.androidannotations:androidannotations-api:3.0+
    compile fileTree(dir: 'libs', include: ['*.jar'])
    compile 'com.android.support:appcompat-v7:21.0.3'
}
5.最後的build文件應該是這樣的。
buildscript {
    repositories {
        mavenCentral()
    }
    dependencies {
        classpath 'com.neenbedankt.gradle.plugins:android-apt:1.2+'
    }
}

apply plugin: 'com.android.application'
apply plugin: 'android-apt'

android {
    compileSdkVersion 21
    buildToolsVersion 21.1.2

    defaultConfig {
        applicationId com.tanglikang.annotationtest
        minSdkVersion 9
        targetSdkVersion 21
        versionCode 1
        versionName 1.0
    }
    buildTypes {
        release {
            minifyEnabled false
            proguardFiles getDefaultProguardFile('proguard-android.txt'), 'proguard-rules.pro'
        }
    }
}

apt {
    arguments {
        androidManifestFile variant.outputs[0].processResources.manifestFile
        resourcePackageName com.tanglikang.annotationtest
    }
}


dependencies {
    apt org.androidannotations:androidannotations:3.0+          // add these
    compile org.androidannotations:androidannotations-api:3.0+  // two lines
    compile fileTree(dir: 'libs', include: ['*.jar'])
    compile 'com.android.support:appcompat-v7:21.0.3'
}
6.重新build工程,系統會自動下載依賴的第三方庫。然後就可以使用AndroidAnnotation了。
AndroidAnnotation的使用其實很簡單,主要需要注意兩個點。
一是標簽的使用。AA中有很多有用的標簽,具體可以參考以下網頁:https://github.com/excilys/androidannotations/wiki/AvailableAnnotations。
二是在編譯工程的時候,AA會將原來的Activity換成Activity_的形式,所以需要在AndroidMainfest中也做相應地修改。
這裡嘗試一個最簡單地例子。這裡使用了三個標簽@EActivity設置布局文件。@ViewById引入一個控件。@Click設置空間點擊事件。
@EActivity(R.layout.activity_main)
public class MainActivity extends ActionBarActivity {


    @ViewById(R.id.tv_1)
    TextView hello;

    @Click(R.id.tv_1)
    public void showToast(){
        Toast.makeText(MainActivity.this, ok, Toast.LENGTH_LONG).show();
    }


    @Override
    protected void onCreate(Bundle savedInstanceState) {
        super.onCreate(savedInstanceState);
    }

}
經過實踐,AndroidAnnotation確實能夠大幅度增加android編程效率,值得學習和使用。
 Android之旅十一 android中數據存儲(1)
Android中的數據存儲主要有以下幾種方式: 1、使用SharedPreferences:該存儲方式主要用於應用程序有少量的數據需要保存,而且這些數據的格
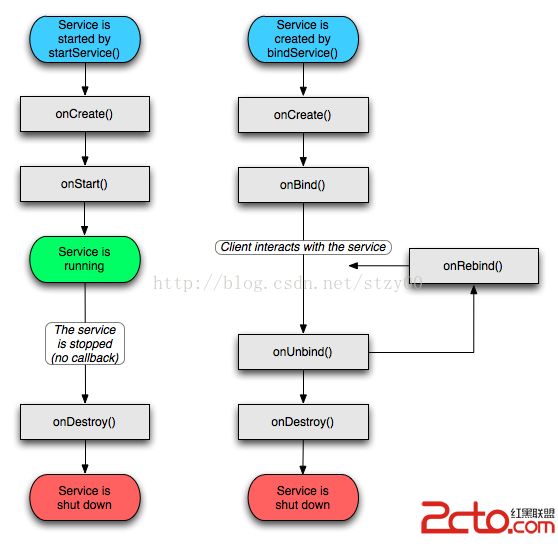
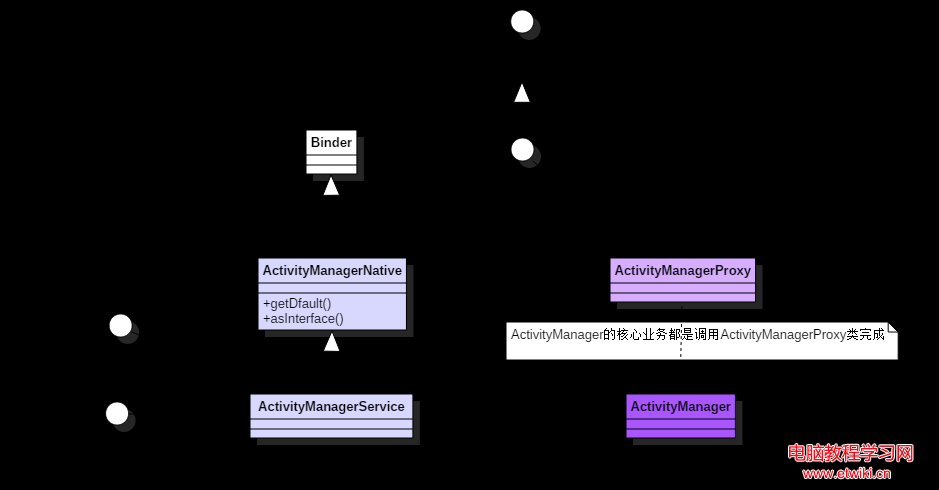 startService啟動過程分析詳細教程
基於Android 6.0的源碼剖析, 分析android Service啟動流程中ActivityManagerService所扮演的角色/framewo
 Universal-Image-Loader,android-Volley,Picasso、Fresco和Glide圖片緩存庫的聯系與區別
前言Universal-Image-Loader,android-Volley,Picasso、Fresco和Glide五大Android開源組件加載網絡圖片比較。在An
 Vuforia unity開發攝像頭問題
項目一直在趕進度,寫博的時間越來越少了~從事Unity開發也快兩個月了,AR方向~ 使用的是高通家的SDK Vuforia。。。從工程融合一直到對unity和Vufori