編輯:關於Android編程
ScrollView和ListView這兩個控件想必大家都不會陌生,但是這兩者嵌套使用的時候就會出現麻煩。比如,我們如果想在ListView下面添加其他的布局或者控件,然後想讓它們作為一個整體都可以滑動的話,最常想到的就是用一個ScrollView把它們包裹起來。想法似乎很美好,但是現實就有點殘酷了。我們可以寫一個小例子體驗一下。
首先創建一個Activity,在它的布局文件上放置一個ListView:
<?xml version="1.0" encoding="utf-8"?>
<LinearLayout xmlns:android="http://schemas.android.com/apk/res/android"
  xmlns:tools="http://schemas.android.com/tools"
  android:layout_width="match_parent"
  android:layout_height="match_parent"
  android:orientation="vertical"
  tools:context="com.lin.mr.mystudy.scrollview.TestActivity">

  <ListView
    android:id="@+id/listView"
    android:layout_width="match_parent"
    android:layout_height="wrap_content">
  </ListView>

</LinearLayout>
然後在代碼中使用for循環生成一些數據,並使用ArrayAdapter適配數據。這裡允許我偷一下懶,ListView的item布局直接使用Android提供的R.layout.simple_list_item_1,而沒有自己去自定義。
public class TestActivity extends Activity {
  private ListView listView;
  private ArrayList<String> list;

  @Override
  protected void onCreate(Bundle savedInstanceState) {
    super.onCreate(savedInstanceState);
    setContentView(R.layout.activity_test);
    listView = (ListView) findViewById(R.id.listView);
findViewById(R.id.ll_container);

    list = new ArrayList<>();
    //生成需要顯示到ListView中的數據
    for (int i = 0; i < 30; i++) {
      list.add("這是數據"+i);
    }
    //使用ArrayAdapter適配數據
    listView.setAdapter(new ArrayAdapter<String>(this, android.R.layout.simple_list_item_1,list));
  }
}
確保你當前的Activity為啟動Activity,然後運行App,可以看到如下的效果:
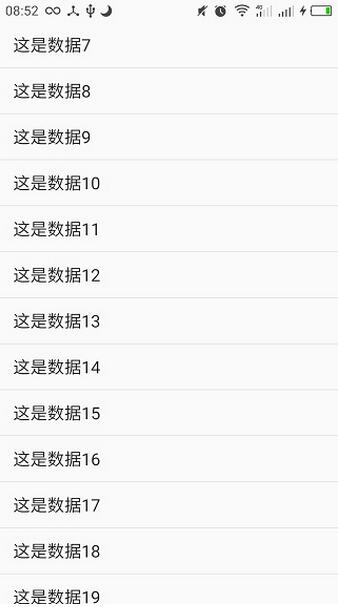
好,看起來沒有問題,但是如果這時我們需要在這個ListView的頭部或者底部添加一些控件,然後讓它們整體都可以滑動呢?我們可以先這樣試試:
<?xml version="1.0" encoding="utf-8"?>
<ScrollView xmlns:android="http://schemas.android.com/apk/res/android"
  xmlns:tools="http://schemas.android.com/tools"
  android:layout_width="match_parent"
  android:layout_height="match_parent"
  tools:context="com.lin.mr.mystudy.scrollview.TestActivity">

  <LinearLayout
    android:layout_width="match_parent"
    android:layout_height="match_parent"
    android:orientation="vertical">

    <ListView
      android:id="@+id/listView"
      android:layout_width="match_parent"
      android:layout_height="wrap_content">

    </ListView>

    <ImageView
      android:layout_width="wrap_content"
      android:layout_height="wrap_content"
      android:src="@mipmap/ic_launcher" />

    <ImageView
      android:layout_width="wrap_content"
      android:layout_height="wrap_content"
      android:src="@mipmap/ic_launcher" />

    <Button
      android:layout_width="match_parent"
      android:layout_height="wrap_content"
      android:text="按鈕一" />

    <Button
      android:layout_width="match_parent"
      android:layout_height="wrap_content"
      android:text="按鈕二" />

  </LinearLayout>

</ScrollView>
在ListView的頭部和底部加了幾個控件,然後把所有的控件都用一個線性布局包裹起來,再把最外層的布局改為ScrollView,再次運行,麻煩出現了:
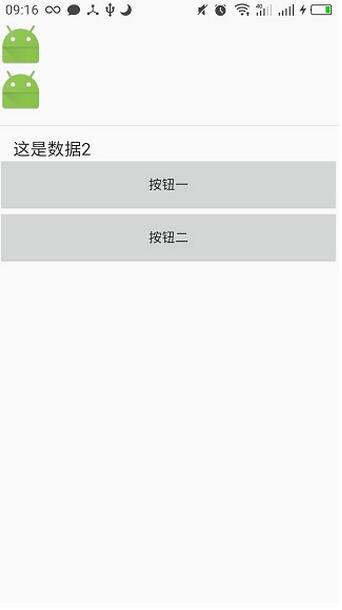
天!我們的ListView只剩下小小的一行了!試著滑動一下,發現滑動是沒有問題的,就是只能顯示一行。那我們該怎麼辦呢?
別著急,有一個簡單的方法可以起死回生。我們可以自定義一個ListView:
/**
 * 自定義ListView
 */
public class MyListView extends ListView {

  public MyListView(Context context) {
    super(context);
  }

  public MyListView(Context context, AttributeSet attrs) {
    super(context, attrs);
  }

  public MyListView(Context context, AttributeSet attrs, int defStyleAttr) {
    super(context, attrs, defStyleAttr);
  }

  @Override
  protected void onMeasure(int widthMeasureSpec, int heightMeasureSpec) {
    heightMeasureSpec = MeasureSpec.makeMeasureSpec(Integer.MAX_VALUE>>2,//右移運算符,相當於除於4
        MeasureSpec.AT_MOST);//測量模式取最大值
    super.onMeasure(widthMeasureSpec,heightMeasureSpec);//重新測量高度
  }
}
在這個ListView中我們重寫了onMeasure方法,然後重新定義heightMeasureSpec參數,它的大小取最大值的四分之一(一般的做法),測量模式取最大值,然後調用父類的構造方法重新傳入heightMeasureSpec參數。這些步驟是為了保證ListView的高度不出現問題。完成後,我們在布局文件中使用自定義的ListView:
<?xml version="1.0" encoding="utf-8"?>
<ScrollView xmlns:android="http://schemas.android.com/apk/res/android"
  xmlns:tools="http://schemas.android.com/tools"
  android:layout_width="match_parent"
  android:layout_height="match_parent"
  tools:context="com.lin.mr.mystudy.scrollview.TestActivity">

  <LinearLayout
    android:layout_width="match_parent"
    android:layout_height="match_parent"
    android:orientation="vertical">

    <ImageView
      android:layout_width="wrap_content"
      android:layout_height="wrap_content"
      android:src="@mipmap/ic_launcher" />

    <ImageView
      android:layout_width="wrap_content"
      android:layout_height="wrap_content"
      android:src="@mipmap/ic_launcher" />

    <com.lin.mr.mystudy.scrollview.MyListView
      android:id="@+id/listView"
      android:layout_width="match_parent"
      android:layout_height="wrap_content">

    </com.lin.mr.mystudy.scrollview.MyListView>

    <Button
      android:layout_margin="4dp"
      android:layout_width="match_parent"
      android:layout_height="wrap_content"
      android:text="按鈕一" />

    <Button
      android:layout_margin="4dp"
      android:layout_width="match_parent"
      android:layout_height="wrap_content"
      android:text="按鈕二" />

  </LinearLayout>

</ScrollView>
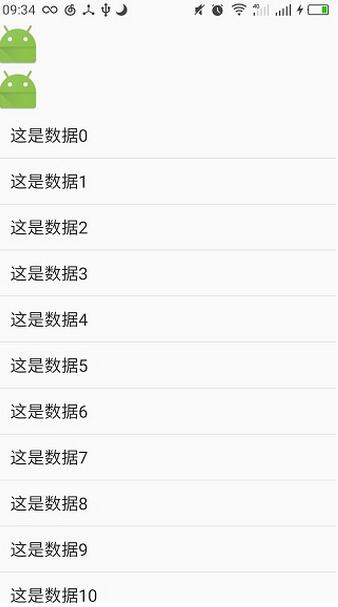
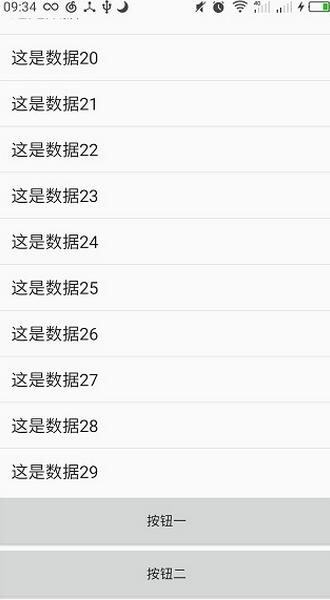
運行之後,發現問題解決了!ListView可以完整地顯示,而且也可以滑動到頭部和頂部的布局。
其實要想顯示ListView的頭部或者底部布局或者控件的話不一定要用ScrollView,我們也可以將頭部和底部作為一個整體的布局,即頭布局或者腳布局,然後調用ListView的addHeaderView方法或者addFooterView方法就可以將它添加到ListView的頭部或者底部了。
以上就是本文的全部內容,希望對大家的學習有所幫助,也希望大家多多支持本站。
 (Android Framework 之路)BootAnimation(2)
前言上一篇主要講解了BootAnimation是從何而來,如何啟動,從開機,到SurfaceFlinger服務起來,然後到執行開機動畫,如果要深入的看裡面的代碼,是需要花
 Android學習筆記之Menu一級菜單、二級菜單的使用
(1)布局文件沒有做更改 (2)在res--menu目錄下的main.xml文件中代碼如下:
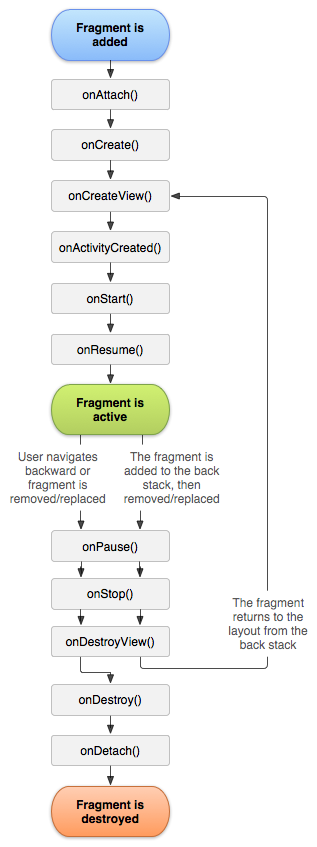 Fragment生命周期詳解
1. Fragment概述Fragment從Android v3.0版本開始引入隨著界面布局的復雜化,處理起來也更加的復雜,引入Fragment可以把activity拆分
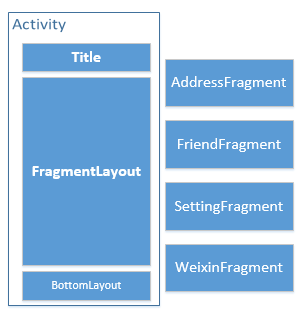 android-多種方式實現主界面的Tab
前言這篇文章主要介紹多種方式實現主界面的tab,包括:(1)使用Fragment實現(2)使用ViewPage實現(3)使用ViewPage+FragmentPageAd