編輯:關於Android編程
做Android開發我們一般是從原生態的開始,就是調用默認那些Android代碼來開發我們的應用,但是到了一定程度,我們就想著怎麼來快速開發我們的應用,這個時候我們就要著手來研究框架了。下面介紹一個很流行的框架xUtil:
DbUtils模塊:
- android中的orm框架,一行代碼就可以進行增刪改查;
- 支持事務,默認關閉;
- 可通過注解自定義表名,列名,外鍵,唯一性約束,NOT NULL約束,CHECK約束等(需要混淆的時候請注解表名和列名);
- 支持綁定外鍵,保存實體時外鍵關聯實體自動保存或更新;
- 自動加載外鍵關聯實體,支持延時加載;
- 支持鏈式表達查詢,更直觀的查詢語義,參考下面的介紹或sample中的例子。
ViewUtils模塊:
- android中的ioc框架,完全注解方式就可以進行UI,資源和事件綁定;
- 新的事件綁定方式,使用混淆工具混淆後仍可正常工作;
- 目前支持常用的20種事件綁定,參見ViewCommonEventListener類和包com.lidroid.xutils.view.annotation.event。
HttpUtils模塊:
- 支持同步,異步方式的請求;
- 支持大文件上傳,上傳大文件不會oom;
- 支持GET,POST,PUT,MOVE,COPY,DELETE,HEAD,OPTIONS,TRACE,CONNECT請求;
- 下載支持301/302重定向,支持設置是否根據Content-Disposition重命名下載的文件;
- 返回文本內容的請求(默認只啟用了GET請求)支持緩存,可設置默認過期時間和針對當前請求的過期時間。
BitmapUtils模塊:
- 加載bitmap的時候無需考慮bitmap加載過程中出現的oom和android容器快速滑動時候出現的圖片錯位等現象;
- 支持加載網絡圖片和本地圖片;
- 內存管理使用lru算法,更好的管理bitmap內存;
- 可配置線程加載線程數量,緩存大小,緩存路徑,加載顯示動畫等...
DbUtils db = DbUtils.create(this); User user = new User(); //這裡需要注意的是User對象必須有id屬性,或者有通過@ID注解的屬性 user.setEmail([email protected]); user.setName(wyouflf); db.save(user); // 使用saveBindingId保存實體時會為實體的id賦值 ... // 查找 Parent entity = db.findById(Parent.class, parent.getId()); Listlist = db.findAll(Parent.class);//通過類型查找 Parent Parent = db.findFirst(Selector.from(Parent.class).where(name,=,test)); // IS NULL Parent Parent = db.findFirst(Selector.from(Parent.class).where(name,=, null)); // IS NOT NULL Parent Parent = db.findFirst(Selector.from(Parent.class).where(name,!=, null)); // WHERE id<54 AND (age>20 OR age<30) ORDER BY id LIMIT pageSize OFFSET pageOffset List list = db.findAll(Selector.from(Parent.class) .where(id ,<, 54) .and(WhereBuilder.b(age, >, 20).or(age, < , 30)) .orderBy(id) .limit(pageSize) .offset(pageSize * pageIndex)); // op為in時,最後一個參數必須是數組或Iterable的實現類(例如List等) Parent test = db.findFirst(Selector.from(Parent.class).where(id, in, new int[]{1, 2, 3})); // op為between時,最後一個參數必須是數組或Iterable的實現類(例如List等) Parent test = db.findFirst(Selector.from(Parent.class).where(id, between, new String[]{1, 5})); DbModel dbModel = db.findDbModelAll(Selector.from(Parent.class).select(name));//select(name)只取出name列 List dbModels = db.findDbModelAll(Selector.from(Parent.class).groupBy(name).select(name, count(name))); ... List dbModels = db.findDbModelAll(sql); // 自定義sql查詢 db.execNonQuery(sql) // 執行自定義sql ...
// xUtils的view注解要求必須提供id,以使代碼混淆不受影響。
@ViewInject(R.id.textView)
TextView textView;

//@ViewInject(vale=R.id.textView, parentId=R.id.parentView)
//TextView textView;

@ResInject(id = R.string.label, type = ResType.String)
private String label;

// 取消了之前使用方法名綁定事件的方式,使用id綁定不受混淆影響
// 支持綁定多個id @OnClick({R.id.id1, R.id.id2, R.id.id3})
// or @OnClick(value={R.id.id1, R.id.id2, R.id.id3}, parentId={R.id.pid1, R.id.pid2, R.id.pid3})
// 更多事件支持參見ViewCommonEventListener類和包com.lidroid.xutils.view.annotation.event。
@OnClick(R.id.test_button)
public void testButtonClick(View v) { // 方法簽名必須和接口中的要求一致
    ...
}
...
//在Activity中注入:
@Override
public void onCreate(Bundle savedInstanceState) {
    super.onCreate(savedInstanceState);
    setContentView(R.layout.main);
    ViewUtils.inject(this); //注入view和事件
    ...
    textView.setText(some text...);
    ...
}
//在Fragment中注入:
@Override
public View onCreateView(LayoutInflater inflater, ViewGroup container, Bundle savedInstanceState) {
    View view = inflater.inflate(R.layout.bitmap_fragment, container, false); // 加載fragment布局
    ViewUtils.inject(this, view); //注入view和事件
    ...
}
//在PreferenceFragment中注入:
public void onActivityCreated(Bundle savedInstanceState) {
    super.onActivityCreated(savedInstanceState);
    ViewUtils.inject(this, getPreferenceScreen()); //注入view和事件
    ...
}
// 其他重載
// inject(View view);
// inject(Activity activity)
// inject(PreferenceActivity preferenceActivity)
// inject(Object handler, View view)
// inject(Object handler, Activity activity)
// inject(Object handler, PreferenceGroup preferenceGroup)
// inject(Object handler, PreferenceActivity preferenceActivity)
HttpUtils http = new HttpUtils();
http.send(HttpRequest.HttpMethod.GET,
    http://www.lidroid.com,
    new RequestCallBack(){
        @Override
        public void onLoading(long total, long current, boolean isUploading) {
            testTextView.setText(current + / + total);
        }

        @Override
        public void onSuccess(ResponseInfo responseInfo) {
            textView.setText(responseInfo.result);
        }

        @Override
        public void onStart() {
        }

        @Override
        public void onFailure(HttpException error, String msg) {
        }
});
RequestParams params = new RequestParams();
params.addHeader(name, value);
params.addQueryStringParameter(name, value);

// 只包含字符串參數時默認使用BodyParamsEntity,
// 類似於UrlEncodedFormEntity(application/x-www-form-urlencoded)。
params.addBodyParameter(name, value);

// 加入文件參數後默認使用MultipartEntity(multipart/form-data),
// 如需multipart/related,xUtils中提供的MultipartEntity支持設置subType為related。
// 使用params.setBodyEntity(httpEntity)可設置更多類型的HttpEntity(如:
// MultipartEntity,BodyParamsEntity,FileUploadEntity,InputStreamUploadEntity,StringEntity)。
// 例如發送json參數:params.setBodyEntity(new StringEntity(jsonStr,charset));
params.addBodyParameter(file, new File(path));
...

HttpUtils http = new HttpUtils();
http.send(HttpRequest.HttpMethod.POST,
    uploadUrl....,
    params,
    new RequestCallBack() {

        @Override
        public void onStart() {
            testTextView.setText(conn...);
        }

        @Override
        public void onLoading(long total, long current, boolean isUploading) {
            if (isUploading) {
                testTextView.setText(upload:  + current + / + total);
            } else {
                testTextView.setText(reply:  + current + / + total);
            }
        }

        @Override
        public void onSuccess(ResponseInfo responseInfo) {
            testTextView.setText(reply:  + responseInfo.result);
        }

        @Override
        public void onFailure(HttpException error, String msg) {
            testTextView.setText(error.getExceptionCode() + : + msg);
        }
});
HttpUtils http = new HttpUtils();
HttpHandler handler = http.download(http://apache.dataguru.cn/httpcomponents/httpclient/source/httpcomponents-client-4.2.5-src.zip,
    /sdcard/httpcomponents-client-4.2.5-src.zip,
    true, // 如果目標文件存在,接著未完成的部分繼續下載。服務器不支持RANGE時將從新下載。
    true, // 如果從請求返回信息中獲取到文件名,下載完成後自動重命名。
    new RequestCallBack() {

        @Override
        public void onStart() {
            testTextView.setText(conn...);
        }

        @Override
        public void onLoading(long total, long current, boolean isUploading) {
            testTextView.setText(current + / + total);
        }

        @Override
        public void onSuccess(ResponseInfo responseInfo) {
            testTextView.setText(downloaded: + responseInfo.result.getPath());
        }


        @Override
        public void onFailure(HttpException error, String msg) {
            testTextView.setText(msg);
        }
});

...
//調用cancel()方法停止下載
handler.cancel();
BitmapUtils bitmapUtils = new BitmapUtils(this);

// 加載網絡圖片
bitmapUtils.display(testImageView, http://bbs.lidroid.com/static/image/common/logo.png);

// 加載本地圖片(路徑以/開頭, 絕對路徑)
bitmapUtils.display(testImageView, /sdcard/test.jpg);

// 加載assets中的圖片(路徑以assets開頭)
bitmapUtils.display(testImageView, assets/img/wallpaper.jpg);

// 使用ListView等容器展示圖片時可通過PauseOnScrollListener控制滑動和快速滑動過程中時候暫停加載圖片
listView.setOnScrollListener(new PauseOnScrollListener(bitmapUtils, false, true));
listView.setOnScrollListener(new PauseOnScrollListener(bitmapUtils, false, true, customListener));
// 自動添加TAG,格式: className.methodName(L:lineNumber)
// 可設置全局的LogUtils.allowD = false,LogUtils.allowI = false...,控制是否輸出log。
// 自定義log輸出LogUtils.customLogger = new xxxLogger();
LogUtils.d(wyouflf);
實例,BitmapUtils:
public class xUtilsImageLoader {//框架裡面設置了緩存和異步操作,不用單獨設置線程池和緩存機制(也可以自定義緩存路徑)

    private BitmapUtils bitmapUtils;
    private Context mContext;

    public xUtilsImageLoader(Context context) {
        // TODO Auto-generated constructor stub
        this.mContext = context;
        bitmapUtils = new BitmapUtils(mContext);
        bitmapUtils.configDefaultLoadingImage(R.drawable.logo_new);//默認背景圖片
        bitmapUtils.configDefaultLoadFailedImage(R.drawable.logo_new);//加載失敗圖片
        bitmapUtils.configDefaultBitmapConfig(Bitmap.Config.RGB_565);//設置圖片壓縮類型

    }
    /**
     *
     * @author sunglasses
     * @category 圖片回調函數
     */
    public class CustomBitmapLoadCallBack extends
            DefaultBitmapLoadCallBack {

        @Override
        public void onLoading(ImageView container, String uri,
                BitmapDisplayConfig config, long total, long current) {
        }

        @Override
        public void onLoadCompleted(ImageView container, String uri,
                Bitmap bitmap, BitmapDisplayConfig config, BitmapLoadFrom from) {
            // super.onLoadCompleted(container, uri, bitmap, config, from);
            fadeInDisplay(container, bitmap);
        }

        @Override
        public void onLoadFailed(ImageView container, String uri,
                Drawable drawable) {
            // TODO Auto-generated method stub
        }
    }

    private static final ColorDrawable TRANSPARENT_DRAWABLE = new ColorDrawable(
            android.R.color.transparent);
    /**
     * @author sunglasses
     * @category 圖片加載效果
     * @param imageView
     * @param bitmap
     */
    private void fadeInDisplay(ImageView imageView, Bitmap bitmap) {//目前流行的漸變效果
        final TransitionDrawable transitionDrawable = new TransitionDrawable(
                new Drawable[] { TRANSPARENT_DRAWABLE,
                        new BitmapDrawable(imageView.getResources(), bitmap) });
        imageView.setImageDrawable(transitionDrawable);
        transitionDrawable.startTransition(500);
    }
    public void display(ImageView container,String url){//外部接口函數
        bitmapUtils.display(container, url,new CustomBitmapLoadCallBack());
    }
}
實例:HttpGet:
public class xUtilsGet {//自動實現異步處理,自己不用處理

    public void getJson(String url,RequestParams params,final IOAuthCallBack iOAuthCallBack){

        HttpUtils http = new HttpUtils();
        http.configCurrentHttpCacheExpiry(1000 * 10);//設置超時時間
        http.send(HttpMethod.GET, url, params, new RequestCallBack() {//接口回調

            @Override
            public void onFailure(HttpException arg0, String arg1) {
                // TODO Auto-generated method stub
            }

            @Override
            public void onSuccess(ResponseInfo info) {
                // TODO Auto-generated method stub
                iOAuthCallBack.getIOAuthCallBack(info.result);//利用接口回調數據傳輸
            }
        });
    }
    public void getCataJson(int cityId,IOAuthCallBack iOAuthCallBack) {//外部接口函數
        String url = http://xxxxxxxxxx;
        RequestParams params = new RequestParams();
        params.addQueryStringParameter(currentCityId, cityId+);
        getJson(url,params,iOAuthCallBack);
    }
}
實例:HttpPost(和HttpGet類似):
public class xUtilsPost {//自動實現異步處理

    public void doPost(String url, RequestParams params,
            final IOAuthCallBack iOAuthCallBack) {

        HttpUtils http = new HttpUtils();
        http.configCurrentHttpCacheExpiry(1000 * 10);
        http.send(HttpMethod.POST, url, params, new RequestCallBack() {

            @Override
            public void onFailure(HttpException arg0, String arg1) {
                // TODO Auto-generated method stub
            }

            @Override
            public void onSuccess(ResponseInfo info) {
                // TODO Auto-generated method stub
                iOAuthCallBack.getIOAuthCallBack(info.result);
            }
        });
    }

    public void doPostLogin(int cityId, IOAuthCallBack iOAuthCallBack) {
        String url = http://xxxxxxxxxxxx;
        RequestParams params = new RequestParams();
        params.addQueryStringParameter(currentCityId, cityId + );
        params.addBodyParameter(path, /apps/postCatch);
        doPost(url, params, iOAuthCallBack);
    }
}
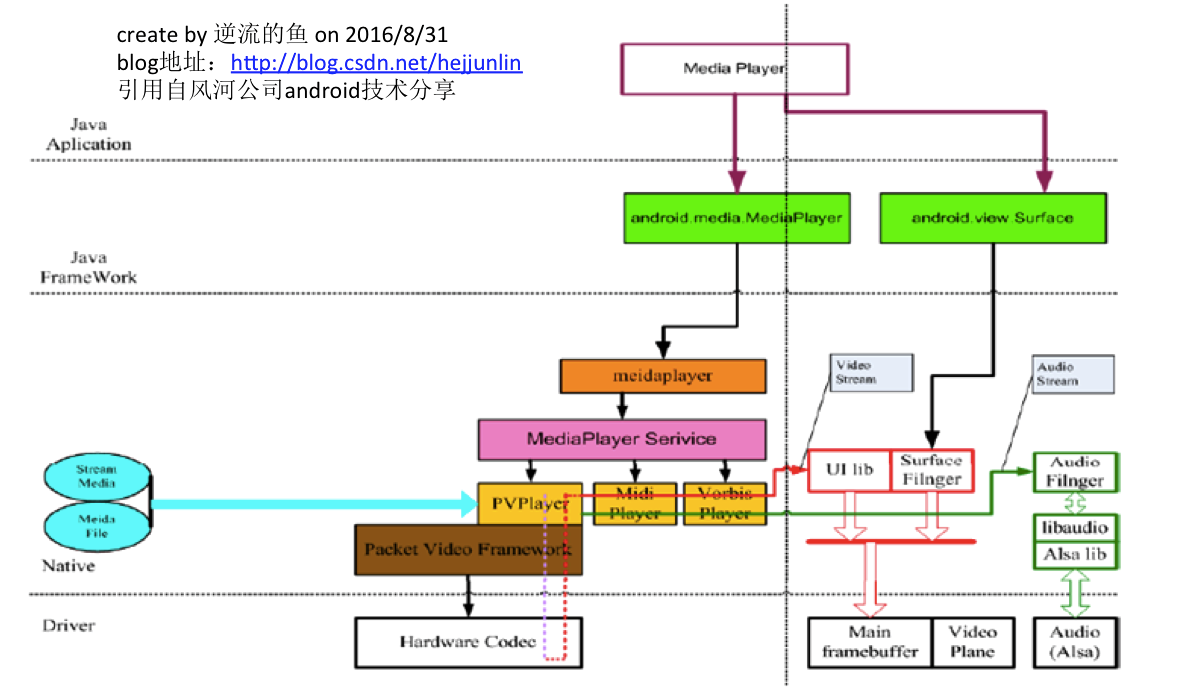 Android Multimedia框架總結(二)MediaPlayer框架及播放網絡視頻案例
前言:前面我們介紹MediaPlayer相關方法,有人說,沒有實際例子,看得不是很明白,今天在分析MediaPlayer時,順帶一個播放網絡視頻例子。可以自行試試。同樣先
 Android實現頂部導航菜單左右滑動效果
本文給大家介紹在Android中如何實現頂部導航菜單左右滑動效果,具體內容如下第一種解決方案: 實現原理是使用android-support-v4.jar包中ViewPa
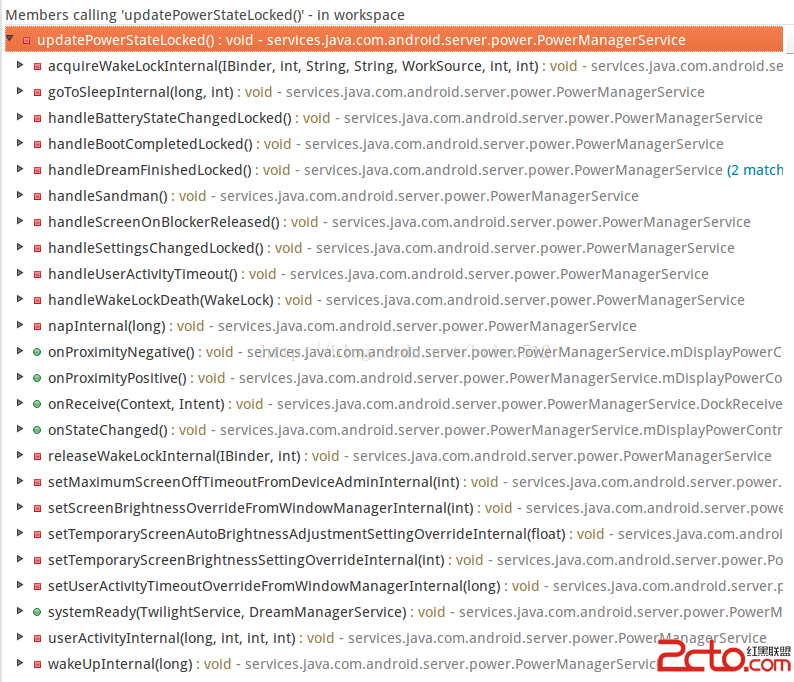 Android待機狀態更新
Android的待機狀態管理由PowerManagerService.java管理主要的狀態更新方法在下面貼出代碼, 注釋寫的很清楚, 第一次看系統源碼感覺還比較爽主要是
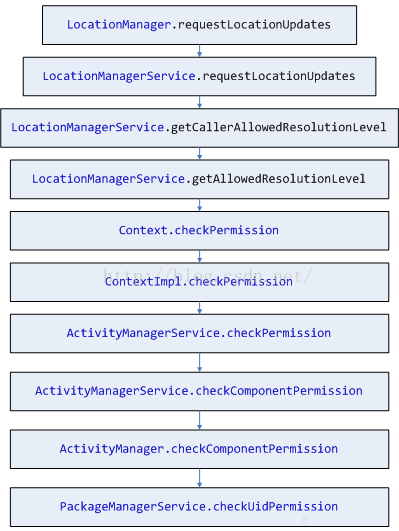
 Android Service講解 和 aidl 實現
一、Android Service1.建立一個serviceservice和activity很相識,只是service在後台運行,activity在前台運行,他們都屬於同