編輯:關於Android編程
android系統內置字體
android 系統本身內置了一些字體,可以在程序中使用,並且支持在xml配置textView的時候進行修改字體的樣式。支持字段為android:textStyle ,android:typeface, android:fontFamily,系統內置了normal|bold|italic三種style, 內置了normal,sans,serif,monospace,幾種字體(實測這幾種字體僅英文有效),typace和fontFamily功能一樣。
使用自定義的字體
以上的方式可以改變字體的樣式,還不是真正的自定義。android系統支持TypeFace,即ttf的字體文件。我們可以在程序中放入ttf字體文件,在程序中使用Typeface設置字體。
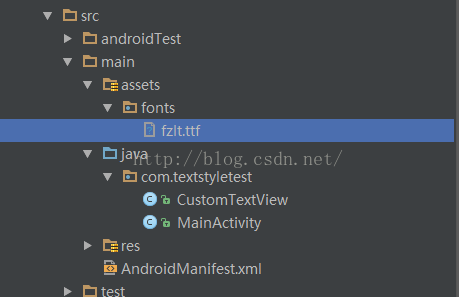
第一步,在assets目錄下新建fonts目錄,把ttf字體文件放到這。
第二步,程序中調用:
public class MainActivity extends AppCompatActivity {
   private TextView textView;
   @Override
   protected void onCreate(Bundle savedInstanceState) {
     super.onCreate(savedInstanceState);
     setContentView(R.layout.activity_main);
     textView= (TextView) findViewById(R.id.text);
     AssetManager assets = getAssets();
     Typeface fromAsset = Typeface.createFromAsset(assets, "fonts/fzlt.ttf");
     textView.setTypeface(fromAsset);
  }
}
注意ttf文件命名不能使用中文,否則可能無法加載。
對於需要使用比較多的地方,可以寫一個TextView的子類來統一處理。
public class CustomTextView extends TextView {

   public CustomTextView(Context context) {
     super(context);
     // TODO Auto-generated constructor stub
   }

   public CustomTextView(Context context, AttributeSet attrs) {
     super(context,attrs);
     // TODO Auto-generated constructor stub
   }

   public CustomTextView(Context context, AttributeSet attrs,int defStyle) {
     super(context,attrs,defStyle);
     // TODO Auto-generated constructor stub
   }

   public void setTypeface(Typeface tf, int style) {
     super.setTypeface(AppContext.getInstance().getTypeface());
   }

}
//初始化自定義字體
typeface = Typeface.createFromAsset(getAssets(), "fonts/fzlt.ttf");
法還是有點缺點的:只能替換一類控件的字體,如果需要替換Button或EditText控件的字體,需要以相同的方式自定義這些控件,這樣工作量大,如何高效替換整個app中的字體,見下方參考資料。
在webview中使用自定義的字體
對於本地的網頁,在asset目錄放字體文件,並在css中添加以下內容,自定義一個字體face,並且在需要的地方使用這個字體face即可。
<style>
@font-face {
   font-family: 'myface';
   src: url('file:///android_asset/fonts/fzlt.ttf');
}
body {
   margin: 0;
   padding: 0;
   font-family:'myface','方正蘭亭纖黑簡體';
}
.textbar{ box-sizing:border-box; width:100%; padding:5px;}
.textbar p{ font-size:16px; text-align:justify; color:#333;line-height:24px; margin:0 0 0 0;}
.textbar h1{ font-size:18px; margin:10px 0 10px 0;color:#000}
</style>
對於在線的網頁,則需要把字體文件放到服務器,使用同樣的方式定義字體face,應用到每個地方。
為了減少網頁或者說服務器端的工作,可以使用本地注入的方式注入font-face的css,並對整個網頁進行樣式替換。給webview自定義webViewClient,重寫onPageFinish,在其中添加如下內容:
view.loadUrl("javascript:!function(){" + "s=document.createElement('style');s.innerHTML=" + "\"@font-face{font-family:myhyqh;src:url('**injection**/hyqh.ttf');}*{font-family:myhyqh !important;}\";"
+ "document.getElementsByTagName('head')[0].appendChild(s);" +
"document.getElementsByTagName('body')[0].style.fontFamily = \"myhyqh\";}()");

//由於網頁上是沒有權限訪問本地的asset文件夾的,因此我們需要攔截請求來加載本地的文件,我這裡替換了`file:
//android_assets/`為 `**injection**/`了,我們還需要重寫`shouldInterceptRequest`
//在請求為我們這個字體文件的時候,加載本地文件:
@Override
public WebResourceResponse shouldInterceptRequest (WebView view, String url){
   WebResourceResponse response = super.shouldInterceptRequest(view, url);
   Log.i("load intercept request:" + url);
   if (url != null && url.contains("**injection**/")) {
     //String assertPath = url.replace("**injection**/", "");
     String assertPath = url.substring(url.indexOf("**injection**/") + "**injection**/".length(), url.length());
     try {
        response = new WebResourceResponse("application/x-font-ttf", "UTF8", getAssets().open(assertPath));
     } catch (IOException e) {
        e.printStackTrace();
     }
   }
   return response;
}
感謝閱讀,希望能幫助到大家,謝謝大家對本站的支持!
 Android POST GET請求
Android應用經常會和服務器端交互,這就需要手機客戶端發送網絡請求,下面介紹常用的兩種網絡請求方式POST,GET。首先要區別POST和GET請求 1. GET是
 Android仿ViVO X6 極速閃充動畫效果
一直都在看自定義View,經過一個星期的堅持,基本上能夠寫出一些比較實用的控件效果了,今天天氣太熱,就待在家裡玩手機,然後手機沒電了,在充電的時候,看到了手機的充電動畫,
 Android開發環境搭建
1 軟件下載 (1) JDK : http://www.oracle.com/technetwork/java/javase/downloads/index.html(2
 Android中GPS定位的用法實例
GPS定位是目前很多手機都有的功能,且非常實用。本文以實例形式講述了Android中GPS定位的用法。分享給大家供大家參考之用。具體方法如下:一般在Android中通過G