編輯:關於Android編程
在java中有annotation這個東西,因為平時用的也並不是太多,所以一直不是很理解,今天特意花了幾個小時看了下相關的知識點,熟悉了一下annotation的簡單用法。
annotation簡答直接用法如下:
一個自定義的annotation主要包括三部分:annotation的定義,annotation的使用,annotation的處理;事實上整個注解機制重點在於最後反射對注解值的使用。
第一步:定義如下:
package com.example.annotationtest.annotation;

import java.lang.annotation.ElementType;
import java.lang.annotation.Retention;
import java.lang.annotation.RetentionPolicy;
import java.lang.annotation.Target;

@Target(ElementType.TYPE)
@Retention(RetentionPolicy.RUNTIME)
public @interface ContentView {
    int value();
}
@Target表明的是注解的類型,即類注解、方法注解、字段注解等
@Retention表明的是注解的使用范圍,即在源碼中的注解、在Runtime的注解等
@interface是一個自定義注解需要的標志,每個自定義的注解都會有相同的格式
第二步:使用的時候注意@Target中所定義的值(以上定義的是類的注解,所以可以按如下方法使用)
package com.example.annotationtest;

import com.example.annotationtest.annotation.ContentView;
import com.example.annotationtest.annotation.ViewUtils;

import android.app.Activity;
import android.os.Bundle;

@ContentView(R.layout.activity_main)
public class MainActivity extends Activity {
    @Override
    protected void onCreate(Bundle savedInstanceState) {
        super.onCreate(savedInstanceState);
        ViewUtils.inject(this);
    }
}
其中主要注意兩處,第一處是MainActivity之上的@ContentView(R.layout.activity_main)這裡代表使用ContentView的注解,第二處是ViewUtils.inject(this),這裡是第三步的功能,主要是執行該注解的過程。第三步:最重要的一步,就是通過反射來執行該注解
package com.example.annotationtest.annotation;

import android.app.Activity;

import java.lang.reflect.Method;

public class ViewUtils {
    public static void inject(Activity activity) {
        injectObject(activity);
    }

    private static void injectObject(Object handler) {
        Class handlerType = handler.getClass();
        ContentView contentView = handlerType.getAnnotation(ContentView.class);
        if (contentView != null) {
            try {
                Method setContentViewMethod = handlerType.getMethod(setContentView, int.class);
                setContentViewMethod.invoke(handler, contentView.value());
            } catch (Throwable e) {
                e.printStackTrace();
            }
        }
    }
}
與普通的反射唯一的不同之處就是,多了從Annotation中拿到其value的一步。
ContentView contentView = handlerType.getAnnotation(ContentView.class);//這是拿到Annotation
contentView.value() //這是拿到在第一步中賦的值
 Day23-AutoCompleteTextView和Scroll
最簡單的使用xml布局文件 Activity.javaList list = new ArrayList<>();list.add("
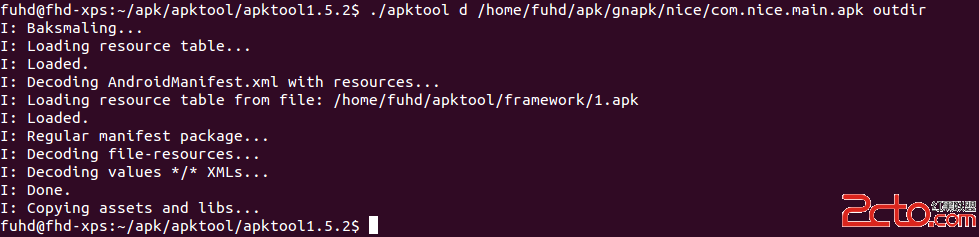 分析Android程序之破解第一個程序
破解Android程序通常的方法是將apk文件利用ApkTool反編譯,生成Smali格式的反匯編代碼,然後閱讀Smali文件的代碼來理解程序的運行機制,找到
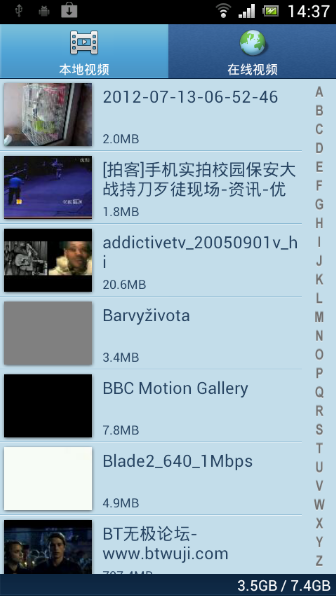 Android 使用Vitamio打造自己的萬能播放器(10)—— 本地播放 (縮略圖、視頻信息、視頻掃描服務)
前言 Vitamio是我們團隊的誠意之作,除了要將VPlayer打造成Android最好的播放器,也要將Vitamio打造成Android最好的播放器組件。新版
 Android開發:JSON簡介&Gson、AS自帶org.son、Jackson解析詳解
前言在上篇文章詳細介紹了XML及其DOM、SAX、PULL解析方法和對比,那麼今天,我們來介紹同樣作為主流的數據交換格式-JSON!定義JavaScript Object