編輯:關於Android編程
天氣說變就變,馬上又變冷了,還好空氣不錯,陽光也不錯,早起上班的車上的人也不多,公司來的同事和昨天一樣一樣的,可能明天會多一些吧,那就再來學習android吧。學了兩個android的組件,這裡學習下第三個android的組件,Content Provider內容提供器。
Content Provider向我們提供了在不同應用程序之間的數據共享,比如微信啊,支付寶啊,想要獲取手機聯系人的信息,而手機聯系人是另一個應用程序,那麼這時候就需要用到Content Provider了。Content Provider為存儲和獲取數據提供了統一的接口,對數據進行了封裝,我們不用關心數據存儲的細節,使用表的形式來組織數據。Android提供了一些默認的ContentProvider,比如音頻,視頻,圖片和通訊錄等。
類似於文件,SharedPreferences或者SQLiteDataBase都有一個路徑,那麼ContentProvider也是有路徑的,它的路徑由Uri表示,Uri主要包含了兩部分的信息,一個是需要操作的ContentProvider,另一個就是對ContentProvider中的什麼數據進行操作。一個簡單的Uri:
content://com.example.contentprovidertest.provider/person/2
主機名或者authority:com.example.contentprovidertest.provider表示,唯一的,一般指的是包名,
路徑:person,表示的是person這個表,2表示id為2。
如果要把上面的字符串轉變為uri,那麼就要使用Uri類中的parse()方法,如下:
Uri uri=Uri.parse("content://com.example.contentprovidertest.provider/person/2");
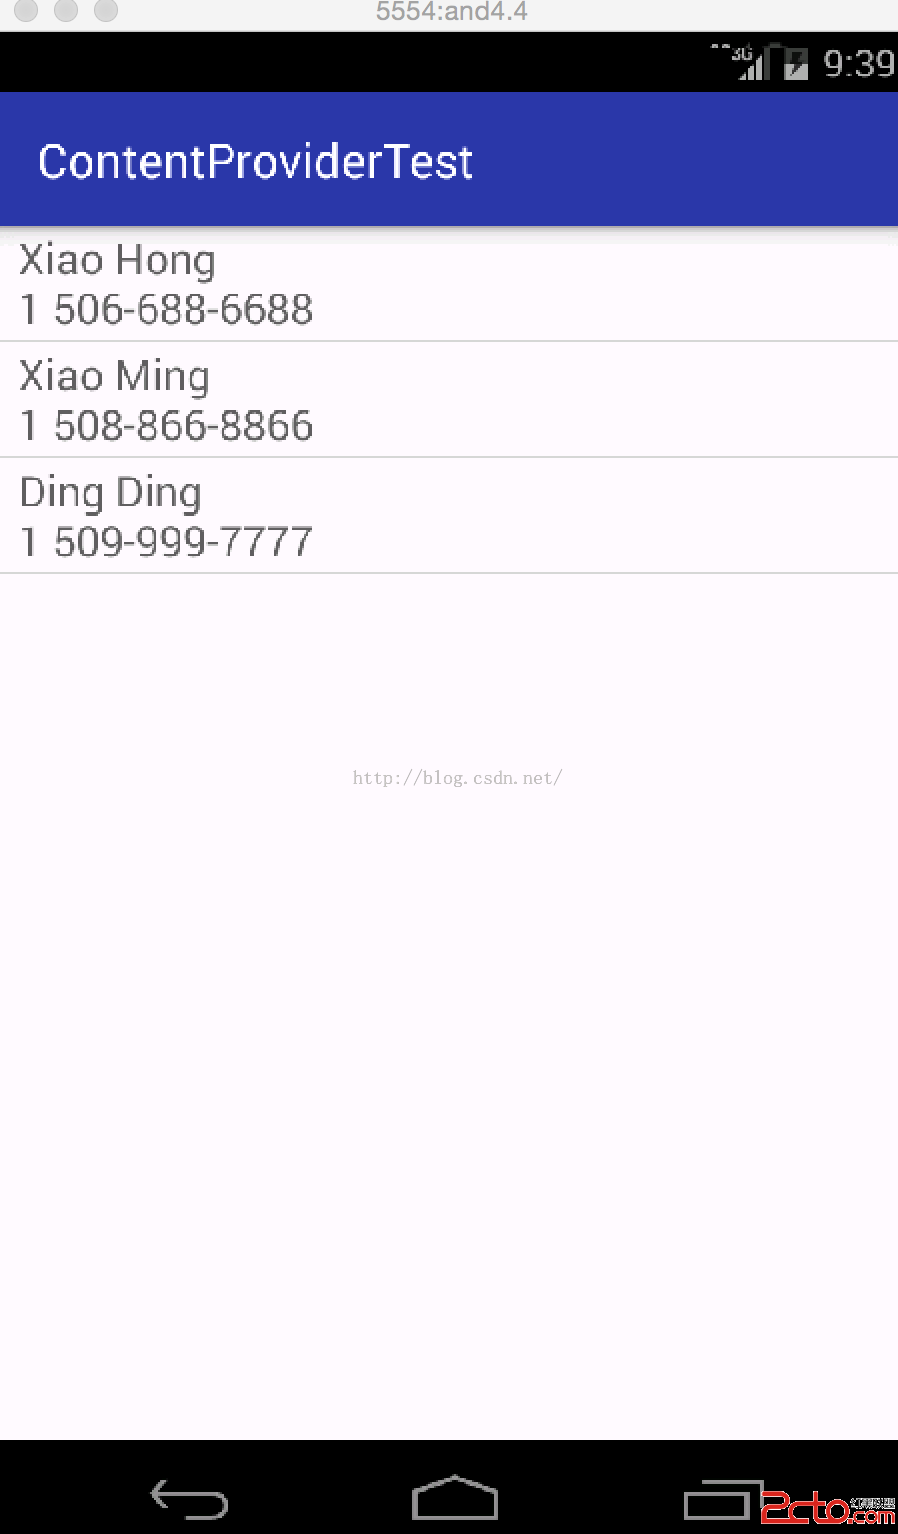
這裡先來寫個例子,用來獲取通訊錄中的信息吧。新建ContentProviderTest工程,因為模擬器的聯系人還沒有創建,這裡先添加幾個好友:
接著我們繼續編寫代碼,先在layout中添加listview,因為通訊錄一般都是用listview來實現的。代碼如下:
<!--{cke_protected}{C}%3C!%2D%2D%3Fxml%20version%3D%221.0%22%20encoding%3D%22utf-8%22%3F%2D%2D%3E-->
<linearlayout xmlns:android="http://schemas.android.com/apk/res/android" xmlns:tools="http://schemas.android.com/tools" android:layout_width="match_parent" android:layout_height="match_parent" android:orientation="vertical" tools:context="com.example.jared.contentprovidertest.MainActivity">

    <listview android:id="@+id/contacts" android:layout_height="match_parent" android:layout_width="match_parent">

</listview></linearlayout>
package com.example.jared.contentprovidertest;

import android.database.Cursor;
import android.os.Bundle;
import android.provider.ContactsContract;
import android.support.v7.app.AppCompatActivity;
import android.widget.ArrayAdapter;
import android.widget.ListView;

import java.util.ArrayList;
import java.util.List;

public class MainActivity extends AppCompatActivity {

    private ListView contactViews;

    ArrayAdapter adapter;
    List contactList = new ArrayList();

    @Override
    protected void onCreate(Bundle savedInstanceState) {
        super.onCreate(savedInstanceState);
        setContentView(R.layout.activity_main);

        contactViews = (ListView)findViewById(R.id.contacts);
        adapter = new ArrayAdapter(this, android.R.layout.simple_list_item_1, contactList);
        contactViews.setAdapter(adapter);
        readContacts();
    }

    public void readContacts() {
        Cursor cursor = null;
        try {
            cursor = getContentResolver().query(ContactsContract.CommonDataKinds.Phone.CONTENT_URI,
                    null, null, null, null);
            while(cursor.moveToNext()) {
                String ContactName = cursor.getString(cursor.getColumnIndex(ContactsContract.CommonDataKinds.Phone.DISPLAY_NAME));
                String ContactPhoneNum = cursor.getString(cursor.getColumnIndex(ContactsContract.CommonDataKinds.Phone.NUMBER));
                contactList.add(ContactName+'\n'+ContactPhoneNum);
            }
        } catch (Exception e) {
            e.printStackTrace();
        } finally {
            if(cursor != null){
                cursor.close();
            }
        }
    }
}
String DISPLAY_NAME = "display_name";
String NUMBER = "number";這個和數據庫的存取很類似,接著在AndroidManifest中添加權限:
由上可知,獲得了三個聯系人的信息,也就是我們剛保存的信息。
接著學習自定義的ContentProvider,這裡借用了dbtest中的MyDBHelper類,新建myContenProvider類,代碼如下:
package com.example.jared.contentprovidertest;

import android.content.ContentProvider;
import android.content.ContentValues;
import android.content.UriMatcher;
import android.database.Cursor;
import android.database.sqlite.SQLiteDatabase;
import android.net.Uri;
import android.support.annotation.Nullable;

/**
 * Created by jared on 16/2/15.
 */
public class myContentProvider extends ContentProvider {

    public static final int PERSON_DIR = 0;
    public static final int PERSON_ITEM = 1;
    public static final int TEACHER_DIR = 2;
    public static final int TEACHER_ITEM = 3;

    private static UriMatcher uriMatcher;
    private static final String AUTHORITY = "com.example.jared.contentprovidertest.provider";

    private MyDBHelper myDBHelper;

    static {
        uriMatcher = new UriMatcher(UriMatcher.NO_MATCH);
        uriMatcher.addURI(AUTHORITY, "person", PERSON_DIR);
        uriMatcher.addURI(AUTHORITY, "person/#", PERSON_ITEM);
        uriMatcher.addURI(AUTHORITY, "teacher", TEACHER_DIR);
        uriMatcher.addURI(AUTHORITY, "teacher/#", TEACHER_DIR);
    }
    @Override
    public boolean onCreate() {
        myDBHelper = new MyDBHelper(getContext(), "PersonStore.db", null, 2);
        return true;
    }

    @Override
    public int update(Uri uri, ContentValues contentValues, String s, String[] strings) {
        SQLiteDatabase db = myDBHelper.getWritableDatabase();
        int updateRows = 0;
        switch (uriMatcher.match(uri)) {
            case PERSON_DIR:
                updateRows = db.update("person", contentValues, s, strings);
                break;
            case PERSON_ITEM:
                String personId = uri.getPathSegments().get(1);
                updateRows = db.update("person", contentValues, "id = ?", new String[]{personId});
                break;
            case TEACHER_DIR:
                updateRows = db.update("teacher", contentValues, s, strings);
                break;
            case TEACHER_ITEM:
                String teacherId = uri.getPathSegments().get(1);
                updateRows = db.update("teacher", contentValues, "id = ?", new String[]{teacherId});
                break;
            default:
                break;
        }
        return updateRows;
    }

    @Override
    public int delete(Uri uri, String s, String[] strings) {
        SQLiteDatabase db = myDBHelper.getWritableDatabase();
        int deleteRows = 0;
        switch (uriMatcher.match(uri)) {
            case PERSON_DIR:
                deleteRows = db.delete("person", s, strings);
                break;
            case PERSON_ITEM:
                String personId = uri.getPathSegments().get(1);
                deleteRows = db.delete("person", "id = ?", new String[]{personId});
                break;
            case TEACHER_DIR:
                deleteRows = db.delete("teacher", s, strings);
                break;
            case TEACHER_ITEM:
                String teacherId = uri.getPathSegments().get(1);
                deleteRows = db.delete("teacher", "id = ?", new String[]{teacherId});
                break;
            default:
                break;
        }
        return deleteRows;
    }

    @Nullable
    @Override
    public String getType(Uri uri) {
        switch (uriMatcher.match(uri)) {
            case PERSON_DIR:
                return "vnd.android.cursor.dir/vnd."+AUTHORITY+".person";
                //break;
            case TEACHER_DIR:
                return "vnd.android.cursor.dir/vnd."+AUTHORITY+".teacher";
                //break;
            case PERSON_ITEM:
                return "vnd.android.cursor.item/vnd."+AUTHORITY+".person";
                //break;
            case TEACHER_ITEM:
                return "vnd.android.cursor.item/vnd."+AUTHORITY+".teacher";
                //break;
            default:
                break;
        }
        return null;
    }

    @Nullable
    @Override
    public Cursor query(Uri uri, String[] strings, String s, String[] strings1, String s1) {
        SQLiteDatabase db = myDBHelper.getWritableDatabase();
        Cursor cursor = null;
        switch (uriMatcher.match(uri)) {
            case PERSON_DIR:
                cursor = db.query("person", strings, s, strings1, null, null, s1);
                break;
            case PERSON_ITEM:
                String personId = uri.getPathSegments().get(1);
                cursor = db.query("person", strings, "id = ?", new String[]{personId}, null, null, s1);
                break;
            case TEACHER_DIR:
                cursor = db.query("teacher", strings, s, strings1, null, null, s1);
                break;
            case TEACHER_ITEM:
                String teacherId = uri.getPathSegments().get(1);
                cursor = db.query("teacher", strings, "id = ?", new String[]{teacherId}, null, null, s1);
                break;
            default:
                break;
        }
        return cursor;
    }

    @Nullable
    @Override
    public Uri insert(Uri uri, ContentValues contentValues) {
        SQLiteDatabase db = myDBHelper.getWritableDatabase();
        Uri uriReturn = null;
        switch (uriMatcher.match(uri)) {
            case PERSON_DIR:
            case PERSON_ITEM:
                long newPersonId = db.insert("person", null, contentValues);
                uriReturn = Uri.parse("content://"+AUTHORITY+"/person/"+newPersonId);
                break;
            case TEACHER_DIR:
            case TEACHER_ITEM:
                long newTeacherId = db.insert("teacher", null, contentValues);
                uriReturn = Uri.parse("content://"+AUTHORITY+"teacher"+newTeacherId);
                break;
            default:
                break;
        }
        return uriReturn;
    }
}
通過UriMatcher來匹配uri,然後通過Uri.parse解析uri。此外這裡又重寫了onCreate方法,update方法,delete方法。getType方法,query方法,insert方法。其中onCreate方法主要是創建數據庫,update為更新數據,delete是刪除數據,query是查詢數據,insert為插入數據,基本和數據庫的操作很類似。
getType方法主要是獲取Uri對象的MIME類型
如果以路徑結尾的話,那麼就是:vnd.android.cursor.dir/vnd.+authoriry+.path;
如果以id結尾的話,那麼就是:vnd.android.cursor.item/vnd.+authoriry+.path;
接著就是AndroidManifest了,代碼如下:
<!--{cke_protected}{C}%3C!%2D%2D%3Fxml%20version%3D%221.0%22%20encoding%3D%22utf-8%22%3F%2D%2D%3E-->
<manifest xmlns:android="http://schemas.android.com/apk/res/android" package="com.example.jared.contentprovidertest">

    <uses-permission android:name="android.permission.READ_CONTACTS">

    <application android:allowbackup="true" android:icon="@mipmap/ic_launcher" android:label="@string/app_name" android:supportsrtl="true" android:theme="@style/AppTheme">
        <activity android:name=".MainActivity">
            <intent-filter>
                <action android:name="android.intent.action.MAIN">

                <category android:name="android.intent.category.LAUNCHER">
            </category></action></intent-filter>
        </activity>
        <provider android:name=".myContentProvider" android:exported="true" android:authorities="com.example.jared.contentprovidertest.provider">
        </provider>
    </application>

</uses-permission></manifest>
接著我們創建一個ContentProviderTest2工程,用來獲取,操作ContentProviderTest的內容。layout就參考了dbtest的工程的代碼:
<!--{cke_protected}{C}%3C!%2D%2D%3Fxml%20version%3D%221.0%22%20encoding%3D%22utf-8%22%3F%2D%2D%3E-->
<linearlayout xmlns:android="http://schemas.android.com/apk/res/android" android:layout_width="match_parent" android:layout_height="match_parent" android:orientation="vertical"><button android:id="@+id/createDB" android:layout_width="match_parent" android:layout_height="wrap_content" android:text="創建數據庫">

    <linearlayout android:layout_width="wrap_content" android:layout_height="wrap_content">
        </linearlayout></button><button android:id="@+id/addData" android:layout_width="match_parent" android:layout_height="wrap_content" android:text="添加數據"></button><button android:id="@+id/updateData" android:layout_width="match_parent" android:layout_height="wrap_content" android:text="更新數據"></button><button android:id="@+id/delData" android:layout_width="match_parent" android:layout_height="wrap_content" android:text="刪除數據"></button><button android:id="@+id/queryData" android:layout_width="match_parent" android:layout_height="wrap_content" android:text="查詢數據"></button></linearlayout>
package com.example.jared.contentprovidertest2;

import android.content.ContentValues;
import android.database.Cursor;
import android.net.Uri;
import android.os.Bundle;
import android.support.v7.app.AppCompatActivity;
import android.util.Log;
import android.view.View;
import android.widget.Button;

public class MainActivity extends AppCompatActivity {

    private static final String TAB = "MainActivity";

    private Button addDataBtn;
    private Button deleteDataBtn;
    private Button updateDataBtn;
    private Button queryDataBtn;

    public String id1, id2;
    private static final String PERSON_URI = "content://com.example.jared.contentprovidertest.provider/person";

    @Override
    protected void onCreate(Bundle savedInstanceState) {
        super.onCreate(savedInstanceState);
        setContentView(R.layout.activity_main);

        addDataBtn = (Button)findViewById(R.id.addData);
        addDataBtn.setOnClickListener(new myOnClickListener());

        deleteDataBtn = (Button)findViewById(R.id.delData);
        deleteDataBtn.setOnClickListener(new myOnClickListener());

        updateDataBtn = (Button)findViewById(R.id.updateData);
        updateDataBtn.setOnClickListener(new myOnClickListener());

        queryDataBtn = (Button)findViewById(R.id.queryData);
        queryDataBtn.setOnClickListener(new myOnClickListener());

    }

    private class myOnClickListener implements View.OnClickListener {
        @Override
        public void onClick(View view) {
            switch (view.getId()) {
                case R.id.addData:
                    id1 = setAddDataBtn("xiao ming", 20, 172.5, "man");
                    id2 = setAddDataBtn("xiao hong", 22, 162.5, "woman");
                    break;
                case R.id.delData:
                    setDeleteDataBtn(id1);
                    break;
                case R.id.updateData:
                    setUpdateDataBtn(id1, 175.0);
                    break;
                case R.id.queryData:
                    setQueryDataBtn();
                    break;
                default:
                    break;
            }
        }
    }

    public void setQueryDataBtn() {
        Uri uri = Uri.parse(PERSON_URI);
        Cursor cursor = getContentResolver().query(uri, null, null, null, null);
        if(cursor != null) {
            while (cursor.moveToNext()) {
                String personName = cursor.getString(cursor.getColumnIndex("name"));
                int personAge = cursor.getInt(cursor.getColumnIndex("age"));
                double personHeight = cursor.getDouble(cursor.getColumnIndex("height"));
                String personSex = cursor.getString(cursor.getColumnIndex("sex"));

                Log.d(TAB, "name:"+personName + " |age:"+personAge + " |height:"
                        +personHeight + " |sex:"+personSex);
            }
            cursor.close();
        }
    }

    public void setUpdateDataBtn(String id, double height) {
        Uri uri = Uri.parse(PERSON_URI+"/"+id);
        ContentValues values = new ContentValues();
        values.put("height", height);
        getContentResolver().update(uri, values, null, null);
    }

    public void setDeleteDataBtn(String id) {
        Uri uri = Uri.parse(PERSON_URI+"/"+id);
        getContentResolver().delete(uri, null, null);
    }

    public String setAddDataBtn(String name, int age, double height, String sex) {
        Uri uri = Uri.parse(PERSON_URI);
        ContentValues values = new ContentValues();
        values.put("name", name);
        values.put("age", age);
        values.put("height", height);
        values.put("sex", sex);
        Uri newUri = getContentResolver().insert(uri, values);
        return newUri.getPathSegments().get(1);
    }
}
這裡基本上都是先把字符串轉換為Uri,然後通過getContentResolver()類的方法來實現各個功能,准備好代碼後,我們繼續運行看下效果:
首先是添加功能:按添加按鈕再按查詢,查看log信息如下:
02-15 03:47:53.730 17319-17319/com.example.jared.contentprovidertest2 D/MainActivity: name:xiao ming |age:20 |height:172.5 |sex:man
02-15 03:47:53.780 17319-17319/com.example.jared.contentprovidertest2 D/MainActivity: name:xiao hong |age:22 |height:162.5 |sex:woman
已經添加了數據,然後是更新功能:按更新按鈕再按查詢,查看log信息如下:
02-15 03:49:33.210 17319-17319/com.example.jared.contentprovidertest2 D/MainActivity: name:xiao ming |age:20 |height:175.0 |sex:man
02-15 03:49:33.210 17319-17319/com.example.jared.contentprovidertest2 D/MainActivity: name:xiao hong |age:22 |height:162.5 |sex:woman
已經更新身高為175.0了,然後是刪除功能:按刪除按鈕再按查詢,查看log信息如下:
02-15 03:50:46.650 17319-17319/com.example.jared.contentprovidertest2 D/MainActivity: name:xiao hong |age:22 |height:162.5 |sex:woman查詢功能已經在上面的多次操作中用過了,基本上訪問另外一個app數據的功能也實現了。ContentProvider就先學到這裡了,繼續學習別的內容!
 談談Android開發之RecyclerView的使用全解
自Android 5.0之後,谷歌公司推出了RecylerView控件,RecylerView,我想看到一個新名詞後大部分人會首先發出一個疑問,recylerview是什
 Android搶紅包插件實現原理淺析
搶紅包,先看效果圖~實現自動搶紅包,解決問題有兩點:一:如何實時監聽發紅包的事件二:如何在紅包到來的時候自動進入頁面並自動點擊紅包一、如何獲取紅包到來的事件為了獲取紅包到
 android控件封裝 自己封裝的dialog控件
自定義dialog肯定是用的很多了但是感覺每次做都是很亂 單純完成任務而已,現在封裝了一下 以後用到直接copy 先上圖: 主activity 復制代碼 代碼如下: pa
 安卓 (1)教你怎麼使用下拉刷新
很久沒用開源項目,重新復習一下下拉刷新 也是想總結下一個項目,應該需要那些東西, 為自己打下基礎, 你也可以自己去下 library,關於源碼我會在後面放在 效果圖 p