編輯:關於Android編程
廢話不多說,咱們第一篇文章就是模仿“知乎”的回答詳情頁的動畫效果,先上個原版的效果圖,咱們就是要做出這個效果

在實現之前,我們先根據上面的動畫效果,研究下需求,因為gif幀數有限,所以不是很連貫,推薦你直接下載一個知乎,找到這個界面自己玩玩
☞當文章往上移動到一定位置之後,最上面的標題欄Bar和問題布局Title是會隱藏的,回答者Author布局不會隱藏
☞當文章往下移動移動到一定位置之後,原先隱藏的標題欄Bar和問題布局Title會下降顯示
☞當文章往上移動的時候,下部隱藏的Tools布局會上升顯示
☞當文章往下移動的時候,如果Tools布局是顯示的,則隱藏
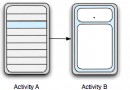
☞當標題欄Bar和問題布局Title下降顯示的時候,Title是從Bar的下面出來的,有個遮擋的效果
☞當快速滑動內容到達底部的時候,隱藏的Tools會顯示出來
☞當快速滑動內容到頂部的時候,隱藏的Bar和Title也會顯示出來
不分析不知道,這樣一個簡單地效果,經過分析需要完成不少東西呢,那麼下面根據要實現的需求,咱們分析一下解決方案。
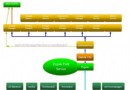
在做這種仿界面之前,我們可以使用ADT帶的View Hierarchy工具看一下“知乎”原生是怎麼實現的
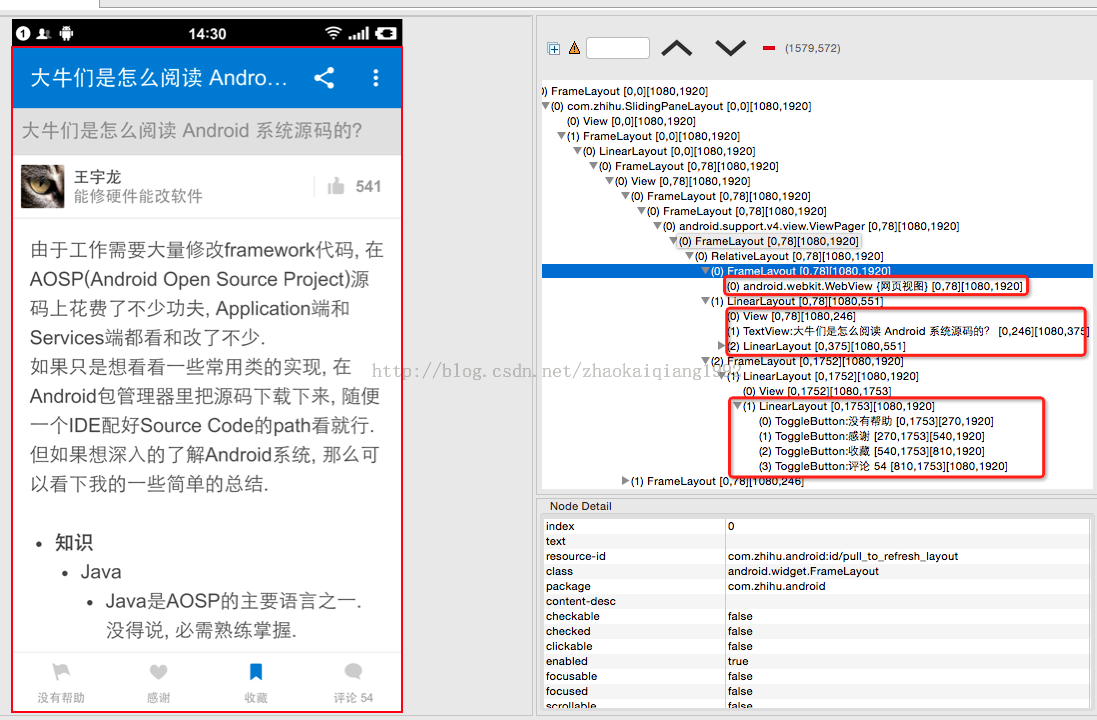
從右邊的分析圖可以看出,知乎的這個界面,內容用的WebView,這很正常,因為用戶的回答裡面格式比較復雜,用WebView是最好的解決方案,而標題欄是一個VIew,是ActionBar還是自定義View呢,不得而知,下面是就是一個LinearLayout包了4個ToggleButton,布局很簡單,我們沒有WebView,所以使用ScrollView代替,上面的布局直接ImageView了,設置個src,模擬一個布局。
其實布局很簡單,咱們一個效果一個效果的來實現。
首先是下面的Tools如何顯示和隱藏呢?當然是用動畫了!什麼動畫呢?能實現的有屬性動畫和幀動畫,屬性動畫能夠真實的改變View的屬性,幀動畫只是視覺上移動了,View的實際屬性並不改變,這兩種都可以,我們這裡使用屬性動畫
/**
  * 顯示工具欄
  */
 private void showTools() {

  ObjectAnimator anim = ObjectAnimator.ofFloat(img_tools, "y", img_tools.getY(),
    img_tools.getY() - img_tools.getHeight());
  anim.setDuration(TIME_ANIMATION);
  anim.start();

  isToolsHide = false;
 }

 /**
  * 隱藏工具欄
  */
 private void hideTools() {

  ObjectAnimator anim = ObjectAnimator.ofFloat(img_tools, "y", img_tools.getY(),
    img_tools.getY() + img_tools.getHeight());
  anim.setDuration(TIME_ANIMATION);
  anim.start();

  isToolsHide = true;

 }
那麼什麼時候調用呢?從上面的需求分析中,我們知道,用戶手指下拉的時候,Tools顯示,反之隱藏,那麼我們就可以監聽ScrollView的onTouch,判斷手指方向,實現動畫效果的調用
mScroller.setOnTouchListener(new View.OnTouchListener() {
   @Override
   public boolean onTouch(View v, MotionEvent event) {


    switch (event.getAction()) {

     case MotionEvent.ACTION_DOWN:
      lastY = event.getY();
      break;
     case MotionEvent.ACTION_MOVE:

      float disY = event.getY() - lastY;

      //垂直方向滑動
      if (Math.abs(disY) > viewSlop) {
       //是否向上滑動
       isUpSlide = disY < 0;

       //實現底部tools的顯示與隱藏
       if (isUpSlide) {
        if (!isToolsHide)
         hideTools();
       } else {
        if (isToolsHide)
         showTools();
       }
      }

      break;
    }

    return false;
   }
  });
用變量isToolsHide放置代碼重復調用。
下面的Tools的問題解決了,我們再看一下上面的布局動畫如何來實現。上面的思路和下面一樣,也是通過屬性動畫,完成位置的移動,移動的布局有Bar、Title和根布局。為什麼答題人布局Author不移動呢?因為根布局必須移動,否則就會擋住下面的文字內容,根布局的移動會讓子布局都跟著移動,所以只移動根布局即可。
對了,為了更大范圍的現實文本,“知乎”的WebView是占據整個布局的,其他布局都是在根布局FrameLayout裡面,所以,在首次加載的時候,下面的文本在開頭需要留出一定的間隔,防止被遮擋,當上面的布局隱藏之後,就沒有問題了。
在簡單分析之後,我再給出實現的布局的代碼
<FrameLayout xmlns:android="http://schemas.android.com/apk/res/android"
    android:layout_width="match_parent"
    android:layout_height="match_parent"
    android:background="@android:color/white"
 >


 <com.socks.zhihudetail.MyScrollView
  android:id="@+id/scroller"
  android:layout_width="match_parent"
  android:layout_height="wrap_content"
  >

  <TextView
   android:layout_width="match_parent"
   android:layout_height="match_parent"
   android:textSize="16sp"
   android:textColor="@android:color/black"
   android:text="@string/hello_world"/>

 </com.socks.zhihudetail.MyScrollView>


 <FrameLayout
  android:id="@+id/ll_top"
  android:layout_width="match_parent"
  android:layout_height="wrap_content"
  android:background="@android:color/white"
  android:orientation="vertical"
  android:layout_gravity="top">

  <ImageView
   android:id="@+id/img_author"
   android:layout_width="match_parent"
   android:layout_height="80dp"
   android:scaleType="fitXY"
   android:src="@drawable/bg_author"/>

  <TextView
   android:id="@+id/tv_title"
   android:layout_width="match_parent"
   android:layout_height="wrap_content"
   android:layout_marginTop="55dp"
   android:text="為什麼美國有那麼多肌肉極其強大的肌肉男?"
   android:textSize="18sp"
   android:background="#DBDBDB"
   android:gravity="center|left"
   android:paddingLeft="15dp"
   android:paddingRight="15dp"
   android:paddingTop="5dp"
   android:paddingBottom="5dp"
   android:textColor="@android:color/darker_gray"
   />

  <ImageView
   android:id="@+id/img_bar"
   android:layout_width="match_parent"
   android:layout_height="55dp"
   android:scaleType="fitXY"
   android:src="@drawable/bg_actionbar"/>

 </FrameLayout>

 <ImageView
  android:id="@+id/img_tools"
  android:layout_width="match_parent"
  android:layout_height="wrap_content"
  android:scaleType="fitXY"
  android:layout_gravity="bottom"
  android:src="@drawable/bg_bottom"/>


</FrameLayout>
效果圖如下,文本留了一些空行,保證不被遮擋。
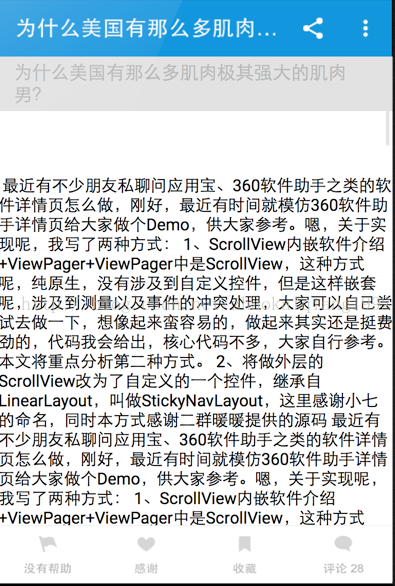
有的同學看了上面的效果圖可能會疑惑,這裡為什麼沒有答題人的布局呢?
其實是這樣的,為了模擬上部的布局顯示時,Title從Bar下面出現的效果,所以特意這樣設計的。我試過用linearLayout實現,效果也是可以實現的,但是當Title往下移動顯示的時候,會覆蓋在Bar上面,這也很好理解,LinearLayout沒有層次順序,所以會遮擋。我試過View.bringToFront(),試圖把Bar的布局提高層次,但是這樣會導致布局的紊亂,在首次加載的時候,Bar會顯示在最下面,是因為提高層次之後,Bar的布局重新計算,所以不按照LinearLayout的布局規則來了。無奈之下,換成了Framelayout,但是又出現了問題,Bar的高度可以設置,但是Title的高度會隨著文本的增加而改變,這樣一來,最下面Author的布局的位置就不能設置了,因為不知道距離上面多遠,所以我們只能在代碼裡面動態的計算Bar和Title的高度,然後在界面加載的時候,動態的給Author的布局設置MargenTop,保證位置的正確。
因為在onCreate裡面,還沒有開始View的繪制,所以得不到控件的真實高度,我們可以用下面的方法,獲取這個時期的高度
//獲取Bar和Title的高度,完成auther布局的margenTop設置
  ViewTreeObserver viewTreeObserver = fl_top.getViewTreeObserver();
  viewTreeObserver.addOnPreDrawListener(new ViewTreeObserver.OnPreDrawListener() {
   @Override
   public boolean onPreDraw() {

    if (!hasMeasured) {
     FrameLayout.LayoutParams layoutParams = new FrameLayout.LayoutParams(FrameLayout
       .LayoutParams.MATCH_PARENT, FrameLayout.LayoutParams.WRAP_CONTENT);
     layoutParams.setMargins(0, img_bar.getHeight() + tv_title.getHeight(), 0, 0);
     img_author.setLayoutParams(layoutParams);
     hasMeasured = true;
    }
    return true;
   }
  });
獲取了高度之後,我們就可以正確地設置位置了。但是,如果保證上面的布局隨著我們的內容的移動,而改變現實狀態呢?
經過我手動直觀測試,知乎的這個界面是根據一個固定的值,來改變顯示狀態的,因此,我們可以監聽ScrollView的滑動距離,來判斷。但是ScrollView並沒有給我們這樣一個監聽器,咋辦?重寫!
/**
 * Created by zhaokaiqiang on 15/2/26.
 */
public class MyScrollView extends ScrollView {

 private BottomListener bottomListener;

 private onScrollListener scrollListener;


 public MyScrollView(Context context) {
  this(context, null);
 }

 public MyScrollView(Context context, AttributeSet attrs) {
  super(context, attrs);
 }

 protected void onScrollChanged(int l, int t, int oldl, int oldt) {
  super.onScrollChanged(l, t, oldl, oldt);
  if (getScrollY() + getHeight() >= computeVerticalScrollRange()) {

   if (null != bottomListener) {
    bottomListener.onBottom();
   }

  }

  if (null != scrollListener) {
   scrollListener.onScrollChanged(l, t, oldl, oldt);
  }


 }

 public void setBottomListener(BottomListener bottomListener) {
  this.bottomListener = bottomListener;
 }

 public void setScrollListener(onScrollListener scrollListener) {

  this.scrollListener = scrollListener;

 }


 public interface onScrollListener {

  public void onScrollChanged(int l, int t, int oldl, int oldt);

 }


 public interface BottomListener {

  public void onBottom();

 }


}
我們只需要重寫onScrollChange()方法即可,在裡面不光可以時時的得到位置的變化,還添加了一個BottomListener接口來監聽滑動到底部的事件,寫好之後就很簡單了
mScroller.setBottomListener(this);
mScroller.setScrollListener(this);
/**
  * 顯示上部的布局
  */
 private void showTop() {

  ObjectAnimator anim1 = ObjectAnimator.ofFloat(img_bar, "y", img_bar.getY(),
    0);
  anim1.setDuration(TIME_ANIMATION);
  anim1.start();

  ObjectAnimator anim2 = ObjectAnimator.ofFloat(tv_title, "y", tv_title.getY(),
    img_bar.getHeight());
  anim2.setInterpolator(new DecelerateInterpolator());
  anim2.setDuration(TIME_ANIMATION + 200);
  anim2.start();

  ObjectAnimator anim4 = ObjectAnimator.ofFloat(fl_top, "y", fl_top.getY(),
    0);
  anim4.setDuration(TIME_ANIMATION);
  anim4.start();

  isTopHide = false;
 }


 /**
  * 隱藏上部的布局
  */
 private void hideTop() {

  ObjectAnimator anim1 = ObjectAnimator.ofFloat(img_bar, "y", 0,
    -img_bar.getHeight());
  anim1.setDuration(TIME_ANIMATION);
  anim1.start();

  ObjectAnimator anim2 = ObjectAnimator.ofFloat(tv_title, "y", tv_title.getY(),
    -tv_title.getHeight());
  anim2.setDuration(TIME_ANIMATION);
  anim2.start();

  ObjectAnimator anim4 = ObjectAnimator.ofFloat(fl_top, "y", 0,
    -(img_bar.getHeight() + tv_title.getHeight()));
  anim4.setDuration(TIME_ANIMATION);
  anim4.start();

  isTopHide = true;
 }

 @Override
 public void onBottom() {
  if (isToolsHide) {
   showTools();
  }
 }

 @Override
 public void onScrollChanged(int l, int t, int oldl, int oldt) {

  if (t <= dp2px(TOP_DISTANCE_Y) && isTopHide && isAnimationFinish) {
   showTop();
   Log.d(TAG, "顯示");
  } else if (t > dp2px(TOP_DISTANCE_Y) && !isTopHide && isAnimationFinish) {
   hideTop();
   Log.d(TAG, "隱藏");
  }
 }
我們只需要根據當前的位置,來實現布局的顯示和隱藏就可以啦!
OK,這篇文章就到這裡,希望對大家的學習有所幫助。
 android Watchdog 實現剖析
系統啟動過程圖: Framework層所有的Service都是運行在SystemServer進程中;SystemServer進程是由Zygote進程創建。 S
 Android Fragment概述及用法
Fragment一般是宿主Activity UI的一部分或一種行為,作為Activity的整個V
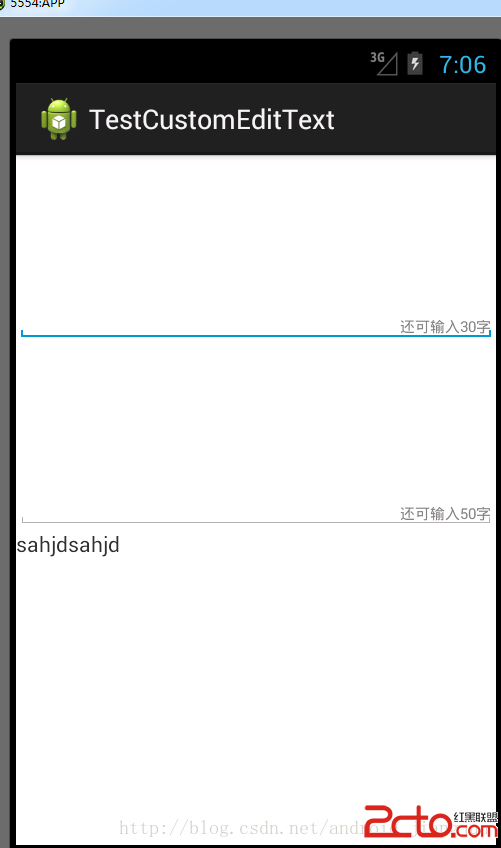 Android 中自定義控件之判斷還剩多少可輸入字符的EditText
最近做的項目有個需求就是判斷一下還 剩多少字符可輸入,也就是對EditText 的文本變化做監聽 ,功能實現了,但是感覺使用組合方式,每次都要編寫,還不如寫
 詳解Android中Handler的內部實現原理
本文主要是對Handler和消息循環的實現原理進行源碼分析,如果不熟悉Handler可以參見博文《詳解Android中Handler的使用方法》,裡面對Android為何