編輯:關於Android編程
前言
?android5.X新增的一個控件Toolbar,這個控件比ActionBar更加自由,可控,由於以前的ActionBar的靈活性比較差,所以google逐漸使用Toolbar替代ActionBar,所以Toolbar也可以說是超級ActionBar。
這篇文章不詳細介紹ToolBar的使用(定制),主要是介紹Toolbar使用的一個例子,即Toolbar結合DrawerLayout實現抽屜菜單。
使用這個兩個控件需要引入相應的庫依賴:
dependencies {
    compile fileTree(dir: 'libs', include: ['*.jar'])
    compile 'com.android.support:appcompat-v7:23.0.1'
    compile 'com.android.support:design:23.0.1'
}
1. Toolbar的布局文件
include_toolbar.xml
Toolbar控件使用和其他的控件使用類似,需要注意的是引用v7擴展包中的Toolbar,而不是系統自帶的那個Toolbar,這樣可以兼容v21以下的設備。
2. 添加動作菜單
菜單項通常放在menu文件夾下的一個xml文件中
menu_main.xml
之前的ActionBar也是需要使用這個菜單文件來渲染其動作菜單,Toolbar也一樣。
有了菜單布局文件,還需要在代碼中初始化菜單,這樣Toolbar上面才會顯示這些動作菜單(重寫Activity的onCreateOptionsMenu()方法):
/**
 * 必須重寫該方法創建菜單,不然菜單不會顯示在Toolbar中
 * @param menu
 * @return
 */
@Override
public boolean onCreateOptionsMenu(Menu menu) {
    getMenuInflater().inflate(R.menu.menu_main,menu);
    return true;
}
3. activity主布局文件
activity_main.xml
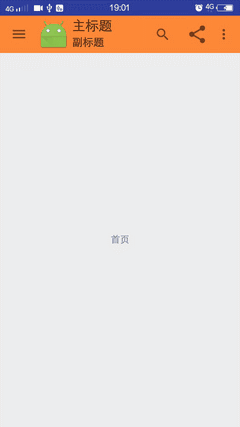
4. 代碼初始化Toolbar
 @NonNull
 private void initToolbar() {
     mToolbar = (Toolbar) findViewById(R.id.toolbar);
     mToolbar.setLogo(R.mipmap.ic_launcher);
     mToolbar.setTitle("主標題");
     mToolbar.setSubtitle("副標題");
     // ...
     // 這個方法很重要,不能少,讓toolbar取代ActionBar
     setSupportActionBar(mToolbar);
 }
注意:一定要調用setSupportActionBar()讓Toolbar取代ActionBar,同時還需要將當前Activity的主題設置為NoActionBar。
5. 將Toolbar與DrawerLayout狀態綁定
mDrawerLayout = (DrawerLayout) findViewById(R.id.drawerLayout);
ActionBarDrawerToggle drawerToggle = new ActionBarDrawerToggle(this, mDrawerLayout, mToolbar, R.string.open, R.string.close);
drawerToggle.syncState();
mDrawerLayout.setDrawerListener(drawerToggle);
6. 初始化內容視圖
private void initContentView() {
    Fragment fragment = new ContentFragment();
    Bundle bundle = new Bundle();
    bundle.putString("title","首頁");
    fragment.setArguments(bundle);
    mFm.beginTransaction().replace(R.id.fl_containor,fragment).commit();
}
ContentFragment.java
package com.example.lt.toolbar;

import android.app.ActionBar;
import android.os.Bundle;
import android.support.annotation.Nullable;
import android.support.v4.app.Fragment;
import android.view.Gravity;
import android.view.LayoutInflater;
import android.view.View;
import android.view.ViewGroup;
import android.widget.TextView;

/**
 * Created by lt on 2016/3/16.
 */
public class ContentFragment extends Fragment{

    @Nullable
    @Override
    public View onCreateView(LayoutInflater inflater, ViewGroup container, Bundle bundle) {
        TextView textView = new TextView(getActivity());
        if(getArguments()!=null){
            String title = getArguments().getString("title");
            textView.setText(title);
            textView.setGravity(Gravity.CENTER);
            textView.setLayoutParams(new ActionBar.LayoutParams(ViewGroup.LayoutParams.MATCH_PARENT,ViewGroup.LayoutParams.MATCH_PARENT));
        }
        return textView;
    }
}
7. 初始化抽屜菜單
private void initLeftMenu() {
 ListView menuList = (ListView) findViewById(R.id.lv_menu);
 menuList.setAdapter(new ArrayAdapter(this, android.R.layout.simple_list_item_1
         , new String[]{"首頁","新聞","個人中心"}));
 menuList.setOnItemClickListener(new AdapterView.OnItemClickListener() {
     @Override
     public void onItemClick(AdapterView parent, View view, int position, long id) {
         Fragment fragment = new ContentFragment();
         Bundle bundle = new Bundle();
         bundle.putString("title", ((TextView) view).getText().toString());
         fragment.setArguments(bundle);
         mFm.beginTransaction().replace(R.id.fl_containor, fragment).commit();
         mDrawerLayout.closeDrawer(Gravity.LEFT);
     }
 });
}
這裡用了一個ListView來渲染抽屜菜單,並設置了當點擊後替換右邊的內容視圖的點擊事件。
完整代碼:
package com.example.lt.toolbar;

import android.os.Bundle;
import android.support.annotation.NonNull;
import android.support.design.widget.FloatingActionButton;
import android.support.design.widget.Snackbar;
import android.support.v4.app.Fragment;
import android.support.v4.app.FragmentManager;
import android.support.v4.widget.DrawerLayout;
import android.support.v7.app.ActionBarDrawerToggle;
import android.support.v7.app.AppCompatActivity;
import android.support.v7.widget.Toolbar;
import android.view.Gravity;
import android.view.MenuInflater;
import android.view.View;
import android.view.Menu;
import android.view.MenuItem;
import android.widget.AdapterView;
import android.widget.ArrayAdapter;
import android.widget.ListView;
import android.widget.TextView;
import android.widget.Toast;

public class MainActivity extends AppCompatActivity {

    private FragmentManager mFm;
    private DrawerLayout mDrawerLayout;
    private Toolbar mToolbar;

    @Override
    protected void onCreate(Bundle savedInstanceState) {
        super.onCreate(savedInstanceState);
        mFm = getSupportFragmentManager();
        setContentView(R.layout.activity_main);

        initToolbar();

        mDrawerLayout = (DrawerLayout) findViewById(R.id.drawerLayout);
        ActionBarDrawerToggle drawerToggle = new ActionBarDrawerToggle(this, mDrawerLayout, mToolbar, R.string.open, R.string.close);
        drawerToggle.syncState();
        mDrawerLayout.setDrawerListener(drawerToggle);

        initLeftMenu();
        initContentView();
    }

    @NonNull
    private void initToolbar() {
        mToolbar = (Toolbar) findViewById(R.id.toolbar);
        mToolbar.setLogo(R.mipmap.ic_launcher);
        mToolbar.setTitle("主標題");
        mToolbar.setSubtitle("副標題");
        // 這個方法很重要,不能少,讓toolbar取代ActionBar
        setSupportActionBar(mToolbar);
    }

    private void initContentView() {
        Fragment fragment = new ContentFragment();
        Bundle bundle = new Bundle();
        bundle.putString("title","首頁");
        fragment.setArguments(bundle);
        mFm.beginTransaction().replace(R.id.fl_containor,fragment).commit();
    }

    private void initLeftMenu() {
        ListView menuList = (ListView) findViewById(R.id.lv_menu);
        menuList.setAdapter(new ArrayAdapter(this, android.R.layout.simple_list_item_1
                , new String[]{"首頁","新聞","個人中心"}));
        menuList.setOnItemClickListener(new AdapterView.OnItemClickListener() {
            @Override
            public void onItemClick(AdapterView parent, View view, int position, long id) {
                Fragment fragment = new ContentFragment();
                Bundle bundle = new Bundle();
                bundle.putString("title", ((TextView) view).getText().toString());
                fragment.setArguments(bundle);
                mFm.beginTransaction().replace(R.id.fl_containor, fragment).commit();
                mDrawerLayout.closeDrawer(Gravity.LEFT);
            }
        });
    }

    /**
     * 必須重寫該方法創建菜單,不然菜單不會顯示在Toolbar中
     * @param menu
     * @return
     */
    @Override
    public boolean onCreateOptionsMenu(Menu menu) {
        getMenuInflater().inflate(R.menu.menu_main,menu);
        return true;
    }
}
運行效果演示:
這篇文章就介紹了Toolbar+DrawerLayout實現帶有動畫效果的常見的一種抽屜菜單,Toolbar更多詳細的的用法及樣式定制可以參考官方文檔,也可以參考下面這篇文章,我個人覺得介紹得比較詳細。
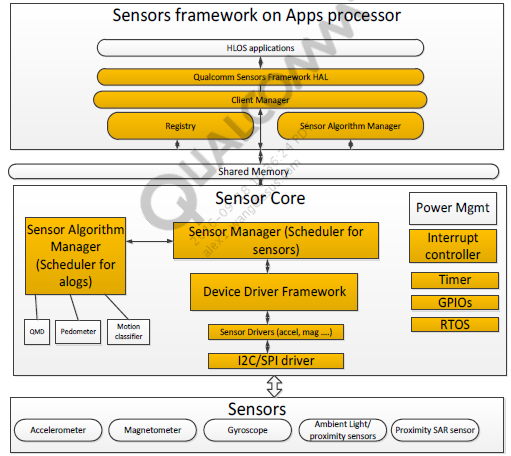
 談談Android 6.0 的動態權限管理
1.前言大家都知道Android 6.0的新特性之一就是應用權限的管理。也就是說凡是涉及用戶隱私的權限,用戶可以自己去設置管理了。然而在6.0以前,我們安裝一款APP是默
 Android實現閱讀APP平移翻頁效果
自己做的一個APP需要用到翻頁閱讀,網上看過立體翻頁效果,不過bug太多了還不兼容。看了一下多看閱讀翻頁是采用平移翻頁的,於是就仿寫了一個平移翻頁的控件。效果如下:在翻頁
 Android4.4-Launcher源碼分析系列之WorkSpace及屏幕滑動
一.WorkSpace是什麼前面已經介紹了一個WorkSpace包含了多個CellLayout,再回憶下之前畫過的圖WorkSpace是一個ViewGroup,它的布局如
 Android之旅第三站——Android默認打開各種文件格式DataAndType…
在你手機中,打開文件的方式有這麼幾種:1、通過要打開的這個文件的類型找到對應的應用程序app打開2、通過已知文件類型打開應用程序,找到對應的這個文件打開簡單點說,通過文件