編輯:關於Android編程
Android平台api沒有特意為換膚提供一套簡便的機制,這可能是外國的軟件更注重功能和易用,不流行換膚。系統不提供直接支持,只能自行研究。
換膚,可以認為是動態替換資源(文字、顏色、字體大小、圖片、布局文件……)。這個使用編程語言來動態設置是可以做到的,例如使用View的setBackgroundResource、setTextSize、setTextColor等函數。但我們不可能在每個activity裡對頁面裡的所有控件都通過調用這些函數來換膚,這樣的程序代碼難以維護、擴展,也違背了UI和代碼分離的原則(android開發中UI以xml文件的方式布局)。 通常,皮膚資源會在主程序apk之外提供,以減少主程序的大小,以及方便隨時提供新的皮膚擴展。
簡單的來說,軟件皮膚包括圖標、字體、布局、交互風格等,換膚就是換掉皮膚包括的部分或所有資源。
主流應用程序換膚方式:
國內有很多的軟件都支持皮膚定制,這也是與國外軟件重大不同之一,國外用戶注重社交、郵件等功能,國內用戶則重視音樂、小說、皮膚等功能. 在寫這個換膚系列之前,我也參考了其他人的一些總結. 知識點比較散,因此我對其進行了整理和進一步的優化和擴展. 當然,由於精力有限,部分換膚方式我也只寫了主體功能的實現. 如果出現有誤或者不夠詳細的地方,希望大家提出意見或者自行進行擴展.
關於其中提到的幾種主流實現方式,接下來的文章裡我會具體提供代碼進行解釋, 此次先做一個整體的概述.
目前主流的換膚從功能上可以劃分幾種實現方式,
1) 軟件內置多個皮膚,不可由用戶增加或修改:
最低的自由度,軟件實現相對於後面的幾種相對簡單.
如果你的程序和資源都很小,可以在主程序apk中放入足夠的皮膚資源.
典型應用:平板電腦Apad上QQ空間的換膚功能,實際上只是改變了Activity的背景,或這部分的資源.
2) 官方提供皮膚供下載,用戶可以使用下載的皮膚:
用戶可選擇下載自己喜歡的皮膚,有些玩家會破解皮膚的定制方法,自己做皮膚使用,或者傳到網上給大家用。
典型應用: 墨跡天氣下載的皮膚就是一個zip格式的壓縮包,在應用的時候把皮膚資源釋放到墨跡天氣應用的目錄下,更換皮膚時新的皮膚資源會替換掉老的皮膚資源每次加載的時候就是從手機硬盤上讀取圖片,這些圖片資源的命名和程序中的資源的命名保持一致,一旦找不到這些資源,可以選擇到系統默認中查找。
這種實現是直接讀取了外部資源文件,在程序運行時通過代碼顯示的替換界面的背景資源。
這種方式的優點是:皮膚資源的格式定義很隨意可以是zip也可以是自定義的格式,只要程序中能夠解析到資源就行,缺點是需要讀取並解析文件,導致效率上會比較差.
3) 皮膚資源存在於主程序之類的APK中,即實現了APK的拆分. 這裡類似於浏覽器與插件的關系. 當考慮應用程序需要擴展時,則需要采用本方式實現.,這不僅僅體現在換膚的APK中.
典型應用: 手機QQ換膚的實現方式
Q的皮膚是一個無界面APK應用,這個皮膚應用中的資源和主程序的資源命名一致,通過主程序和皮膚程序共享進程實現主程序對皮膚程序中資源的訪問,在程序運行時通過代碼顯示指定皮膚資源,缺點是在主程序中每個activity要增加復雜的使用哪種皮膚邏輯,優點是效率比較快,且使應用程序具有了良好的擴展性,降低了程序的耦合性. 包括其他類似的擴展功能,都可以利用此方式實現.
4) 官方提供皮膚制作工具或方法,用戶可自制皮膚:
大致分為兩種情況:
a. 應用程序主列表為一個GridView,用戶可通過在設置中選擇背景的顏色和按鈕的風格. 直接進行替換即可.
b. 另外一種是有可視化帶向導的工具。用戶只要自己找一些圖片、修改文字的字體替換就可以了。用戶可以上傳自制的皮膚,提供其他用戶下載. 一般都是打包為.zip格式的,擴展名可由公司需求自定義. 例如墨跡天氣皮膚擴展名是mja,搜狗輸入法的皮膚擴展名是sga,它們的文件格式實際上都是zip。之後的應用就和第二種換膚方式類似了.
這種方式優點是:使用戶有參與感,自由度較高。用戶可根據自己的喜好定制軟件的皮膚。
5) 改寫SDK的Resource類:
此處提供一些思路:
在Android系統中,資源主要指圖片和MP3類型的文件,也是用戶UI包含的所有元素。谷歌在設計Android系統時,將UI界面和邏輯代碼分開組建:界面設計通過XML的形式描述,具體的程序和應用邏輯則通過代碼來實現;前端工程師只負責HTML和CSS的設計與架構,後端工程師則專門考慮JSP和Java的代碼執行.
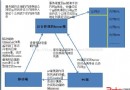
資源訪問在Android性能架構中處於何種地位?在進行Android開發時,開發者經常用到Framework提供的資源包Framework.jar與Framework-res.apk,以及與核心資源相關的組件“Resource Manager”文件系統。
APK本身是一個簡單的文件格式,也是一個壓縮文件包。通過解壓文件包可以釋放APK文件:首先需要APK的原數據Meta INF、Manifest以及RES目錄。一部分包含圖片資源的應用,在資源釋放時也會用到Layout。
在安裝文件時,系統會將文件取出、解壓後放在Dalvik Cache中。該緩存下有許多dex文件,當用戶打開應用時系統會自動加載相應的類。在加載過程中,系統如需訪問APK,則需對其進行解壓,這樣通常導致效率較為低下。而如果將dex文件放入Dalvik Cache中,則能夠令加載的效率大大提升。
每個進程都有一份關於Framework的共享類和共享資源,但物理內存空間中的系統級別資源只有一份。Framework類和資源是只讀的,而Android操作系統設計之初並沒有硬盤的虛擬內存和換進換出機制,所以節省內存空間是非常重要的工作。
應用程序內置資源實現換膚功能
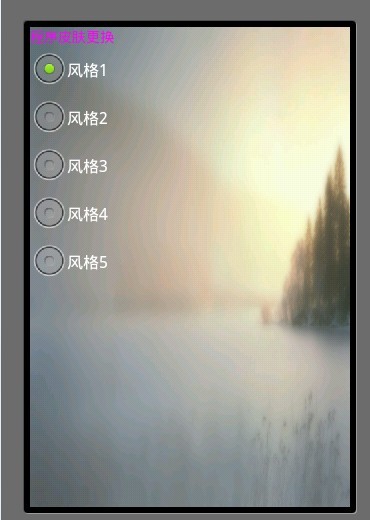
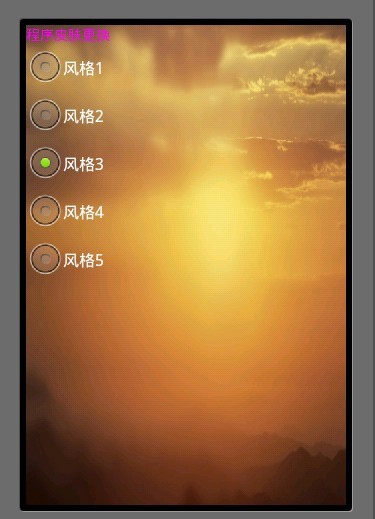
通過應用程序內置資源實現換膚,典型的應用為QQ空間中換膚的實現. 應用場景為: 應用一般不大,且頁面較少,風格相對簡單,一般只用實現部分資源或者只用實現背景的更換.
此種換膚方式實現的思路:
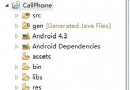
1. 把幾套皮膚放在res/drawable目錄裡,然後用SharedPreferences來記錄當前皮膚的資源id.然後在程序啟動時加載Activity背景。
2. 主要的實現在皮膚管理器SkinManager類中. 將皮膚資源的ID加入集合中. 由該類同一調度皮膚更換,如初始化皮膚,獲取當前皮膚符號以及具體的對應資源的更換皮膚.
接下來看一下效果圖:
內置皮膚的實現相對比較簡單,下面直接上代碼:
AndroidMainfest.xml
<?xml version="1.0" encoding="utf-8"?>
<manifest xmlns:android="http://schemas.android.com/apk/res/android"
 package="com.tony.skindemo"
 android:versionCode="1"
 android:versionName="1.0" >

 <uses-sdk android:minSdkVersion="8" />

 <application
  android:icon="@drawable/ic_launcher"
  android:label="@string/app_name" >
  <activity
   android:label="@string/app_name"
   android:name="com.tony.skindemo.SkinDemoActivity" >
   <intent-filter >
    <action android:name="android.intent.action.MAIN" />

    <category android:name="android.intent.category.LAUNCHER" />
   </intent-filter>
  </activity>


 </application>

</manifest>
布局文件:
main.xml
<?xml version="1.0" encoding="utf-8"?>
<LinearLayout xmlns:android="http://schemas.android.com/apk/res/android"
 android:layout_width="fill_parent"
 android:layout_height="fill_parent"
 android:orientation="vertical" >

 <TextView
  android:textColor="#ff00ff"
  android:text="程序皮膚更換"
  android:layout_width="fill_parent"
  android:layout_height="wrap_content" />
<RadioGroup
  android:id="@+id/skin_options"
  android:layout_width="fill_parent"
  android:layout_height="wrap_content"
   >

  <RadioButton
   android:layout_weight="1"
   android:id="@+id/radioButton1"
   android:layout_width="wrap_content"
   android:layout_height="wrap_content"
   android:text="風格1" />

  <RadioButton
   android:layout_weight="1"
   android:id="@+id/radioButton2"
   android:layout_width="wrap_content"
   android:layout_height="wrap_content"
   android:text="風格2" />

  <RadioButton
   android:layout_weight="1"
   android:id="@+id/radioButton3"
   android:layout_width="wrap_content"
   android:layout_height="wrap_content"
   android:text="風格3" />

  <RadioButton
   android:layout_weight="1"
   android:id="@+id/radioButton4"
   android:layout_width="wrap_content"
   android:layout_height="wrap_content"
   android:text="風格4" />

  <RadioButton
   android:layout_weight="1"
   android:id="@+id/radioButton5"
   android:layout_width="wrap_content"
   android:layout_height="wrap_content"
   android:text="風格5" />
 </RadioGroup>

</LinearLayout>
程序主Activity
package com.tony.skindemo;

import android.app.Activity;
import android.os.Bundle;
import android.view.MotionEvent;
import android.view.Window;
import android.view.WindowManager;
import android.widget.RadioButton;
import android.widget.RadioGroup;
import android.widget.RadioGroup.OnCheckedChangeListener;

public class SkinDemoActivity extends Activity {

 private SkinSettingManager mSettingManager;
 private RadioButton radioButton1;
 private RadioButton radioButton2;
 private RadioButton radioButton3;
 private RadioButton radioButton4;
 private RadioButton radioButton5;

 @Override
 public void onCreate(Bundle savedInstanceState) {
  super.onCreate(savedInstanceState);

  // 取消標題欄
  requestWindowFeature(Window.FEATURE_NO_TITLE);
  // 完成窗體的全屏顯示 // 取消掉狀態欄
  getWindow().setFlags(WindowManager.LayoutParams.FLAG_FULLSCREEN,
    WindowManager.LayoutParams.FLAG_FULLSCREEN);

  setContentView(R.layout.main);
  // 初始化皮膚
  mSettingManager = new SkinSettingManager(this);
  mSettingManager.initSkins();

  //通過單選按鈕設置皮膚(可自定義更換的方式,如導航欄,也可以加上預覽功能,此處不再實現)
  radioButton1 = (RadioButton) findViewById(R.id.radioButton1);
  radioButton2 = (RadioButton) findViewById(R.id.radioButton2);
  radioButton3 = (RadioButton) findViewById(R.id.radioButton3);
  radioButton4 = (RadioButton) findViewById(R.id.radioButton4);
  radioButton5 = (RadioButton) findViewById(R.id.radioButton5);
  RadioGroup radioGroup = (RadioGroup) findViewById(R.id.skin_options);
  radioGroup.setOnCheckedChangeListener(new OnCheckedChangeListener() {

   @Override
   public void onCheckedChanged(RadioGroup group, int checkedId) {

    switch (checkedId) {
    case R.id.radioButton1:
     mSettingManager.changeSkin(1);
     break;

    case R.id.radioButton2:
     mSettingManager.changeSkin(2);
     break;
    case R.id.radioButton3:
     mSettingManager.changeSkin(3);
     break;
    case R.id.radioButton4:
     mSettingManager.changeSkin(4);
     break;
    case R.id.radioButton5:
     mSettingManager.changeSkin(5);
     break;
    default:
     break;
    }
   }
  });
 }

 // 這裡為了簡單實現,實現換膚
 public boolean onTouchEvent(MotionEvent event) {
  mSettingManager.toggleSkins();
  return super.onTouchEvent(event);
 }


}
皮膚管理器:
import android.app.Activity;
import android.content.SharedPreferences;

/**
 * 皮膚管理器
 * @author tony
 *
 */
public class SkinSettingManager {


 public final static String SKIN_PREF = "skinSetting";

 public SharedPreferences skinSettingPreference;

 private int[] skinResources = { R.drawable.default_wallpaper,
   R.drawable.wallpaper_c,R.drawable.wallpaper_d,R.drawable.wallpaper_f,
   R.drawable.wallpaper_g
 };

 private Activity mActivity;


 public SkinSettingManager(Activity activity) {
  this.mActivity = activity;
  skinSettingPreference = mActivity.getSharedPreferences(SKIN_PREF, 3);
 }

 /**
  * 獲取當前程序的皮膚序號
  *
  * @return
  */
 public int getSkinType() {
  String key = "skin_type";
  return skinSettingPreference.getInt(key, 0);
 }

 /**
  * 把皮膚序號寫到全局設置裡去
  *
  * @param j
  */
 public void setSkinType(int j) {
  SharedPreferences.Editor editor = skinSettingPreference.edit();
  String key = "skin_type";

  editor.putInt(key, j);
  editor.commit();
 }

 /**
  * 獲取當前皮膚的背景圖資源id
  *
  * @return
  */
 public int getCurrentSkinRes() {
  int skinLen = skinResources.length;
  int getSkinLen = getSkinType();
  if(getSkinLen >= skinLen){
   getSkinLen = 0;
  }

  return skinResources[getSkinLen];
 }

 public void toggleSkins(){

  int skinType = getSkinType();
  if(skinType == skinResources.length - 1){
   skinType = 0;
  }else{
   skinType ++;
  }
  setSkinType(skinType);
  mActivity.getWindow().setBackgroundDrawable(null);
  try {
   mActivity.getWindow().setBackgroundDrawableResource(getCurrentSkinRes());
  } catch (Throwable e) {
   e.printStackTrace();

  }


 }

 /**
  * 用於初始化皮膚
  */
 public void initSkins(){
  mActivity.getWindow().setBackgroundDrawableResource(getCurrentSkinRes());
 }

 /**
  * 隨即切換一個背景皮膚
  */
 public void changeSkin(int id) {

  setSkinType(id);
  mActivity.getWindow().setBackgroundDrawable(null);
  try {
   mActivity.getWindow().setBackgroundDrawableResource(getCurrentSkinRes());
  } catch (Throwable e) {
   e.printStackTrace();
  }
 }

}
就這樣,通過程序內置皮膚的基本功能完成了.若想在自己的應用中實現,仍需注意以下幾點(實現起來並不復雜,此處不再寫具體實現):
1. 實現多個activity的更換皮膚. 需要利用自定義MyApplication類,繼承自Application. 並加入activity的集合屬性.用於存儲應用所有的activity。修改SkinManager,在更換皮膚時,從application中取出該集合,進行遍歷並更換皮膚。
2.可以優化用戶體驗,通過導航欄方式進入更換皮膚界面,並可以加入預覽功能,當確定修改配置後,才完成更換皮膚功能.
3. 加入style.theme等資源,實現更加復雜的皮膚更換. 具體實現同更換背景.
 Android中如何搭建一個WebServer
今天終於把老大交代的任務搞完了,感覺收獲挺多的,所以就寫一篇來記錄一下吧,首先還是來看一下,老大們的需求 需求: 希望移動端的用戶標識(IMEI)和HTML頁面的用戶
 使用Android Studio分析內存問題
大家好!本人是即將畢業學生一枚,閒暇時間經常看大神們寫的博客學到很多東西。最近在做畢業設計的時候遇到一些問題,然後把自己的問題和解決方法總結一下,有不對的地方希望大家多多
 Android學習之界面篇(七)側滑菜單的實現
側滑菜單的實現方式:SlidingMenu開源庫:https://github.com/jfeinstein10/SlidingMenuDrawerLayout:是201
 Android5.0新特性-Material Design
概述2014年,Google攜Android5.X重裝歸來,全新的UI設計和更加優化的性能,令開發者眼前一亮安裝和配置Android5.0開發環境開發Android還得靠