編輯:關於Android編程
前一篇文章說到要貼自己的相關代碼,這篇開始會結合代碼一起和大家一起分享。要開始講數據的傳輸了,先講講GATT吧。
GATT的全名是Generic Attribute Profile(暫且翻譯成:普通屬性協議),它定義兩個BLE設備通過叫做Service和Characteristic的東西進行通信。GATT就是使用了ATT(Attribute Protocol)協議,ATT協議把Service、 Characteristic遺跡對應的數據保存在一個查找表中,次查找表使用16 bit ID作為每一項的索引。一旦兩個設備建立起了連接,GATT就開始起作用了,這也意味著,你必需完成前面的GAP協議。這裡需要說明的是,GATT連接,必需先經過GAP協議。實際上,我們在Android開發中,可以直接使用設備的MAC地址發起連接,可以不經過掃描的步驟。這並不意味不需要經過GAP,實際上在芯片級別已經給你做好了,藍牙芯片發起連接,總是先掃描設備,掃描到了才會發起連接。
GATT 連接需要特別注意的是:GATT連接是獨占的。也就是一個 BLE 外設同時只能被一個中心設備連接。一旦外設被連接,它就會馬上停止廣播,這樣它就對其他設備不可見了。當設備斷開,它又開始廣播。中心設備和外設需要雙向通信的話,唯一的方式就是建立GATT連接。

由上圖可以看出:
* 一個低功耗藍牙(ble)可以包括多個Profile
* 一個Profile中有多個Service(通過uuid就可以找到對應的Service)
* 一個Service中有多個Characteristic(通過uuid就可以找到對應的Characteristic)
* 一個Characteristic中包括一個value和多個DescriptZ喎?/kf/ware/vc/" target="_blank" class="keylink">vcqOozai5/XV1aWS+zb/J0tTV0rW9ttTTprXERGVzY3JpcHRvcqOpPC9wPg0KPGgxIGlkPQ=="如何開發ble">如何開發Ble?
在整個Ble開發中,我有使用別人比較優秀的第三方庫輔助開發, 開發起來真的很方便,使用也比較簡單。
(1) 聲明權限
(2) 添加lite-ble-0.9.2.jar庫到工程中
這步應該不用講解怎麼添加了吧。
(3) 檢測藍牙是否打開並且創建藍牙操作的對象
private LiteBluetooth liteBluetooth;
 // 檢查當前手機是否支持ble 藍牙,如果不支持退出程序
if (!getPackageManager().hasSystemFeature(PackageManager.FEATURE_BLUETOOTH_LE)) {
            Toast.makeText(this, "ble_not_supported", Toast.LENGTH_SHORT).show();
}
// 初始化 Bluetooth adapter, 通過藍牙管理器得到一個參考藍牙適配器(API必須在以上android4.3或以上和版本)
// 1.獲取bluetoothAdapter
final BluetoothManager bluetoothManager = (BluetoothManager)getSystemService(Context.BLUETOOTH_SERVICE);
mBluetoothAdapter = bluetoothManager.getAdapter();
// 2.檢查設備上是否支持並開啟藍牙
if (mBluetoothAdapter == null) {
            Toast.makeText(this, "ble_not_supported", Toast.LENGTH_SHORT).show();
return;
}
//創建liteBluetooth的單例對象,(BleUtil是自己寫的類,實現單例的)
if (liteBluetooth == null)
   liteBluetooth = BleUtil.getInstance(getApplicationContext());
// 為了確保設備上藍牙能使用, 如果當前藍牙設備沒啟用,彈出對話框向用戶要求授予權限來啟用
//liteBluetooth.enableBluetoothIfDisabled(activity,REQUEST_ENABLE_BT);
private void scanDevicesPeriod() {
    //liteBluetooth = new LiteBluetooth(getBaseContext());
    liteBluetooth.startLeScan(new PeriodScanCallback(SCAN_PERIOD) {
        @Override
        public void onScanTimeout() {
            //超過搜索時間後的相關操作
        }
        @Override
        public void onLeScan(BluetoothDevice device, int rssi, byte[] scanRecord) {
            //搜到的設備
            if (Math.abs(rssi) <= 90 ){//過濾掉信號強度小於-90的設備
                Log.i("test scan", "device: " + device.getName() + "  mac: "+ device.getAddress()
                  + "  rssi: " + rssi + "  scanRecord: " + DeviceBytes.byte2hex(scanRecord));
            }
        }
    });
}
SCAN_PERIOD:搜索的時長,毫秒數 ble的mac地址:通過device.getAddress()就可以得到了 scanRecord:Ble廣播的數據(DeviceBytes是自己寫的工具類,有空分享出來)一旦獲取到GATT的Services,就可以讀寫他們的屬性了
private void  connect(final BluetoothDevice device){
    liteBluetooth.connect(device, false, new LiteBleGattCallback() {
        @Override
        public void onConnectSuccess(BluetoothGatt bluetoothGatt, int i) {
            bluetoothGatt.discoverServices();
            //連接成功後,還需要發現服務成功後才能進行相關操作
        }
        @Override
        public void onServicesDiscovered(BluetoothGatt bluetoothGatt, int i) {
            BluetoothUtil.printServices(bluetoothGatt);//把服務打印出來
            //服務發現成功後,我們就可以進行數據相關的操作了,比如寫入數據、開啟notify等等
        }
        @Override
        public void onConnectFailure(BleException e) {
            bleExceptionHandler.handleException(e);
        }
        @Override
        public void onCharacteristicChanged(BluetoothGatt gatt, BluetoothGattCharacteristic characteristic) {
            //開啟notify之後,我們就可以在這裡接收數據了。
            //處理數據也是需要注意的,在我們項目中需要進行類似分包的操作,感興趣的我以後分享
            Log.i("notify", "onCharacteristicChanged: "+ DeviceBytes.byte2hex(characteristic.getValue()));
            super.onCharacteristicChanged(gatt, characteristic);
        }
        @Override
        public void onCharacteristicWrite(BluetoothGatt gatt, BluetoothGattCharacteristic characteristic, int status) {
            //當我們對ble設備寫入相關數據成功後,這裡也會被調用
            Log.i("test", "onCharacteristicWrite: "+ DeviceBytes.byte2hex(characteristic.getValue()));
            super.onCharacteristicWrite(gatt, characteristic, status);
        }
    });
}
實現二次重連也挺簡單的,在第一次連接成功的會掉函數中,我們把設備的mac地址保存下來,二次重連的時候直接把mac地址傳進去就好了。
private void scanAndConnect(final String mac) {
    liteBluetooth.scanAndConnect(mac, false, new LiteBleGattCallback() {//默認搜20s
        @Override
        public void onConnectSuccess(BluetoothGatt bluetoothGatt, int i) {
            bluetoothGatt.discoverServices();
            //連接成功後,還需要發現服務成功後才能進行相關操作
        }
        @Override
        public void onServicesDiscovered(BluetoothGatt bluetoothGatt, int i) {
            BluetoothUtil.printServices(bluetoothGatt);//把服務打印出來
            //服務發現成功後,我們就可以進行數據相關的操作了,比如寫入數據、開啟notify等等
        }
        @Override
        public void onConnectFailure(BleException e) {
            bleExceptionHandler.handleException(e);
        }
        @Override
        public void onCharacteristicChanged(BluetoothGatt gatt, BluetoothGattCharacteristic characteristic) {
            //開啟notify之後,我們就可以在這裡接收數據了。
            //處理數據也是需要注意的,在我們項目中需要進行類似分包的操作,感興趣的我以後分享
            Log.i("notify", "onCharacteristicChanged: "+ DeviceBytes.byte2hex(characteristic.getValue()));
            super.onCharacteristicChanged(gatt, characteristic);
        }
        @Override
        public void onCharacteristicWrite(BluetoothGatt gatt, BluetoothGattCharacteristic characteristic, int status) {
            //當我們對ble設備寫入相關數據成功後,這裡也會被調用
            Log.i("test", "onCharacteristicWrite: "+ DeviceBytes.byte2hex(characteristic.getValue()));
            super.onCharacteristicWrite(gatt, characteristic, status);
        }
    });
}
如果設備主動給手機發信息,則可以通過notification的方式,這種方式不用手機去輪詢地讀設備上的數據。手機可以用如下方式給設備設置notification功能。如果notificaiton方式對於某個Characteristic是enable的,那麼當設備上的這個Characteristic改變時,手機上的onCharacteristicChanged()回調就會被促發。
我嘗試調用那個庫的方法來開啟notify,但始終沒有成功,所以索性自己寫了。原理不難,也是一步步的通過uuid找到服務、在服務中通過uuid找Characteristic、再通過uuid找到Descriptor。有沒有覺得很熟悉?就是文章一開始放的那張圖!嘿嘿~是不是就理解了~
//uuid需要替換成項目中使用的uuid,這只是舉個例子
private static final String serviceid = "0000fee7-0000-1000-8000-00805f9b34fb";
private static final String charaid   = "0000feaa-0000-1000-8000-00805f9b34fb";
private static final String notifyid  = "00001202-0000-1000-8000-00805f9b34fb";
private void enableNotificationOfCharacteristic(final boolean enable) {
    UUID ServiceUUID = UUID.fromString(serviceid);
    UUID CharaUUID = UUID.fromString(charaid);
    if(!mBluetoothGatt.equals(null)){
        BluetoothGattService service = mBluetoothGatt.getService(ServiceUUID);
        if(service != null){
            BluetoothGattCharacteristic chara= service.getCharacteristic(CharaUUID);
            if(chara != null){
                boolean success = mBluetoothGatt.setCharacteristicNotification(chara,enable);
                Log.i("success", "setCharactNotify: "+success);
                BluetoothGattDescriptor descriptor = chara.getDescriptor(UUID.fromString(notifyid));
                if (descriptor != null){
                    if (enable) {
                        descriptor.setValue(BluetoothGattDescriptor.ENABLE_INDICATION_VALUE);
                    } else {
                        descriptor.setValue(BluetoothGattDescriptor.DISABLE_NOTIFICATION_VALUE);
                    }
                    SystemClock.sleep(200);
                    mBluetoothGatt.writeDescriptor(descriptor);
                }
            }
        }
    }
}
    private void writeDataToCharacteristic(byte[] value) {
        if (liteBluetooth.isServiceDiscoered()){
            LiteBleConnector connector = liteBluetooth.newBleConnector();
            connector.withUUIDString(serviceid, get_write_charaid, null)
                    .writeCharacteristic(connector.getCharacteristic(), value, new BleCharactCallback() {
                        @Override
                        public void onSuccess(BluetoothGattCharacteristic characteristic) {
//                        BleLog.i(TAG, "Write Success, DATA: " + DeviceBytes.byte2hex(characteristic.getValue()));
                        }
                        @Override
                        public void onFailure(BleException exception) {
                            BleLog.i(TAG, "Write failure: " + exception);
                            bleExceptionHandler.handleException(exception);
                        }
                    });
        }else {
            return;
        }
    }
if (liteBluetooth.isConnectingOrConnected()) {
        liteBluetooth.closeBluetoothGatt();
}
在藍牙的數據收發過程中,幾乎都是用byte[]數組來進行的,那麼我們調試保存的數據難免會為數據格式的轉換而各種百度,下面和大家分享下我項目中用到的一些方法~
private  int byteToInt(byte b, byte c) {//計算總包長,兩個字節表示的
    short s = 0;
    int ret;
    short s0 = (short) (c & 0xff);// 最低位
    short s1 = (short) (b & 0xff);
    s1 <<= 8;
    s = (short) (s0 | s1);
    ret = s;
    return ret;
}
private byte[] int2byte(int res) {
    byte[] targets = new byte[2];
    targets[1] = (byte) (res & 0xff);// 最低位
    targets[0] = (byte) ((res >> 8) & 0xff);// 次低位
    return targets;
}
public static byte[] hexStringToByte(String hex) {
    int len = (hex.length() / 2);
    byte[] result = new byte[len];
    char[] achar = hex.toCharArray();
    for (int i = 0; i < len; i++) {
        int pos = i * 2;
        result[i] = (byte) (toByte(achar[pos]) << 4 | toByte(achar[pos + 1]));
    }
    return result;
}
private static byte toByte(char c) {
    byte b = (byte) "0123456789ABCDEF".indexOf(c);
    return b;
}
 public static String byte2hex(byte [] buffer){
        String h = "";
        for(int i = 0; i < buffer.length; i++){
            String temp = Integer.toHexString(buffer[i] & 0xFF);
            if(temp.length() == 1){
                temp = "0" + temp;
            }
            h = h + temp;
        }
        return h;
  }
Ble基本的操作幾乎都列出來了,下篇和大家分享低耗藍牙空中升級,網上的demo都太龐大了,下次分享我實現的demo,代碼一定最少~嘿嘿。還有就是數據分包那部分,如果感興趣的可以留言給我,我看是否需要分享。謝謝觀看~
原創作品,如需轉載,請與作者聯系,否則將追究法律責任。
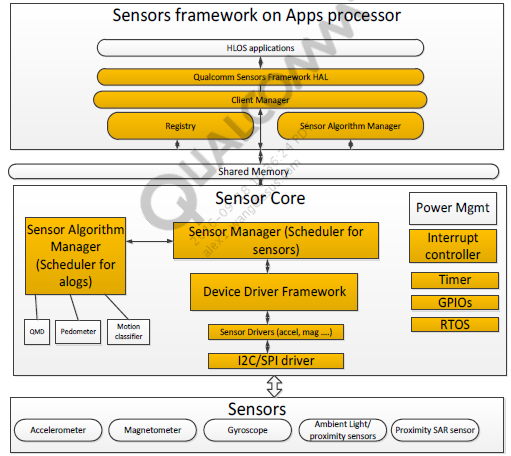 Android Sensor詳解(2)如何portingADSP中的sensor
ADSP sensor overview在初略介紹sensor的時候,就有講到sensor的架構,在此繼續將其具體化,來看看高通的sensor架構。我們可以通過下圖看具體
 Android開源項目分類匯總(六)工具庫
主要包括那些不錯的開發庫,包括依賴注入框架、圖片緩存、網絡相關、數據庫ORM建模、Android公共庫、Android 高版本向低版本兼容、多媒體相關及其他。一、依賴注入
 Android網絡編程之傳遞數據給服務器(二)
Android網絡編程之傳遞數據給服務器(二) 請尊重他人的勞動成果,轉載請注明出處:Android網絡編程之傳遞數據給服務器(二) 我曾在《Andr
 Android動畫譯文(上)
1.概述Android框架提供了兩套動畫系統property animation 屬性動畫 view animation 視圖動畫他們都有可取之處,不過總的來講。屬性動畫