編輯:關於Android編程
通常我們調用getResources()方法獲取資源文件
public Resources getResources() {
    return mResources;
}
mResources是在創建ContextImp對象後的init方法裡面創建的
mResources = mPackageInfo.getResources(mainThread);調用了LoadedApk的getResources方法
public Resources getResources(ActivityThread mainThread) {
    if (mResources == null) {
        mResources = mainThread.getTopLevelResources(mResDir,
                Display.DEFAULT_DISPLAY, null, this);
    }
    return mResources;
}
又調用到了ActivityThread類的getTopLevelResources方法
Resources getTopLevelResources(String resDir, int displayId, Configuration overrideConfiguration, CompatibilityInfo compInfo) {
    ResourcesKey key = new ResourcesKey(resDir, displayId, overrideConfiguration, compInfo.applicationScale, compInfo.isThemeable);
    Resources r;
    synchronized (mPackages) {
        // ...
        WeakReference wr = mActiveResources.get(key);
        r = wr != null ? wr.get() : null;
        if (r != null && r.getAssets().isUpToDate()) {
            if (false) {
                Slog.w(TAG, "Returning cached resources " + r + " " + resDir
                        + ": appScale=" + r.getCompatibilityInfo().applicationScale);
            }
            return r;
        }
    }

    AssetManager assets = new AssetManager();
    assets.setThemeSupport(compInfo.isThemeable);
    if (assets.addAssetPath(resDir) == 0) {
        return null;
    }

    // ...

    r = new Resources(assets, dm, config, compInfo);
    if (false) {
        Slog.i(TAG, "Created app resources " + resDir + " " + r + ": "
                + r.getConfiguration() + " appScale="
                + r.getCompatibilityInfo().applicationScale);
    }

    synchronized (mPackages) {
        WeakReference wr = mActiveResources.get(key);
        Resources existing = wr != null ? wr.get() : null;
        if (existing != null && existing.getAssets().isUpToDate()) {
            // Someone else already created the resources while we were
            // unlocked; go ahead and use theirs.
            r.getAssets().close();
            return existing;
        }

        // XXX need to remove entries when weak references go away
        mActiveResources.put(key, new WeakReference(r));
        return r;
    }
}
ResourcesKey使用resDir和其他參數來構造,這裡主要是resDir參數,表明資源文件所在的路徑。也就是APK程序所在路徑。
ResourcesKey key = new ResourcesKey(resDir, displayId, overrideConfiguration, compInfo.applicationScale, compInfo.isThemeable);上面代碼的主要邏輯是獲取Resources對象,從一個Map變量mActiveResources獲取,這個Map維護了ResourcesKey和WeakReference
因此只要這個Map中包含多個指向不同資源路徑的Resources對象或者說我們有指向不同路徑的資源的Resources對象,就可以訪問多個路徑的資源,即有實現訪問其他APK文件中的資源的可能。
創建Resources對象的主要邏輯為
AssetManager assets = new AssetManager();
assets.setThemeSupport(compInfo.isThemeable);
    if (assets.addAssetPath(resDir) == 0) {
        return null;
}
 r = new Resources(assets, dm, config, compInfo);
首先創建AssetManager對象,然後用其創建Resources對象。我們以前使用getAssets方法讀取assets文件夾中的文件,其實他就是在這裡創建的。
AssetManager的構造函數:
public AssetManager() {
    synchronized (this) {
        if (DEBUG_REFS) {
            mNumRefs = 0;
            incRefsLocked(this.hashCode());
        }
        init();
        if (localLOGV) Log.v(TAG, "New asset manager: " + this);
        ensureSystemAssets();
    }
}
init()函數也是一個native函數,其native代碼在android_util_AssetManager.cpp中
static void android_content_AssetManager_init(JNIEnv* env, jobject clazz)
{
    AssetManager* am = new AssetManager();
    if (am == NULL) {
        jniThrowException(env, "java/lang/OutOfMemoryError", "");
        return;
    }
    // 將Framework的資源文件添加到AssertManager對象的路徑中。
    am->addDefaultAssets();

    ALOGV("Created AssetManager %p for Java object %p\n", am, clazz);
    env->SetIntField(clazz, gAssetManagerOffsets.mObject, (jint)am);
}

bool AssetManager::addDefaultAssets()
{
	// /system
    const char* root = getenv("ANDROID_ROOT");
    LOG_ALWAYS_FATAL_IF(root == NULL, "ANDROID_ROOT not set");

    String8 path(root);
    // kSystemAssets定義為static const char* kSystemAssets = "framework/framework-res.apk";
    // 因此,path為/system/framework/framework-res.apk,framework對應的資源文件
    path.appendPath(kSystemAssets);

    return addAssetPath(path, NULL);
}
到此為止,在創建AssetManager的時候完成了添加framework資源,然後添加本應用的資源路徑,即調用addAssetPath方法
/**
 * Add an additional set of assets to the asset manager.  This can be
 * either a directory or ZIP file.  Not for use by applications.  Returns
 * the cookie of the added asset, or 0 on failure.
 * {@hide}
 */
public native final int addAssetPath(String path);
也是一個native方法,其native代碼在android_util_AssetManager.cpp中
static jint android_content_AssetManager_addAssetPath(JNIEnv* env, jobject clazz, jstring path)
{
    ScopedUtfChars path8(env, path);
    if (path8.c_str() == NULL) {
        return 0;
    }
    AssetManager* am = assetManagerForJavaObject(env, clazz);
    if (am == NULL) {
        return 0;
    }

    void* cookie;
    // 在native代碼中完成添加資源路徑的工作
    bool res = am->addAssetPath(String8(path8.c_str()), &cookie);

    return (res) ? (jint)cookie : 0;
}
可以看到,Resources對象的內部AssetManager對象包含了framework的資源還包含了應用程序本身的資源,因此這也就是為什麼能使用getResources函數獲得的resources對象來訪問系統資源和本應用資源的原因。
受此過程的提醒,我們是不是可以自己創建一個Resources對象,讓它的包含我們指定路徑的資源,就可以實現訪問其他的資源了呢?答案是肯定的,利用這個思想可以實現資源的動態加載,換膚、換主題等功能都可以利用這種方法實現。
於是,主要思想就是創建一個AssetManager對象,利用addAssetPath函數添加指定的路徑,用其創建一個Resources對象,使用該Resources對象獲取該路徑下的資源。
需要注意的是addAssetPath函數是hide的,可以使用反射調用。
public void loadRes(String path){
	try {
		assetManager = AssetManager.class.newInstance();
		Method addAssetPath = AssetManager.class.getMethod("addAssetPath", String.class);
		addAssetPath.invoke(assetManager, path);
	} catch (Exception e) {
	}
	resources = new Resources(assetManager, super.getResources().getDisplayMetrics(), super.getResources().getConfiguration());
	// 也可以根據資源獲取主題
}
這裡的參數path就是APK文件的路徑,可以通過以下方式獲取
getPackageManager().getApplicationInfo("xxx", 0).sourceDir;
並且還可以重寫Context的getResources方法,getAsset方法,提高代碼的一致性。
@Override
public Resources getResources() {
	return resources == null ? super.getResources() : resources;
}
@Override
public AssetManager getAssets() {
	return assetManager == null ? super.getAssets() : assetManager;
}
於是在加載了資源之後就可以通過該Resources對象獲取對應路徑下面的資源了。
兩種不同風格的按鈕,默認的是本應用提供的資源,還有一種作為另一個單獨的插件APK程序存放在手機的其他路徑中,當選擇不同的風格時加載不同的圖片資源。
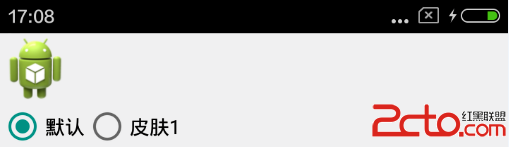

插件APK僅僅包含了一些資源文件。
宿主程序的代碼具體如下
private AssetManager assetManager;
	private Resources resources;
	private RadioGroup rg;
	private ImageView iv;

	@Override
	protected void onCreate(Bundle savedInstanceState) {
		super.onCreate(savedInstanceState);
		setContentView(R.layout.activity_main);
		iv = (ImageView) findViewById(R.id.iv);
		rg = (RadioGroup) findViewById(R.id.rg);
		rg.setOnCheckedChangeListener(new OnCheckedChangeListener() {
			@Override
			public void onCheckedChanged(RadioGroup group, int checkedId) {
				switch (checkedId) {
				case R.id.default_skin:
					assetManager = null;
					resources = null;
					iv.setImageDrawable(getResources().getDrawable(R.drawable.ic_launcher));
					break;
				case R.id.skin1:
			        String dexPath = "";
			        try {
						dexPath = getPackageManager().getApplicationInfo("com.example.plugin", 0).sourceDir;
					} catch (NameNotFoundException e) {
						e.printStackTrace();
					}
					loadRes(dexPath);
					// 由於重寫了getResources方法,因此這時返回的是我們自己維護的Resources對象,因此可以訪問到他的編號id的資源
					iv.setImageDrawable(getResources().getDrawable(0x7f020000));
					break;
				}
			}
		});
	}

	public void loadRes(String path){
		try {
			assetManager = AssetManager.class.newInstance();
			Method addAssetPath = AssetManager.class.getMethod("addAssetPath", String.class);
			addAssetPath.invoke(assetManager, path);
		} catch (Exception e) {
		}
		resources = new Resources(assetManager, super.getResources().getDisplayMetrics(), super.getResources().getConfiguration());
	}


	@Override
	public Resources getResources() {
		return resources == null ? super.getResources() : resources;
	}

	@Override
	public AssetManager getAssets() {
		return assetManager == null ? super.getAssets() : assetManager;
	}
可以查到,插件APK中的額ic_launcher圖片的id為0x7f020000,於是可以通過該id值獲取到對應的資源
public static final int ic_launcher=0x7f020000;當然這樣的耦合性太高了,可以用來說明原理,但看起來不是很直觀,因為這個id只有查看了插件APK的代碼才知道,因此可以讓插件APK提供返回這個id的函數,由宿主APK來調用,具體可以通過反射也可以通過接口。
插件APK提供getImageId函數獲取圖片資源的id
public class Plugin {
	public static int getImageId() {
		return R.drawable.ic_launcher;
	}
}
這樣在加載完資源後,可以調用以下方法來獲取該圖片資源
private void setImage(String dexPath) {
		DexClassLoader loader = new DexClassLoader(dexPath, getApplicationInfo().dataDir, null, this.getClass().getClassLoader());
		try {
			Class clazz = loader.loadClass("com.example.plugin.Plugin");
			Method getImageId = clazz.getMethod("getImageId");
			int ic_launcher = (int) getImageId.invoke(clazz);
			iv.setImageDrawable(getResources().getDrawable(ic_launcher));
		} catch (Exception e) {
			e.printStackTrace();
		}
	}
對於每個插件,在AndroidManifest.xml中聲明一個空的Activity,並添加他的action,比如:
<activity android:name=".plugin">
            <intent-filter>
                <action android:name="android.intent.plugin">
            </action></intent-filter>
        </activity>
這樣在宿主程序中就可以查到對應的插件,以供選擇加載。
PackageManager pm = getPackageManager(); List效果:resolveinfos = pm.queryIntentActivities(intent, 0); ActivityInfo activityInfo = resolveinfos.get(i).activityInfo; dexPaths.add(activityInfo.applicationInfo.sourceDir);
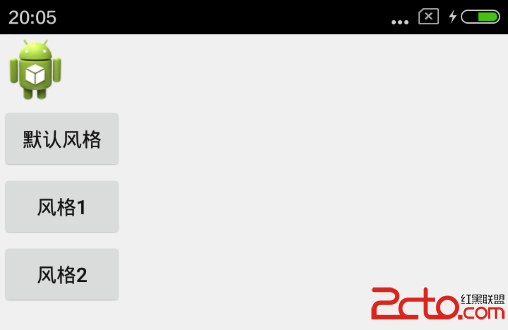
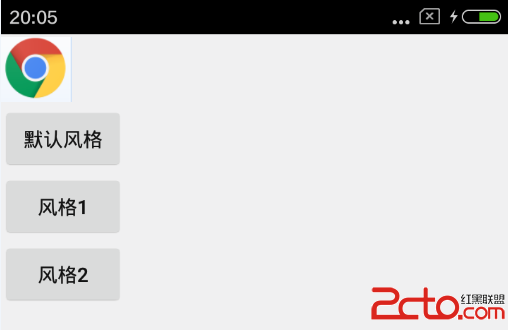
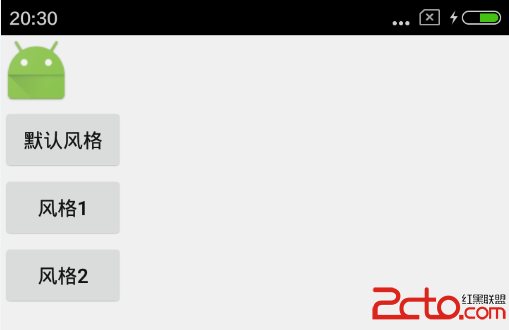
private AssetManager assetManager; private Resources resources; private LinearLayout ll; private ImageView iv; private Button btn; private List兩個插件程序:dexPaths = new ArrayList (); @Override protected void onCreate(Bundle savedInstanceState) { super.onCreate(savedInstanceState); setContentView(R.layout.activity_main); iv = (ImageView) findViewById(R.id.iv); ll = (LinearLayout) findViewById(R.id.ll); btn = (Button) findViewById(R.id.btn); btn.setOnClickListener(new OnClickListener() { @Override public void onClick(View v) { resources = null; iv.setImageDrawable(getResources().getDrawable(R.drawable.ic_launcher)); } }); Intent intent = new Intent("android.intent.plugin"); PackageManager pm = getPackageManager(); final List resolveinfos = pm.queryIntentActivities(intent, 0); for (int i = 0; i < resolveinfos.size(); i++) { final ActivityInfo activityInfo = resolveinfos.get(i).activityInfo; dexPaths.add(activityInfo.applicationInfo.sourceDir); // 根據查詢到的插件數添加按鈕 final Button btn = new Button(this); btn.setText("風格" +(i+1)); btn.setTag(i); ll.addView(btn, new LinearLayout.LayoutParams(LayoutParams.WRAP_CONTENT,LayoutParams.WRAP_CONTENT)); btn.setOnClickListener(new OnClickListener() { @Override public void onClick(View v) { int index = (Integer)btn.getTag(); String dexPath = dexPaths.get(index); loadRes(dexPath); setImage(resolveinfos.get(index).activityInfo); } }); } } private void setImage(ActivityInfo activityInfo) { DexClassLoader loader = new DexClassLoader(activityInfo.applicationInfo.sourceDir, getApplicationInfo().dataDir, null, this.getClass().getClassLoader()); try { Class clazz = loader.loadClass(activityInfo.packageName + ".Plugin"); Method getImageId = clazz.getMethod("getImageId"); int ic_launcher = (int) getImageId.invoke(clazz); iv.setImageDrawable(getResources().getDrawable(ic_launcher)); } catch (Exception e) { e.printStackTrace(); } } public void loadRes(String path) { try { assetManager = AssetManager.class.newInstance(); Method addAssetPath = AssetManager.class.getMethod("addAssetPath", String.class); addAssetPath.invoke(assetManager, path); } catch (Exception e) { e.printStackTrace(); } resources = new Resources(assetManager, super.getResources() .getDisplayMetrics(), super.getResources().getConfiguration()); } @Override public Resources getResources() { return resources == null ? super.getResources() : resources; } @Override public AssetManager getAssets() { return assetManager == null ? super.getAssets() : assetManager; }
com.example.plugin
|-- Plugin.java
com.example.plugin2
|--Plugin.java
Plugin類的內容一樣,為提供給宿主程序反射調用的類
注冊空的activity
<activity android:name=".plugin" android:label="@string/name">
      <intent-filter>
            <action android:name="android.intent.plugin">
      </action></intent-filter>
</activity>
 [Android] 獲取WebView的頁面標題(Title)-----WebChromeClient.onReceivedTitle()方法的重寫
應用開發中需要獲取WebView當前頁面的標題,可能通過對WebChromeClient.onReceivedTitle()方法的重寫來實現 效果圖如下: 代碼如下:
 Android apk動態加載機制的研究(二):資源加載和activity生命周期管理
前言 為了更好地閱讀本文,你需要先閱讀Android apk動態加載機制的研究這篇文章,在此文中,博主分析了Android中apk的動態加載機制,並在文章的
 Android動態加載插件APK
問題起因我曾經在開發Android Application的過程中遇到過那個有名的65k方法數的問題。如果你開發的應用程序變得非常龐大,你八成會遇到這個問題。這個問題實際
 Android中自定義進度條詳解
Android原生控件只有橫向進度條一種,而且沒法變換樣式,比如原生rom的樣子很丑是吧,當偉大的產品設計要求更換前背景,甚至縱向,甚至圓弧狀的,咋辦,比如:ok,我們開