編輯:關於Android編程
Android-Universal-Image-Loader 是 github上一個開源的圖片緩存框架 ,提供圖片MemoryCache和DiskCache的功能,並支持加載網絡、本地、contentProvider圖片的功能
"http://site.com/image.png" // from Web
"file:///mnt/sdcard/image.png" // from SD card
"file:///mnt/sdcard/video.mp4" // from SD card (video thumbnail)
"content://media/external/images/media/13" // from content provider
"content://media/external/video/media/13" // from content provider (video thumbnail)
"assets://image.png" // from assets
"drawable://" + R.drawable.img // from drawables (non-9patch images) //通常不用。
NOTE:Usedrawable://only if you really need it! Alwaysconsider the native wayto load drawables -ImageView.setImageResource(...)instead of using ofImageLoader.
下面我來從源碼的角度分析一下這個開源項目的流程:
首先 先寫一個簡單的例子:
 ImageLoader imageLoader = ImageLoader.getInstance();
        ImageLoaderConfiguration config = new ImageLoaderConfiguration.Builder(this).build();

        imageLoader.init(config);
        imageLoader.displayImage("http://pic32.nipic.com/20130829/12906030_124355855000_2.png", image);
第一行 要先實例化ImageLoader 采用了單例模式實例化
然後需要給imageLoader 初始化配置信息,也就是ImageLoaderConfiguration 這個類 如果不初始化 會報異常
接下來我們來看看這個類中都可以初始化哪些變量:
final Resources resources; //用於加載app中資源文件

	final int maxImageWidthForMemoryCache;  //內存緩存的圖片寬度最大值  默認為屏幕寬度
	final int maxImageHeightForMemoryCache;  //同上
	final int maxImageWidthForDiskCache;  //磁盤緩存寬度  默認無限制
	final int maxImageHeightForDiskCache;  //同上
	final BitmapProcessor processorForDiskCache;  //位圖處理器  磁盤緩存 處理器

	final Executor taskExecutor;   //任務執行者
	final Executor taskExecutorForCachedImages;   //緩存圖片任務執行者
	final boolean customExecutor;   //自定義的任務執行者
	final boolean customExecutorForCachedImages;   //自定義的緩存圖片任務執行者

	final int threadPoolSize;   //線程池 大小  默認為3
	final int threadPriority;  //線程優先級
	final QueueProcessingType tasksProcessingType;   //隊列的類型 可以選擇 FIFO(先進先出)LIFO(後進先出)

	final MemoryCache memoryCache;   //內存緩存
	final DiskCache diskCache;   //磁盤緩存
	final ImageDownloader downloader;  //圖片下載器
	final ImageDecoder decoder;    //圖片解碼器
	final DisplayImageOptions defaultDisplayImageOptions;  //圖片展示選項

	final ImageDownloader networkDeniedDownloader;   //離線圖片下載器
	final ImageDownloader slowNetworkDownloader;   //網速慢圖片下載器
在這個配置類中可以初始化以上內容 下面是一些默認的初始化
File cacheDir = StorageUtils.getCacheDirectory(context);
ImageLoaderConfiguration config = new ImageLoaderConfiguration.Builder(context)
        .memoryCacheExtraOptions(480, 800) // default = device screen dimensions
        .diskCacheExtraOptions(480, 800, CompressFormat.JPEG, 75, null)
        .taskExecutor(...)
        .taskExecutorForCachedImages(...)
        .threadPoolSize(3) // default
        .threadPriority(Thread.NORM_PRIORITY - 1) // default
        .tasksProcessingOrder(QueueProcessingType.FIFO) // default
        .denyCacheImageMultipleSizesInMemory()
        .memoryCache(new LruMemoryCache(2 * 1024 * 1024))
        .memoryCacheSize(2 * 1024 * 1024)
        .memoryCacheSizePercentage(13) // default
        .diskCache(new UnlimitedDiscCache(cacheDir)) // default
        .diskCacheSize(50 * 1024 * 1024)
        .diskCacheFileCount(100)
        .diskCacheFileNameGenerator(new HashCodeFileNameGenerator()) // default
        .imageDownloader(new BaseImageDownloader(context)) // default
        .imageDecoder(new BaseImageDecoder()) // default
        .defaultDisplayImageOptions(DisplayImageOptions.createSimple()) // default
        .writeDebugLogs()
        .build();
可以根據自己的需要選擇需要使用的disk和memory緩存策略
接下來我們繼續往下看:
public synchronized void init(ImageLoaderConfiguration configuration) {
		if (configuration == null) {
			throw new IllegalArgumentException(ERROR_INIT_CONFIG_WITH_NULL);
		}
		if (this.configuration == null) {
			L.d(LOG_INIT_CONFIG);
			engine = new ImageLoaderEngine(configuration);
			this.configuration = configuration;
		} else {
			L.w(WARNING_RE_INIT_CONFIG);
		}
	}
init方法 傳入配置信息 並根據配置信息初始化 ImageLoaderEngine引擎類 (主要是 初始化其中的TaskExecutor)
之後 便是 displayImage方法了
下面我們來看 displayImage這個方法
這個方法 參數最多的重載是 :
public void displayImage(String uri, ImageAware imageAware, DisplayImageOptions options,
ImageSize targetSize, ImageLoadingListener listener, ImageLoadingProgressListener progressListener)
參數包括 圖片uri 圖片控件 展示圖片的選項、圖像的大小 、圖像加載的監聽、圖像加載的進度條監聽等 其中 options中還可以設置更多的選項
下面正式開始看 displayImage方法的源碼 (由於太長 一步步來看):
		checkConfiguration();
		if (imageAware == null) {
			throw new IllegalArgumentException(ERROR_WRONG_ARGUMENTS);
		}
		if (listener == null) {
			listener = defaultListener;
		}
		if (options == null) {
			options = configuration.defaultDisplayImageOptions;
		}
private void checkConfiguration() {
if (configuration == null) {
throw new IllegalStateException(ERROR_NOT_INIT);
}
}
下面幾行 也是類似 如果所判斷的變量為空則初始化一個
		if (TextUtils.isEmpty(uri)) {
			engine.cancelDisplayTaskFor(imageAware);
			listener.onLoadingStarted(uri, imageAware.getWrappedView());
			if (options.shouldShowImageForEmptyUri()) {
				imageAware.setImageDrawable(options.getImageForEmptyUri(configuration.resources));
			} else {
				imageAware.setImageDrawable(null);
			}
			listener.onLoadingComplete(uri, imageAware.getWrappedView(), null);
			return;
		}

		if (targetSize == null) {
			targetSize = ImageSizeUtils.defineTargetSizeForView(imageAware, configuration.getMaxImageSize());
		}
然後調用listener的start 之後由於 uri為空 如果設置了需要設置空的圖像那麼直接設置 圖像是 空的時候需要設置的圖像即可 如果沒設置,直接不顯示就好
之後調用 complete 回調 返回 這是uri為空的情況 不需要做太多操作 也不需要緩存
如果 圖像的大小 設置是空 那麼根據控件設置的大小 設置 要展示圖片的大小
public static ImageSize defineTargetSizeForView(ImageAware imageAware, ImageSize maxImageSize) {
int width = imageAware.getWidth();
if (width <= 0) width = maxImageSize.getWidth();
int height = imageAware.getHeight();
if (height <= 0) height = maxImageSize.getHeight();
return new ImageSize(width, height);
}
String memoryCacheKey = MemoryCacheUtils.generateKey(uri, targetSize);
		engine.prepareDisplayTaskFor(imageAware, memoryCacheKey);

		listener.onLoadingStarted(uri, imageAware.getWrappedView());
之後 根據 uri和目標的大小 生成一個key 並把 這個任務放入 engine 的集合中
回調 started方法
		Bitmap bmp = configuration.memoryCache.get(memoryCacheKey);  //從內存緩存取
		if (bmp != null && !bmp.isRecycled()) {  //如果存在 並且沒被回收
			L.d(LOG_LOAD_IMAGE_FROM_MEMORY_CACHE, memoryCacheKey);

				if (options.shouldPostProcess()) { //如果設置了 postProcess 執行  默認沒設置  設置這個可以提前對圖片進行某些處理
				ImageLoadingInfo imageLoadingInfo = new ImageLoadingInfo(uri, imageAware, targetSize, memoryCacheKey,
						options, listener, progressListener, engine.getLockForUri(uri));
				ProcessAndDisplayImageTask displayTask = new ProcessAndDisplayImageTask(engine, bmp, imageLoadingInfo,
						defineHandler(options));
				if (options.isSyncLoading()) {
					displayTask.run();
				} else {
					engine.submit(displayTask);
				}
			} else {
				options.getDisplayer().display(bmp, imageAware, LoadedFrom.MEMORY_CACHE);
				listener.onLoadingComplete(uri, imageAware.getWrappedView(), bmp);
			}
		}
首先第一行 從內存緩存中根據key取bitmap
第二行 判斷 內存中有沒有和 有沒有被內存回收 如果存在切沒被回收 那麼就比較簡單了
先對圖片進行一些處理 然後把圖片展示出來即可
其中 上述的那幾行 task 代碼 的主要目的就是 封裝了一些在展示圖片之前的一些對圖片的處理 然後再展示圖片
倒數第五行的else 語句 是在 不需要 在展示圖片之前處理圖片時,那麼就直接使用 displaywe 對 圖片進行 展示 並回調complete函數
其中 這個displayer可以設置 fadeIn(透明度) 和 Circle displayer(圓角) 看自己需要了
public void display(Bitmap bitmap, ImageAware imageAware, LoadedFrom loadedFrom) {
imageAware.setImageBitmap(bitmap);
}
普通的displayer display非常簡單 見上面代碼
else { //如果不存在內存緩存中 或者已經被回收了
			if (options.shouldShowImageOnLoading()) {
				imageAware.setImageDrawable(options.getImageOnLoading(configuration.resources));
			} else if (options.isResetViewBeforeLoading()) {
				imageAware.setImageDrawable(null);
			}

			ImageLoadingInfo imageLoadingInfo = new ImageLoadingInfo(uri, imageAware, targetSize, memoryCacheKey,
					options, listener, progressListener, engine.getLockForUri(uri));
			LoadAndDisplayImageTask displayTask = new LoadAndDisplayImageTask(engine, imageLoadingInfo,
					defineHandler(options));
			if (options.isSyncLoading()) { //表示同步  直接執行
				displayTask.run();
			} else {  // 不同步 那麼就交給線程池 對象執行  engine中 有  Executor  這其中有 線程池
				engine.submit(displayTask);
			}

		}
繼續 源碼 如果 不在內存緩存中 那麼 就麻煩了 大體的操作步驟是 先從圖片原始地加載圖片,得到圖片後放入硬盤和內存 然後展示
第二行 如果加載時需要顯示圖片 那麼設置 否則 不設置圖片
然後 設置正在加載時的信息 ImageLoadingInfo 和 任務LoadAndDisplayImageTask
之後根據是否同步 執行任務
接下來看 displayTask的run方法
		if (waitIfPaused()) return;
		if (delayIfNeed()) return;

		ReentrantLock loadFromUriLock = imageLoadingInfo.loadFromUriLock;
		L.d(LOG_START_DISPLAY_IMAGE_TASK, memoryCacheKey);
		if (loadFromUriLock.isLocked()) {
			L.d(LOG_WAITING_FOR_IMAGE_LOADED, memoryCacheKey);
		}

		loadFromUriLock.lock();
前兩行是
如果waitIfPaused(), delayIfNeed()返回true的話,直接從run()方法中返回了,不執行下面的邏輯,
這兩個方法 主要是判斷是否是被中斷了任務 或者要延時任務的
繼續看 第四行 獲取了 一個鎖 然後 給其 加鎖 這是為了防止重復的加載
假如在一個ListView中,某個item正在獲取圖片的過程中,而此時我們將這個item滾出界面之後又將其滾進來,滾進來之後如果沒有加鎖,該item又會去加載一次圖片,假設在很短的時間內滾動很頻繁,那麼就會出現多次去網絡上面請求圖片,所以這裡根據圖片的Url去對應一個ReentrantLock對象,讓具有相同Url的請求就會在最後一行等待,等到這次圖片加載完成之後,ReentrantLock就被釋放,剛剛那些相同Url的請求就會繼續執行下面的代碼
		Bitmap bmp;
		try {
			checkTaskNotActual(); //檢查任務是否還在

			bmp = configuration.memoryCache.get(memoryCacheKey);  //從內存緩存獲取bmp
			if (bmp == null || bmp.isRecycled()) { //如果內存緩存中沒有
				bmp = tryLoadBitmap();  //加載圖片  檢查 硬盤中 是否有  如果有 從硬盤加載 如果沒有  從網絡讀取  並緩存到硬盤
				if (bmp == null) return; // listener callback already was fired

				checkTaskNotActual();
				checkTaskInterrupted();

				if (options.shouldPreProcess()) {  //是否需要在顯示圖片之前 對圖片進行處理  需要自行實現
					L.d(LOG_PREPROCESS_IMAGE, memoryCacheKey);
					bmp = options.getPreProcessor().process(bmp);
					if (bmp == null) {
						L.e(ERROR_PRE_PROCESSOR_NULL, memoryCacheKey);
					}
				}

				if (bmp != null && options.isCacheInMemory()) {  //把加載完成的圖片緩存到內存中
					L.d(LOG_CACHE_IMAGE_IN_MEMORY, memoryCacheKey);
					configuration.memoryCache.put(memoryCacheKey, bmp);
				}
			} else { //內存緩存中有  設置 from 為  內存緩存
				loadedFrom = LoadedFrom.MEMORY_CACHE;
				L.d(LOG_GET_IMAGE_FROM_MEMORY_CACHE_AFTER_WAITING, memoryCacheKey);
			}
            //對加載完成的圖片進行處理  默認不處理
			if (bmp != null && options.shouldPostProcess()) {
				L.d(LOG_POSTPROCESS_IMAGE, memoryCacheKey);
				bmp = options.getPostProcessor().process(bmp);
				if (bmp == null) {
					L.e(ERROR_POST_PROCESSOR_NULL, memoryCacheKey);
				}
			}
			checkTaskNotActual();
			checkTaskInterrupted();
		} catch (TaskCancelledException e) {
			fireCancelEvent();
			return;
		} finally {
			loadFromUriLock.unlock();  //釋放鎖
		}
        //下面兩行是顯示圖片的任務 上面是加載bitmap  現已加載好 並緩存到 內存和磁盤中  只需要顯示即可
		//回調接口的  oncancle  和 oncomplete方法 在這裡調用   進度條的 在 從網絡獲取的時候回調  onstart在最開始回調
		DisplayBitmapTask displayBitmapTask = new DisplayBitmapTask(bmp, imageLoadingInfo, engine, loadedFrom);
		runTask(displayBitmapTask, syncLoading, handler, engine);
主要是先從 磁盤中讀取 如果沒有 再從 網絡上加載
讓我們進入這個方法看看
private Bitmap tryLoadBitmap() throws TaskCancelledException {
		Bitmap bitmap = null;
		try {
			File imageFile = configuration.diskCache.get(uri);   //從磁盤讀取
			if (imageFile != null && imageFile.exists() && imageFile.length() > 0) { //如果存在
				L.d(LOG_LOAD_IMAGE_FROM_DISK_CACHE, memoryCacheKey);
				loadedFrom = LoadedFrom.DISC_CACHE;

				checkTaskNotActual();   //檢查任務是否實際存在
				bitmap = decodeImage(Scheme.FILE.wrap(imageFile.getAbsolutePath()));  //直接解析出bitmap
			}
			if (bitmap == null || bitmap.getWidth() <= 0 || bitmap.getHeight() <= 0) {  //如果 不存在硬盤  那麼 從網絡下載並緩存到硬盤
				L.d(LOG_LOAD_IMAGE_FROM_NETWORK, memoryCacheKey);
				loadedFrom = LoadedFrom.NETWORK;

				String imageUriForDecoding = uri;
				if (options.isCacheOnDisk() && tryCacheImageOnDisk()) {  //tryCahcheImageDisk 方法 從網絡下載 並緩存到硬盤
					imageFile = configuration.diskCache.get(uri);
					if (imageFile != null) {
						imageUriForDecoding = Scheme.FILE.wrap(imageFile.getAbsolutePath());  //把路徑變為合適的樣子
					}
				}

				checkTaskNotActual();
				bitmap = decodeImage(imageUriForDecoding);  //解碼圖片

				if (bitmap == null || bitmap.getWidth() <= 0 || bitmap.getHeight() <= 0) {
					fireFailEvent(FailType.DECODING_ERROR, null);  //如果失敗 那麼設置失敗圖片 並 回調失敗的函數
				}
			}
		} catch (IllegalStateException e) {
			fireFailEvent(FailType.NETWORK_DENIED, null);
		} catch (TaskCancelledException e) {
			throw e;
		} catch (IOException e) {
			L.e(e);
			fireFailEvent(FailType.IO_ERROR, e);
		} catch (OutOfMemoryError e) {
			L.e(e);
			fireFailEvent(FailType.OUT_OF_MEMORY, e);
		} catch (Throwable e) {
			L.e(e);
			fireFailEvent(FailType.UNKNOWN, e);
		}
		return bitmap;
	}
其中tryCacheImageOnDisk這個方法的作用 是 在磁盤中未取到 時 從網絡獲取圖片 並緩存到磁盤中去
/** @return true - if image was downloaded successfully; false - otherwise */
	private boolean tryCacheImageOnDisk() throws TaskCancelledException {
		L.d(LOG_CACHE_IMAGE_ON_DISK, memoryCacheKey);

		boolean loaded;
		try {
			loaded = downloadImage();  //此方法是從網絡下載圖片的
			if (loaded) {
				int width = configuration.maxImageWidthForDiskCache;
				int height = configuration.maxImageHeightForDiskCache;
				if (width > 0 || height > 0) {
					L.d(LOG_RESIZE_CACHED_IMAGE_FILE, memoryCacheKey);
					resizeAndSaveImage(width, height); // TODO : process boolean result
				}
			}
		} catch (IOException e) {
			L.e(e);
			loaded = false;
		}
		return loaded;
	}
private boolean downloadImage() throws IOException {
		InputStream is = getDownloader().getStream(uri, options.getExtraForDownloader());  //用下載器 下載
		if (is == null) {
			L.e(ERROR_NO_IMAGE_STREAM, memoryCacheKey);
			return false;
		} else {
			try {
				return configuration.diskCache.save(uri, is, this);  //緩存到磁盤
			} finally {
				IoUtils.closeSilently(is);
			}
		}
	}
這樣 就完成了 圖片的 緩存 與顯示
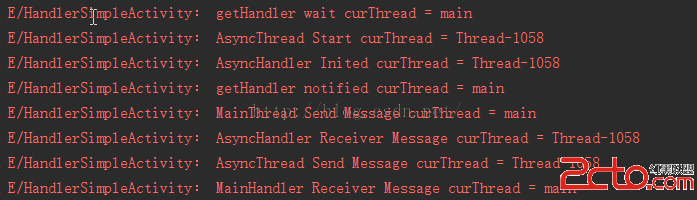
 Android編程開發之seekBar采用handler消息處理操作的方法
本文實例講述了Android編程開發之seekBar采用handler消息處理操作的方法。分享給大家供大家參考,具體如下:該案例簡單實現進度條可走,可拖拽的功能,下面請看
 com.android.phone已停止運行怎麼解決
在安卓手機上,不少用戶都會遇過com.android.phone已停止的彈窗,尤其經常刷機的最明顯。導致的原因實在太多,有刷機步驟不對的,亂改系統文件的,這
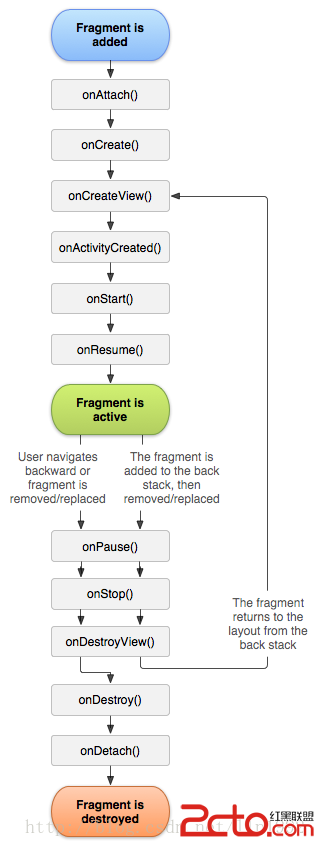
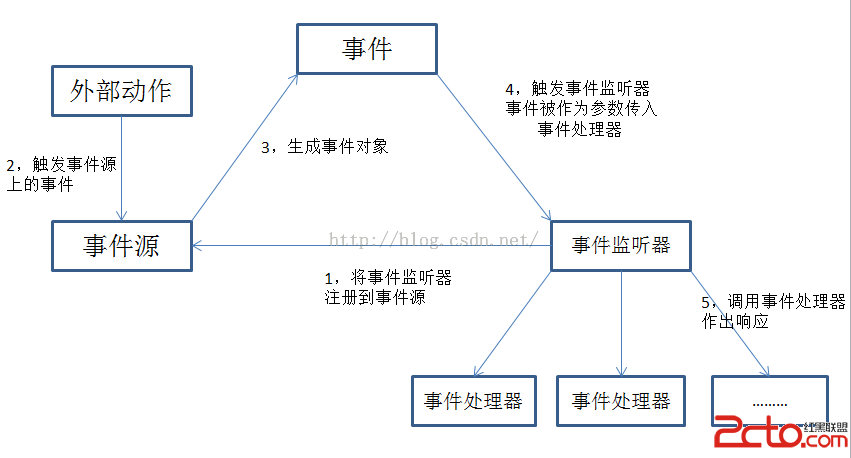 Android基於監聽的事件處理機制
Android提供了強大的事件處理機制,主要包括兩大類:1,基於監聽的事件處理機制:主要做法是為Android界面組件綁定特定的事件監聽器2,基於回調的事件處理機制:主要
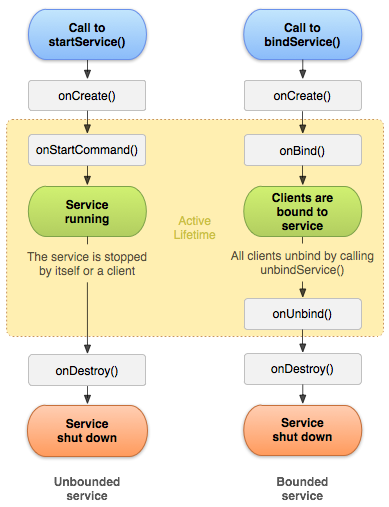
 Android 進階 - ActivieyManagerService簡介
在前面多篇文章中,都有提到ActivityManagerService,它是在系統啟動時加載的一個服務線程,運行於system_server進程中,主要負責管理系統中的A