編輯:關於Android編程
android中自定義view的過程中,需要了解的繪制知識。
1.畫筆paint:
畫筆設置:
paint.setAntiAlias(true);//抗鋸齒功能
paint.setColor(Color.RED); //設置畫筆顏色
paint.setStyle(Style.FILL);//設置填充樣式
paint.setStrokeWidth(30);//設置畫筆寬度
paint.setShadowLayer(10, 15, 15, Color.GREEN);//設置陰影
Paint.Style.FILL :填充內部
Paint.Style.FILL_AND_STROKE :填充內部和描邊
Paint.Style.STROKE :僅描邊
我們在畫筆canvas上繪制就要用到。
2.畫布canvas:
如何獲取我們的畫布呢?
第一種方法是:在繪制View控件時,需要重寫onDraw()函數,在繪制ViewGroup時,需要重寫dispatchDraw()函數。
可以從ondraw()或者dispatchDraw()中獲取到canvas對象;
第二種方法是:
Bitmap bmp = Bitmap.createBitmap(width ,height Bitmap.Config.ARGB_8888); 或者 Bitmap bmp = BitmapFactory.decodeResource(getResources(),R.drawable.wave_bg,null); Canvas c = new Canvas(bitmap); 之後用c畫的信息都在bitmap上,如果要顯示在view上,我們要在ondraw中使用系統的canvas.drawbitmap(bmp)。
saveLayer會創建一個全新透明的bitmap,大小與指定保存的區域一致,其後的繪圖操作都放在這個bitmap上進行。在繪制結束後,會直接蓋在上一層的Bitmap上顯示。
畫布的變換;
平移(translate) void translate(float dx, float dy) 只是平移坐標系的原點的位置,之前畫的東西不變,之後畫的東西依照新的原點畫 旋轉(Rotate) void rotate (float degrees, float px, float py) 旋轉的是坐標系 縮放(scale ) public void scale (float sx, float sy) 扭曲(skew) void skew (float sx, float sy) float sx:將畫布在x方向上傾斜相應的角度,sx傾斜角度的tan值, float sy:將畫布在y軸方向上傾斜相應的角度,sy為傾斜角度的tan值, 改變的是坐標系 裁剪畫布(clip系列函數) 得到新的畫布 boolean clipRect(float left, float top, float right, float bottom, Region.Op op) boolean clipRect(Rect rect) 畫布的保存與恢復(save()、restore()) protected void onDraw(Canvas canvas) { super.onDraw(canvas); canvas.drawColor(Color.RED); //保存的畫布大小為全屏幕大小 canvas.save(); canvas.clipRect(new Rect(100, 100, 800, 800)); canvas.drawColor(Color.GREEN); //保存畫布大小為Rect(100, 100, 800, 800) canvas.save(); canvas.clipRect(new Rect(200, 200, 700, 700)); canvas.drawColor(Color.BLUE); //保存畫布大小為Rect(200, 200, 700, 700) canvas.save(); canvas.clipRect(new Rect(300, 300, 600, 600)); canvas.drawColor(Color.BLACK); //保存畫布大小為Rect(300, 300, 600, 600) canvas.save(); canvas.clipRect(new Rect(400, 400, 500, 500)); canvas.drawColor(Color.WHITE); //連續出棧三次,將最後一次出棧的Canvas狀態作為當前畫布,並畫成黃色背景 canvas.restore(); canvas.restore(); canvas.restore(); canvas.drawColor(Color.YELLOW); }
3.繪制各種線,點,圖形,文字,圖片;
繪制多條直線:
pts的組織方式為{x1,y1,x2,y2,x3,y3,……} 兩兩連接,(x1,y1)-(x2,y2)相連;(x3,y3)-(x3,y4)相連 void drawLines (float[] pts, Paint paint) void drawLines (float[] pts, int offset, int count, Paint paint)
繪制多個點:
void drawPoints (float[] pts, Paint paint) void drawPoints (float[] pts, int offset, int count, Paint paint) float[] pts:點的合集,與上面直線一直,樣式為{x1,y1,x2,y2,x3,y3,……} int offset:集合中跳過的數值個數,注意不是點的個數!一個點是兩個數值; count:參與繪制的數值的個數,指pts[]裡人數值個數,而不是點的個數,因為一個點是兩個數值
繪制幾何圖形:
Rect() Rect(int left, int top, int right, int bottom) Rect(Rect r) void drawRoundRect (RectF rect, float rx, float ry, Paint paint) void drawCircle (float cx, float cy, float radius, Paint paint) void drawOval (RectF oval, Paint paint) void drawArc (RectF oval, float startAngle, float sweepAngle, boolean useCenter, Paint paint) 參數:弧是橢圓的一部分,而橢圓是根據外接矩形來生成的 RectF oval:生成橢圓的矩形 float startAngle:弧開始的角度,以X軸正方向為0度 float sweepAngle:弧持續的角度 boolean useCenter:是否有弧的兩邊,True,還兩邊,False,只有一條弧
繪制路徑:
void drawPath (Path path, Paint paint) 直線路徑 *void moveTo (float x1, float y1):直線的開始點;即將直線路徑的繪制點定在(x1,y1)的位置; void lineTo (float x2, float y2):直線的結束點,又是下一次繪制直線路徑的開始點;lineTo()可以一直用; void close ():如果連續畫了幾條直線,但沒有形成閉環,調用Close()會將路徑首尾點連接起來,形成閉環; * *矩形路徑 *void addRect (float left, float top, float right, float bottom, Path.Direction dir) *Path.Direction.CCW:是counter-clockwise縮寫,指創建逆時針方向的矩形路徑; Path.Direction.CW:是clockwise的縮寫,指創建順時針方向的矩形路徑; * *圓角矩形路徑 *void addRoundRect (RectF rect, float[] radii, Path.Direction dir) *float[] radii:必須傳入8個數值,分四組,分別對應每個角所使用的橢圓的橫軸半徑和縱軸半徑 *void addRoundRect (RectF rect, float rx, float ry, Path.Direction dir) *只能構建統一圓角大小,長軸和短軸的半徑 * *圓形路徑 *void addCircle (float x, float y, float radius, Path.Direction dir) 橢圓路徑 void addOval (RectF oval, Path.Direction dir) 弧形路徑 void addArc (RectF oval, float startAngle, float sweepAngle)
為繪制的路徑添加特效:
reset() 重置畫筆 setStrokeCap(Paint.Cap cap) 設置線冒樣式,取值有Cap.ROUND(圓形線冒)、Cap.SQUARE(方形線冒)、Paint.Cap.BUTT(無線冒) .默認是無線冒的 ,加線冒即使在始末加上一個帽子 setStrokeJoin(Paint.Join join) 設置線段連接處樣式,取值有:Join.MITER(結合處為銳角)、Join.Round(結合處為圓弧)、Join.BEVEL(結合處為直線) setPathEffect(PathEffect effect) 設置路徑樣式;取值類型是所有派生自PathEffect的子類: CornerPathEffect, —圓形拐角效果 public CornerPathEffect(float radius) DashPathEffect, —虛線效果 public DashPathEffect(float intervals[], float phase) //intervals[] intervals[]:表示組成虛線的各個線段的長度;整條虛線就是由intervals[]中這些基本線段循環組成的。比如,我們定義new float[] {20,10};那這個虛線段就是基線就是由兩段線段組成的,第一個可見的線段長為20,每二個線段不可見,長度為10; 長度必須大於等於2;因為必須有一個實線段和一個空線段來組成虛線。 個數必須為偶數,如果是基數,最後一個數字將被忽略;這個很好理解,因為一組虛線的組成必然是一個實線和一個空線成對組成的。 DiscretePathEffect, 離散路徑效果 public DiscretePathEffect(float segmentLength, float deviation) segmentLength為將path分割成多少很多段後每段的長度。deviation每條段的偏移量 PathDashPathEffect, 印章路徑效果 public PathDashPathEffect(Path shape, float advance, float phase,Style style) Path shape:表示印章路徑,比如我們下面示例中的三角形加右上角一個點; float advance:表示兩個印章路徑間的距離,很容易理解,印章間距離越大,間距就越大。 float phase:路徑繪制偏移距離,與上面DashPathEffect中的float phase參數意義相同 Style style:表示在遇到轉角時,如何操作印章以使轉角平滑過渡,取值有:Style.ROTATE,Style.MORPH,Style.TRANSLATE;Style.ROTATE表示通過旋轉印章來過渡轉角; Style.MORPH表示通過變形印章來過渡轉角;Style.TRANSLATE表示通過位移來過渡轉角。 SumPathEffect, * ComposePathEffect, * 這兩個都是做特效合並的。具體做法不同 * 假設這裡有原始路徑A. 特效路徑B, C * ComposePathEffect是public ComposePathEffect(PathEffect B, PathEffect C) ;先對A加上C,再加上B * SumPathEffect是public SumPathEffect(PathEffect B, PathEffect C) ;分別對A做B、C特效生成D、E.然後將D,E合並得到最終特效
繪制路徑還涉及到了一個曲線叫做貝塞爾曲線,常用的2介和3介曲線。
繪制文字:
文字畫筆的設置;
//普通設置 paint.setStrokeWidth (5);//設置畫筆寬度 paint.setAntiAlias(true); //指定是否使用抗鋸齒功能,如果使用,會使繪圖速度變慢 paint.setStyle(Paint.Style.FILL);//繪圖樣式,對於設文字和幾何圖形都有效 paint.setTextAlign(Align.CENTER);//設置文字對齊方式,取值:align.CENTER、align.LEFT或align.RIGHT paint.setTextSize(12);//設置文字大小 //樣式設置 paint.setFakeBoldText(true);//設置是否為粗體文字 paint.setUnderlineText(true);//設置下劃線 paint.setTextSkewX((float) -0.25);//設置字體水平傾斜度,普通斜體字是-0.25 paint.setStrikeThruText(true);//設置帶有刪除線效果 //其它設置 paint.setTextScaleX(2);//只會將水平方向拉伸,高度不會變
繪制文字的方法有這些:
普通水平繪制 void drawText (String text, float x, float y, Paint paint) void drawText (CharSequence text, int start, int end, float x, float y, Paint paint) CharSequence類型,可以實現帶圖片的文字繪制。功能最強大 指定個個文字位置 void drawPosText (String text, float[] pos, Paint paint) float[] pos:每個字體的位置,同樣兩兩一組,如{x1,y1,x2,y2,x3,y3……} 沿路徑繪制 void drawTextOnPath (String text, Path path, float hOffset, float vOffset, Paint paint) float hOffset : 與路徑起始點的水平偏移距離 float vOffset : 與路徑中心的垂直偏移量
繪制文字過程中需要注意的地方:
* mPaint.setTextAlign(Align.CENTER); canvas.drawText("aafdADF", x, y, * mPaint); Align.CENTER, 繪制的時候保證整體文字的中間在(x,y)處 Align.LEFT, * 繪制的時候保證整體文字最左邊位於(x,y)處 Align.Right, 繪制的時候保證整體文字最右邊位於(x,y)處 * * * FontMetrics fontMetrics = mPaint.getFontMetrics(); * fontMetrics.ascent;可繪制的最頂部 * fontMetrics.descent; 可繪制的最底部 * fontMetrics.top;物理最頂部,相當於電視劇的屏幕一樣 * fontMetrics.bottom; 物理最底部 * * 我們的文字是顯示在ascent與descent之間的 這4個值都是相當於baseline而言的。所以fontMetrics.ascent= * ascent線-baseline線 得到的結果是負的 * * 從而可以推出; * ascent線Y坐標 = baseline線的y坐標 + fontMetric.ascent; * descent線Y坐標 =baseline線的y坐標 + fontMetric.descent; * top線Y坐標 = baseline線的y坐標 +fontMetric.top; * bottom線Y坐標 = baseline線的y坐標 + fontMetric.bottom; * * * 所繪文字寬度int width = paint.measureText(String text); * 高度 * Paint.FontMetricsInt fm = paint.getFontMetricsInt(); * int top = baseLineY+ fm.top; * int bottom = baseLineY + fm.bottom; * int height = fm.bottom -fm.top; */ /** * * @param textPaint * @return * fontMetrics.top,fontMetrics.ascent,fontMetrics.descent,fontMetrics.bottom */ private static float[] getMuxLineOffset(Paint textPaint) { FontMetrics fontMetrics = textPaint.getFontMetrics(); return new float[] { fontMetrics.top, fontMetrics.ascent, fontMetrics.descent, fontMetrics.bottom }; } //獲取文字寬度 public static float getTextWidth(Paint textPaint, String text) { return textPaint.measureText(text); } // 物理尺寸的高度,最大高度,我們用來適配文字的大小 public static float getTextMaxHeight(Paint textPaint) { Paint.FontMetrics fm = textPaint.getFontMetrics(); return fm.bottom - fm.top; } /** * 返回基線位置,已知top點Y坐標 * * @param textPaint * @return */ public static float getBaseLineYFromTopY(Paint textPaint, float textTopY) { float baseLineY = textTopY - getMuxLineOffset(textPaint)[0]; return baseLineY; } /** * 返回基線位置,已知center點Y坐標 * @param textPaint * @param textCenterY * @return */ public static float getBaseLineYFromCenterY(Paint textPaint, float textCenterY) { float baseLineY = textCenterY + getTextMaxHeight(textPaint) / 2 - getMuxLineOffset(textPaint)[3]; return baseLineY; }
繪制區域:
public Region(int left, int top, int right, int bottom) //創建一個矩形的區域 Region boolean setPath (Path path, Region clip)構造不規則區域 Path path:用來構造的區域的路徑 Region clip:與前面的path所構成的路徑取交集,並將兩交集設置為最終的區域 矩形集枚舉區域——RegionIterator類,對於特定的區域,我們都可以使用多個矩形來表示其大致形狀 RegionIterator(Region region) //根據區域構建對應的矩形集 boolean next(Rect r) //獲取下一個矩形,結果保存在參數Rect r 中 Canvas中並沒有畫Region的函數,我們可以借助 private void drawRegion(Canvas canvas,Region rgn,Paint paint) { RegionIterator iter = new RegionIterator(rgn); Rect r = new Rect(); while (iter.next(r)) { canvas.drawRect(r, paint); } } 區域的合並、交叉等操作 public boolean op(Region region, Op op) 假設用region1 去組合region2 public enum Op { DIFFERENCE(0), //最終區域為region1 與 region2不同的區域 INTERSECT(1), // 最終區域為region1 與 region2相交的區域 UNION(2), //最終區域為region1 與 region2組合一起的區域 XOR(3), //最終區域為region1 與 region2相交之外的區域 REVERSE_DIFFERENCE(4), //最終區域為region2 與 region1不同的區域 REPLACE(5); //最終區域為為region2的區域 } //構造兩個Region Region region = new Region(rect1); Region region2= new Region(rect2); //取兩個區域的交集 region.op(region2, Op.INTERSECT); 取了op之後的結果在region
4.其他知識:
使用顏色矩陣,完成對圖片的各種特效處理;
/** 色彩矩陣 Bitmap由32位表示,A,R,G,B每一個由8位表示。 色彩矩陣 { R 0,0,0,0 0,G,0,0,0 0 0,B,0,0 0 0,0,A,0 } 第5列表示對應R,G,B,A上的增量。 第1到4列表示對R,G,B,A做線性變化 。 都可以用來過濾色彩和增加某一個色彩的飽和度 生成色彩矩陣 ColorMatrix colorMatrix = new ColorMatrix(new float[]{ 1, 0, 0, 0, 0, 0, 1, 0, 0, 0, 0, 0, 1, 0, 0, 0, 0, 0, 0.5, 0, }); mPaint.setColorFilter(new ColorMatrixColorFilter(colorMatrix)) 整體調整色彩飽和度 ColorMatrix colorMatrix = new ColorMatrix(); //整體增強顏色飽和度,即同時增強R,G,B的色彩飽和度 public void setSaturation(float sat) setScale——色彩縮放 public void setScale(float rScale, float gScale, float bScale,float aScale) setRotate——色彩旋轉 public void setRotate(int axis, float degrees); ColorMatrics相乘 public void setConcat(ColorMatrix matA, ColorMatrix matB) public void preConcat(ColorMatrix prematrix) public void postConcat(ColorMatrix postmatrix) getArray()獲取當前矩陣數組 */ /** * 色彩反轉矩陣 * 顏色值77,反轉後255-77 * @return */ public static ColorMatrix createColorReverse(){ float[] src = { -1, 0, 0, 0, 255, 0, -1, 0, 0, 255, 0, 0, -1, 0, 255, 0, 0, 0, 1, 0, }; return new ColorMatrix(src); } /** * 調節亮度的矩陣 * @param r * @param g * @param b * @param a * @return */ public static ColorMatrix createLightnessAdjust(float r,float g,float b,float a){ float[] src = { r, 0, 0, 0, 0, 0, g, 0, 0, 0, 0, 0, b, 0, 0, 0, 0, 0, a, 0, }; return new ColorMatrix(src); } /** * 過濾顏色通道輸出。 * @param hasR * @param hasG * @param hasB * @return */ public static ColorMatrix createColorChannel(boolean hasR,boolean hasG,boolean hasB){ int r = hasR?1:0; int g = hasG?1:0; int b = hasB?1:0; float[] src = { r, 0, 0, 0, 0, 0, g, 0, 0, 0, 0, 0, b, 0, 0, 0, 0, 0, 1, 0, }; return new ColorMatrix(src); } /** * 增加飽和度 * @param dR * @param dG * @param dB * @return */ public static ColorMatrix createIncreaseSaturation(int dR,int dG,int dB){ float[] src = { 1, 0, 0, 0, dR, 0, 1, 0, 0, dG, 0, 0, 1, 0, dB, 0, 0, 0, 1, 0, }; return new ColorMatrix(src); } /** * * @param type 0,1,2 -->R,G,B * @param angle 旋轉角度-180,180 * @return */ public static ColorMatrix createHueAdjust(int type,int angle){ float cosAngle = (float) Math.cos(Math.toRadians(angle)); float sinAngle = (float) Math.sin(Math.toRadians(angle)); if(type==0){ //紅色色相調節 float[] src = { 1, 0, 0, 0, 0, 0, cosAngle, sinAngle, 0, 0, 0, -sinAngle, cosAngle, 0, 0, 0, 0, 0, 1, 0, 0, 0, 0, 1, 0 }; return new ColorMatrix(src); }else if(type==1){ //綠色色相調節 float[] src = { cosAngle, 0, -sinAngle, 0, 0, 0, 1, 0, 0, 0, sinAngle, 0, cosAngle, 0, 0, 0, 0, 0, 1, 0, 0, 0, 0, 0, 1 }; return new ColorMatrix(src); }else if(type==2){ //藍色色相調節 float[] src = { cosAngle, sinAngle,0, 0, 0, -sinAngle, cosAngle, 0, 0, 0, 0, 0, 1, 0, 0, 0, 0, 0, 1, 0, 0, 0, 0, 0, 1 }; return new ColorMatrix(src); } return null; } /** * 產生一個黑白矩陣 * @return */ public static ColorMatrix createBlackWhite(){ ColorMatrix colorMatrix = new ColorMatrix(new float[]{ 0.213f, 0.715f, 0.072f, 0, 0, 0.213f, 0.715f, 0.072f, 0, 0, 0.213f, 0.715f, 0.072f, 0, 0, 0, 0, 0, 1, 0, }); return colorMatrix; } /** * 紅綠反轉 * @return */ public static ColorMatrix createColorsRGInvert(){ ColorMatrix colorMatrix = new ColorMatrix(new float[]{ 0,1,0,0,0, 1,0,0,0,0, 0,0,1,0,0, 0,0,0,1,0 }); return colorMatrix; }
雖然我們可以通過矩陣的方式來實現各種效果,但是不免有些繁瑣。android提供了一些常見的方法來完成上面的效果;
paint.setColorFilter(new ColorFilter());
實際過程中我們使用的是ColorFilter的3個子類
ColorMatrixColorFilter new ColorMatrixColorFilter(colorMatrix)
該方法是最強大的,只要構造合適的矩陣都可以實現下面的功能
LightingColorFilter 光照顏色過濾 LightingColorFilter(int mul, int add)
可以用來過濾顏色,比如只留下紅色mul=0xff0000 add=0x000000
增強某一顏色 紅色 mul=0xffffff add=0x330000
PorterDuffColorFilter PorterDuffColorFilter(int srcColor, PorterDuff.Mode mode)
int srcColor:0xAARRGGBB類型的顏色值。
PorterDuff.Mode mode:表示混合模式,枚舉值有18個,表示各種圖形混合模式,有:
Mode.ADD(飽和度相加),
Mode.DARKEN(變暗),
Mode.LIGHTEN(變亮),
Mode.MULTIPLY(正片疊底),
Mode.OVERLAY(疊加),
Mode.SCREEN(濾色)
Mode.CLEAR和Mode.XOR他們在這裡的效果是完成一致的,就是把圖像清空
使用setXfermode;
* 在API 11以後,在程序集中加入了對GPU加速的支持,在API 14之後, * 硬件加速是默認開啟的! * 也就是說在API 11——API 13雖然是支持硬件加速的,但是默認是關閉的。 * *setXfermode * Xfermode的有 * AvoidXfermode, * PixelXorXfermode, * PorterDuffXfermode; 禁用GPU加速,方式。 或 或Window層級不支持關閉硬件加速 getWindow().setFlags( WindowManager.LayoutParams.FLAG_HARDWARE_ACCELERATED, WindowManager.LayoutParams.FLAG_HARDWARE_ACCELERATED); 或view 層級上不支持開啟硬件加速 setLayerType(View.LAYER_TYPE_SOFTWARE, null); 在使用Xfermode時,為保險我們要 關閉硬件加速,setLayerType(View.LAYER_TYPE_SOFTWARE, null); 使用離屏繪制, //新建圖層 int layerID = canvas.saveLayer(0,0,width,height,mPaint,Canvas.ALL_SAVE_FLAG); //TODO 核心繪制代碼 //還原圖層 canvas.restoreToCount(layerID); public AvoidXfermode(int opColor, int tolerance, Mode mode) 第一個參數opColor:一個16進制的AARRGGBB的顏色值; 第二個參數tolerance:表示容差,這個概念我們後面再細講 第三個參數mode:取值有兩個Mode.TARGET和Mode.AVOID; Mode.TARGET表示將指定的顏色替換掉 Mode.AVOID表示除去白色之外的其他顏色替換掉 public PorterDuffXfermode(PorterDuff.Mode mode)
 閱讀《Android 從入門到精通》(17)——進度條
進度條(ProgressBar)java.lang.Object;android.view.View;android.widget.ProgressBar;Progres
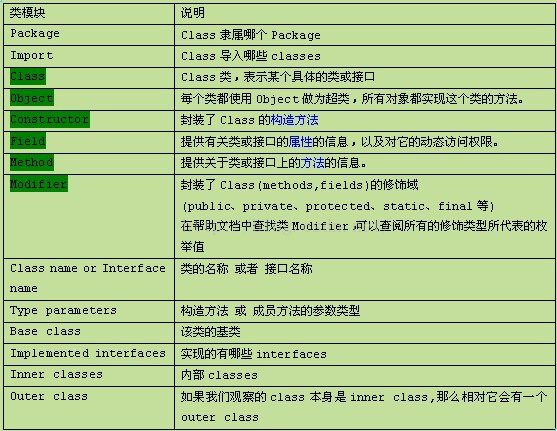 Java反射機制的原理及在Android下的簡單應用
花了幾天時間,研究了一下Java的反射機制。在這裡總結一下這幾天學習的成果,一來分享自己的學習過程和在學習中遇到的問題,二來是給像我一樣不太了解Java反射機制的同學做一
 Android實現三級聯動下拉框 下拉列表spinner的實例代碼
主要實現辦法:動態加載各級下拉值的適配器在監聽本級下拉框,當本級下拉框的選中值改變時,隨之修改下級的適配器的綁定值 &
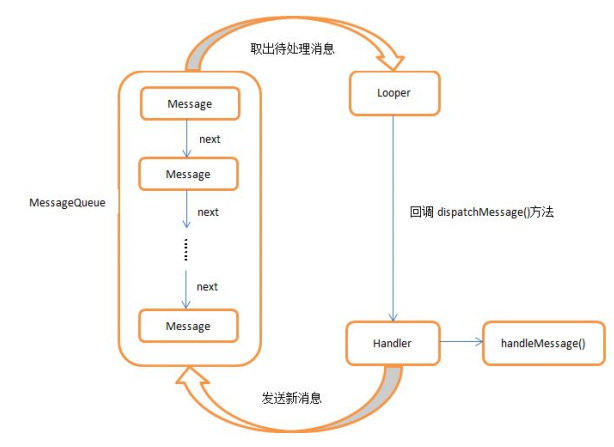 Android多線程編程之Handler篇(消息機制)
Android的消息機制主要是指Handler的運行機制,Handler的運行需要底層的MessageQueue和Looper的支撐。MessageQueue 消息隊列,