編輯:關於Android編程
記錄一下微信第三方實現登錄的方法。還是比較簡單。
一、必要的准備工作
1.首先需要注冊並被審核通過的微信開放平台帳號,然後創建一個移動應用,也需要被審核;
2.然後到資源中心下載開發微信所需的工具;
下載的網址:點擊打開鏈接,有一個是SDK,一個是簽名生成工具還有一個范例代碼。
3.將SDK文件夾lib下的jar文件libammsdk.jar導入到項目工程中;
4.你的測試手機需要裝好微信客戶端;
5.在項目的AndroidManifest.xml文件中添加如下的權限:
<uses-permission android:name="android.permission.INTERNET"/>
<uses-permission android:name="android.permission.ACCESS_NETWORK_STATE"/>
<uses-permission android:name="android.permission.ACCESS_WIFI_STATE"/>
<uses-permission android:name="android.permission.READ_PHONE_STATE"/>
<uses-permission android:name="android.permission.WRITE_EXTERNAL_STORAGE"/>
6.因為微信登錄後會返回結果到我們自己的應用,因此,我們需要按如下的規則來建立一個可供回調的Activity
a. 在包名(申請移動應用時所填的包名)下新建一個名為wxapi的包,然後再在wxapi的包中新增一個WXEntryActivity類,這個類需要繼承自Activity。
然後再在這個AndroidManifest.xml文件中,將這個activity的export屬性設置為true,如下所示。
 <activity
      android:name=".wxapi.WXEntryActivity"
      android:label="@string/title_activity_wxlogin"
      android:launchMode="singleTop"
      android:exported="true">
      <intent-filter>
        <action android:name="android.intent.action.MAIN" />
        <category android:name="android.intent.category.LAUNCHER" />
      </intent-filter>
</activity>
b. 實現IWXAPIEventHandler接口,微信發送的請求將回調到onReq方法,發送到微信請求的響應結果將回調到onResp方法
c. 在WXEntryActivity中將接收到的intent及實現了IWXAPIEventHandler接口的對象傳遞給IWXAPI接口的handleIntent方法,如下所示
api.handleIntent(getIntent(), this);
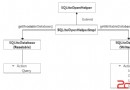
7.微信認證的時序圖
這裡有一點要注意,就是從上往下數第6個箭頭,即通過code加上appid和appsecret換取access_token,其實這一步是在第三方應用服務器上做的,因為appsecret和access_token直接存儲於客戶端是非常不安全的。Android客戶端獲取code後,把這個code提交給應用服務器,應用服務器上保存有appsecret信息,由應用服務器來獲取access_token,並用access_token來完成其它工作。
二、Android代碼
在上一步添加的WXEntryActivity對應的類文件中添加必要的代碼,我的代碼如下:
package com.example.justyoung.logintest.wxapi;

import android.content.Intent;
import android.os.Bundle;
import android.support.v7.app.ActionBarActivity;
import android.view.View;
import android.widget.Button;
import android.widget.Toast;

import com.example.justyoung.logintest.HttpsHelper;
import com.example.justyoung.logintest.R;
import com.example.justyoung.logintest.fileExplorer.WXConstant;
import com.tencent.mm.sdk.modelbase.BaseReq;
import com.tencent.mm.sdk.modelbase.BaseResp;
import com.tencent.mm.sdk.modelmsg.SendAuth;
import com.tencent.mm.sdk.openapi.IWXAPI;
import com.tencent.mm.sdk.openapi.IWXAPIEventHandler;
import com.tencent.mm.sdk.openapi.WXAPIFactory;

import java.io.IOException;
import java.security.KeyManagementException;
import java.security.NoSuchAlgorithmException;
import java.util.UUID;

public class WXEntryActivity extends ActionBarActivity implements IWXAPIEventHandler{

  private Button wxLogin;
  private IWXAPI api;
  private static String uuid;

  @Override
  protected void onCreate(Bundle savedInstanceState) {
    super.onCreate(savedInstanceState);
    setContentView(R.layout.activity_wxlogin);
    wxLogin = (Button) findViewById(R.id.wx_login_button);
    wxLogin.setOnClickListener(new WXLoginEvent());
    api = WXAPIFactory.createWXAPI(this, WXConstant.APPID);
    api.registerApp(WXConstant.APPID);
    api.handleIntent(getIntent(), this);
  }

  @Override
  public void onReq(BaseReq baseReq) {


  }

  @Override
  public void onNewIntent(Intent intent) {
    super.onNewIntent(intent);
    setIntent(intent);
    api.handleIntent(intent, this);
  }

  @Override
  public void onResp(BaseResp resp) {
    String result;
    switch (resp.errCode) {
      case BaseResp.ErrCode.ERR_OK:
        result = "OK";
        SendAuth.Resp regResp = (SendAuth.Resp)resp;
        if (!regResp.state.equals(uuid))
          return;
        String code = regResp.code;
        new WXLoginThread("https://192.168.2.133:8443/CloudStorageServer/wechat/login?code=" + code).start();
        break;
      case BaseResp.ErrCode.ERR_USER_CANCEL:
        result = "USER_CANCEL";
        break;
      case BaseResp.ErrCode.ERR_AUTH_DENIED:
        result = "ERR_AUTH_DENIED";
        break;
      default:
        result = "errcode_unknown";
        break;
    }

    Toast.makeText(this, result, Toast.LENGTH_LONG).show();

  }

  class WXLoginEvent implements View.OnClickListener {
    @Override
    public void onClick(View v) {
      uuid = UUID.randomUUID().toString();
      final SendAuth.Req req = new SendAuth.Req();
      req.scope = "snsapi_userinfo";
      req.state = uuid;
      api.sendReq(req);
    }
  }

  private class WXLoginThread extends Thread {
    private String url;

    public WXLoginThread(String url) {
      this.url = url;
    }

    @Override
    public void run() {
      HttpsHelper httpsHelper = new HttpsHelper();
      try {
        httpsHelper.prepareHttpsConnection(url);
        String response = httpsHelper.connect();
      } catch (KeyManagementException e) {
        e.printStackTrace();
      } catch (NoSuchAlgorithmException e) {
        e.printStackTrace();
      } catch (IOException e) {
        e.printStackTrace();
      }
    }
  }
}
代碼中的如下片段是用來拉起微信認證界面的。這裡我使用了uuid來作為state參數,(該參數可用於防止csrf攻擊(跨站請求偽造攻擊),建議第三方帶上該參數,可設置為簡單的隨機數加session進行校驗)。
uuid = UUID.randomUUID().toString();
final SendAuth.Req req = new SendAuth.Req();
req.scope = "snsapi_userinfo";
req.state = uuid;
api.sendReq(req);
在用戶接受認證後,微信應用會回調IWXAPIEventHandler接口的onResp方法。在該方法中,首先判斷返回的resp的狀態,若是正常狀態,則判斷state,然後從再從resp中獲取code值。至此客戶端便完成了它的工作。
因為客戶端保留appsecret和access_token是非常不安全的,因此剩余信息的獲取應放到我們的應用服務器上進行。
三、應用服務器代碼
在Anroid客戶端獲取到code後,可提交到我們自己的應用服務器,在我們的應用服務器再通過code,來獲取access_token,openid等用戶信息。
1.通過code獲取access_token,openid的方法是使用GET請求,按以下方式請求微信接口:
https://api.weixin.qq.com/sns/oauth2/access_token?appid=APPID&secret=SECRET&code=CODE&grant_type=authorization_code;
2.通過access_token獲取用戶的一些信息的方式是通過GET請求使用微信的接口:
https://api.weixin.qq.com/sns/userinfo?access_token=ACCESS_TOKEN&openid=OPENID
下面貼一下我自己使用的代碼:
private void handle(HttpServletRequest request, HttpServletResponse response) throws ServletException, IOException {
    String code = getParameter(request, "code");
    if (isArgumentNullOrEmpty(code)) {
      Log.logger.info("code為空");
      return;
    }
    Log.logger.info("收到code: " + code);
    try {
      AccessToken accessToken = new AccessToken("/sns/oauth2/access_token", "authorization_code", code);
      AccessToken.UserData userData = accessToken.getMetaData().getUserInfo();
      ... // userData中就是我們通過access_token獲取的用戶信息了。
    } catch (WeiXinException e) {
      Log.logException(e);
      writeMessage(response, e.getMessage());
      return;
    } catch (Exception e) {
      Log.logException(e);
      writeMessage(response, "login error");
      return;
    }
  }
package com.cyber_space.thirdparty.weixin;

import java.io.IOException;
import java.lang.reflect.Field;
import java.net.URI;
import java.net.URISyntaxException;

import org.apache.http.HttpEntity;
import org.apache.http.client.ClientProtocolException;
import org.apache.http.client.methods.CloseableHttpResponse;
import org.apache.http.client.methods.HttpGet;
import org.apache.http.client.utils.URIBuilder;
import org.apache.http.entity.BufferedHttpEntity;
import org.apache.http.impl.client.CloseableHttpClient;
import org.apache.http.impl.client.HttpClients;
import org.apache.http.util.EntityUtils;

import com.cyber_space.util.JsonUtil;

public class AccessToken {

  CloseableHttpClient httpClient;
  HttpGet httpGet;
  URI uri;
  String code;

  /**
   * 用於公眾號
   *
   * @throws URISyntaxException
   */
  public AccessToken() throws URISyntaxException {

    uri = new URIBuilder().setScheme("https").setHost("api.weixin.qq.com").setPath("/cgi-bin/token")
        .setParameter("grant_type", "client_credential").setParameter("appid", WeiXinConfig.APP_ID)
        .setParameter("secret", WeiXinConfig.APP_SECRET).build();
    httpClient = HttpClients.createDefault();
    httpGet = new HttpGet(uri);
  }

  public AccessToken(String path, String grantType, String code) throws URISyntaxException {
    uri = new URIBuilder().setScheme("https").setHost("api.weixin.qq.com").setPath(path)
        .setParameter("grant_type", grantType).setParameter("appid", WeiXinConfig.APP_ID)
        .setParameter("secret", WeiXinConfig.APP_SECRET).setParameter("code", code).build();
    httpClient = HttpClients.createDefault();
    httpGet = new HttpGet(uri);
  }

  public String getAccessToken() throws ClientProtocolException, IOException {
    CloseableHttpResponse response = null;
    try {
      response = httpClient.execute(httpGet);
      HttpEntity httpEntity = response.getEntity();
      if (httpEntity == null)
        return null;
      httpEntity = new BufferedHttpEntity(httpEntity);
      String returnString = EntityUtils.toString(httpEntity);
      String accessToken = com.cyber_space.util.JsonUtil.getAttribute(returnString, "access_token");
      return accessToken;
    } finally {
      response.close();
    }
  }

  /**
   * 獲得用戶的元數據信息,只包括openid和access_token
   *
   * @return
   * @throws ClientProtocolException
   * @throws IOException
   * @throws WeiXinException
   */
  public UserData getMetaData() throws ClientProtocolException, IOException, WeiXinException {
    CloseableHttpResponse response = null;
    try {
      response = httpClient.execute(httpGet);
      HttpEntity httpEntity = response.getEntity();
      if (httpEntity == null)
        return null;
      httpEntity = new BufferedHttpEntity(httpEntity);
      String returnString = EntityUtils.toString(httpEntity);
      JsonUtil jUtil = new JsonUtil(returnString, JsonUtil.JSONOBJECT);
      String error = null;
      try {
        error = jUtil.getAttribute("errcode");
      } catch (Exception e) {
      }
      if (error != null && !error.equals("")) {
        throw new WeiXinException(WeiXinException.INVALID_OPENID);
      }
      String openid = jUtil.getAttribute("openid");
      String accessToken = jUtil.getAttribute("access_token");
      UserData uData = new UserData(openid, accessToken);
      return uData;
    } finally {
      response.close();
    }
  }

  public class UserData {
    public String openid;
    public String accessToken;
    public String nickname;
    public String sex;
    public String province;
    public String city;
    public String country;
    public String headimgurl;
    public String privilege;
    public String unionid;

    public UserData(String openid, String accessToken) {
      this.openid = openid;
      this.accessToken = accessToken;
    }

    public UserData getUserInfo()
        throws IOException, IllegalArgumentException, IllegalAccessException, URISyntaxException, WeiXinException {
      URI uri = new URIBuilder().setScheme("https").setHost("api.weixin.qq.com").setPath("/sns/userinfo")
          .setParameter("access_token", this.accessToken).setParameter("openid", this.openid).build();
      HttpGet httpGet = new HttpGet(uri);
      CloseableHttpResponse response = null;
      try {
        response = httpClient.execute(httpGet);
        HttpEntity httpEntity = response.getEntity();
        if (httpEntity == null)
          throw null;
        httpEntity = new BufferedHttpEntity(httpEntity);
        String jsonString = EntityUtils.toString(httpEntity);
        JsonUtil jUtil = new JsonUtil(jsonString, JsonUtil.JSONOBJECT);
        String errcode = null;
        try {
          errcode = jUtil.getAttribute("errcode");
        } catch (Exception e) {
        }
        // 通過反射循環賦值
        if (errcode == null || errcode.equals("")) {
          for (Field i : getClass().getFields()) {
            if (!i.getName().equals("accessToken"))
              i.set(this, jUtil.getAttribute(i.getName()));
          }
          return this;
        }
        else {
          throw new WeiXinException(WeiXinException.INVALID_ACCESSTOKEN);
        }
      } finally {
        response.close();
      }
    }
  }

}
以上就是本文的全部內容,希望對大家的學習有所幫助,也希望大家多多支持本站。
 Android GPS詳解及示例代碼
LBS(Location Based Services)直譯的話就是基於地理位置的服務,這裡面至少有兩層意思,第一要能輕易的獲取當前的地理位置,譬如經緯度海拔等,另一個就
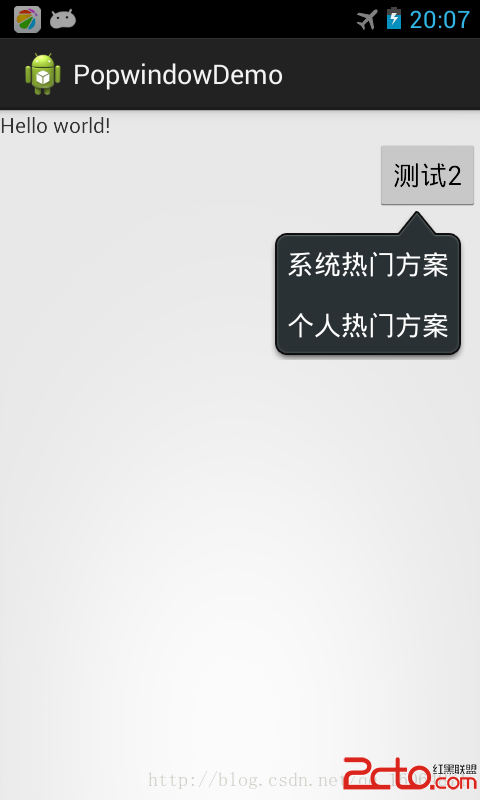 Android popupwindow 示例程序一
經過多番測試實踐,實現了popupwindow 彈出在指定控件的下方。代碼上有注釋,有需要注意的地方。popupwindow 有自已的布局,裡面控件的監聽實現都有。接下來
 如何搭配最新的安卓開發環境
本章只是寫了如何配置JDK,以及adt-bundle的配置。對於以前的adt-bundle的版本,會自帶CPU/ABI系統鏡像,經過本文所描述的兩個步驟後可以直接創建AV
 android自定義鍵盤(解決彈出提示的字體顏色問題)
最近准備要做一個項目,需要用到自定義小鍵盤來確保安全,而且還需要精確獲得用戶點擊鍵盤時的落點位置、力度、指尖接觸屏幕的面積等參數。 在寫自定義鍵盤的時候,用到了國內網上的