編輯:關於Android編程
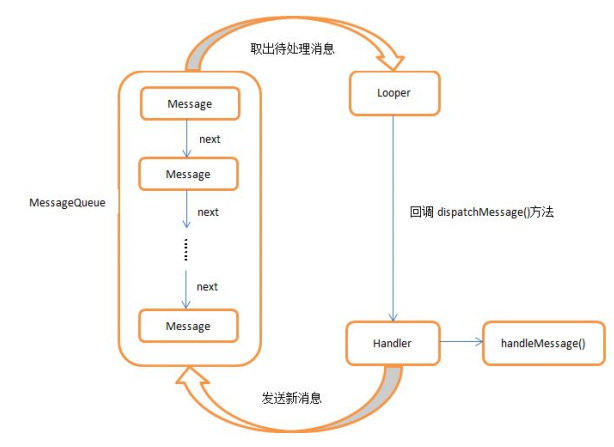
Android的消息機制主要是指Handler的運行機制,Handler的運行需要底層的MessageQueue和Looper的支撐。
MessageQueue消息隊列,以隊列的形式(實為單鏈表結構)對外提供插入和刪除的工作,
Looper
以無限循環的形式不斷獲取MessageQueue中的消息,有則處理,無則等待。
ThreadLocal
ThreadLocal可以在不同的線程互不干擾的存儲並提供數據,通過ThreadLocal可以很方便的獲取每個線程的Looper
為什麼要異步訪問UI?
Android規定UI操作只能在主線程中執行,子線程執行UI操作則會拋出異常,在ViewRootImpl有如下方法:
    void checkThread() {
        if (mThread != Thread.currentThread()) {
            throw new CalledFromWrongThreadException(
                    "Only the original thread that created a view hierarchy can touch its views.");
        }
    }
顯然對於UI這類耗時操作我們不可能全部放在主線程中執行,那麼就要采用異步的方式。
系統為何不允許在子線程去訪問UI?
原因很簡單,Android的UI線程是線程不安全的
為什麼不采用加鎖的方式處理UI線程?
- 會增加UI訪問的邏輯復雜度
- 降低UI訪問效率
至此,我們對異步消息的處理機制和必要性有了一個簡單的了解
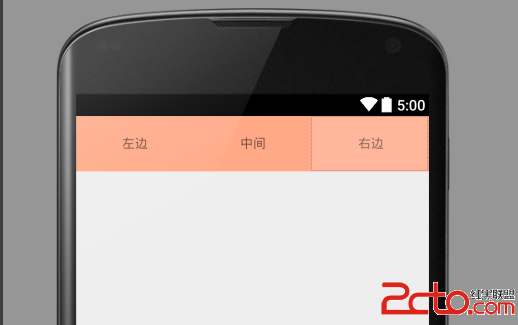
假設有如下需求:在子線程中更新TextView的文本顯示
實現方式一:
        mHandler = new Handler() {
            @Override
            public void handleMessage(Message msg) {
                if (msg.what == 1) {
                    tv.setText(msg.obj.toString());
                }
            }
        };

        tv = (TextView) findViewById(R.id.tv);
        new Thread(new Runnable() {
            @Override
            public void run() {
                Message msg = new Message();
                msg.what = 1;
                msg.obj = "神荼";
                mHandler.sendMessage(msg);
            }
        }).start();
實現方式二:
        mHandler = new Handler();
        mHandler.post(new Runnable() {
            @Override
            public void run() {
                tv.setText("神荼");
            }
        });
實現方式三:
        runOnUiThread(new Runnable() {
            @Override
            public void run() {
                tv.setText("神荼");
            }
        });
實現方式四:
        tv.post(new Runnable() {
            @Override
            public void run() {
                tv.setText("神荼");
            }
        });
實現方式五:
開啟加速,Google異步處理方案之AsyncTask(詳情請關注我的下一篇Android多線程編程之AsyncTask篇)
上述代碼都實現了同樣的處理效果,但實現上卻略有不同,預知詳細原理,請跟進代碼分析。
首先來看一下Handler的工作流程(來自郭神):
 vc/7z6K0psDttcTV+7j2wfezzKOsztLP67j3zru/tLau1eK49tOmuMO2vMrHw7vOyszio6zOqsHLuOPH5bP+xNqyv7XEyrXP1tStwO2jrM7Sw8e+zbTTaGFuZGxlt6LLzc/7z6K1xMbwtePMuMbwo6yjrDwvcD4NCjxoMiBpZD0="messagequeue">MessageQueue
在第一種方式中,我們通過handle.sendMessage()方法發送一個Message對象,這個msg對象的第一站即MessageQueue,MessageQueue主要包含兩個操作:插入(enqueueMessage)和讀取(next)
boolean enqueueMessage(Message msg, long when) {
        if (msg.target == null) {
            throw new IllegalArgumentException("Message must have a target.");
        }
        if (msg.isInUse()) {
            throw new IllegalStateException(msg + " This message is already in use.");
        }

        synchronized (this) {
            if (mQuitting) {
                IllegalStateException e = new IllegalStateException(
                        msg.target + " sending message to a Handler on a dead thread");
                Log.w(TAG, e.getMessage(), e);
                msg.recycle();
                return false;
            }

            msg.markInUse();
            msg.when = when;
            Message p = mMessages;
            boolean needWake;
            if (p == null || when == 0 || when < p.when) {
                // New head, wake up the event queue if blocked.
                msg.next = p;
                mMessages = msg;
                needWake = mBlocked;
            } else {

                needWake = mBlocked && p.target == null && msg.isAsynchronous();
                Message prev;
                for (;;) {
                    prev = p;
                    p = p.next;
                    if (p == null || when < p.when) {
                        break;
                    }
                    if (needWake && p.isAsynchronous()) {
                        needWake = false;
                    }
                }
                msg.next = p; // invariant: p == prev.next
                prev.next = msg;
            }

            // We can assume mPtr != 0 because mQuitting is false.
            if (needWake) {
                nativeWake(mPtr);
            }
        }
        return true;
    }
上面的代碼明顯暴漏了這貨維護的就是一個鏈表結構啊有木有,當該方法被調用時會向消息鏈表中插入新的消息對象。
再來看看next
Message next() {

        final long ptr = mPtr;
        if (ptr == 0) {
            return null;
        }

        int pendingIdleHandlerCount = -1; // -1 only during first iteration
        int nextPollTimeoutMillis = 0;
        for (;;) {
            if (nextPollTimeoutMillis != 0) {
                Binder.flushPendingCommands();
            }

            nativePollOnce(ptr, nextPollTimeoutMillis);

            synchronized (this) {
                // Try to retrieve the next message.  Return if found.
                final long now = SystemClock.uptimeMillis();
                Message prevMsg = null;
                Message msg = mMessages;
                if (msg != null && msg.target == null) {
                    // Stalled by a barrier.  Find the next asynchronous message in the queue.
                    do {
                        prevMsg = msg;
                        msg = msg.next;
                    } while (msg != null && !msg.isAsynchronous());
                }
                if (msg != null) {
                    if (now < msg.when) {
                        // Next message is not ready.  Set a timeout to wake up when it is ready.
                        nextPollTimeoutMillis = (int) Math.min(msg.when - now, Integer.MAX_VALUE);
                    } else {
                        // Got a message.
                        mBlocked = false;
                        if (prevMsg != null) {
                            prevMsg.next = msg.next;
                        } else {
                            mMessages = msg.next;
                        }
                        msg.next = null;
                        if (DEBUG) Log.v(TAG, "Returning message: " + msg);
                        msg.markInUse();
                        return msg;
                    }
                } else {
                    // No more messages.
                    nextPollTimeoutMillis = -1;
                }


                if (mQuitting) {
                    dispose();
                    return null;
                }


                if (pendingIdleHandlerCount < 0
                        && (mMessages == null || now < mMessages.when)) {
                    pendingIdleHandlerCount = mIdleHandlers.size();
                }
                if (pendingIdleHandlerCount <= 0) {
                    // No idle handlers to run.  Loop and wait some more.
                    mBlocked = true;
                    continue;
                }

                if (mPendingIdleHandlers == null) {
                    mPendingIdleHandlers = new IdleHandler[Math.max(pendingIdleHandlerCount, 4)];
                }
                mPendingIdleHandlers = mIdleHandlers.toArray(mPendingIdleHandlers);
            }


            for (int i = 0; i < pendingIdleHandlerCount; i++) {
                final IdleHandler idler = mPendingIdleHandlers[i];
                mPendingIdleHandlers[i] = null; // release the reference to the handler

                boolean keep = false;
                try {
                    keep = idler.queueIdle();
                } catch (Throwable t) {
                    Log.wtf(TAG, "IdleHandler threw exception", t);
                }

                if (!keep) {
                    synchronized (this) {
                        mIdleHandlers.remove(idler);
                    }
                }
            }

            pendingIdleHandlerCount = 0;

            nextPollTimeoutMillis = 0;
        }
    }
嗯,210-237行淋漓盡致的展現了msg是如何被取出並從鏈表中溢出的,沒啥好說的,
我以前一直困惑Looper到底是個啥?是個類?還是個final類,不過這好像沒啥意義啊…其實我們完全沒必要知道它是啥,我們只要知道它對Handler形式的異步處理具有決定性的作用,實際上我們在創建Handler的時候必須伴隨著兩個方法的調用
Looper.prepare()這裡假設你已經了解ThreadLocal這貨是干啥的了,基於此來看一下該方法的源碼
    private static void prepare(boolean quitAllowed) {
        if (sThreadLocal.get() != null) {
            throw new RuntimeException("Only one Looper may be created per thread");
        }
        sThreadLocal.set(new Looper(quitAllowed));
    }
看到某,如果當前線程存在已經與之具有“綁定關系”的Looper,那麼通過本地sThreadLocal獲取即可,否則新建一個,重點來了
Looper對象所“綁定”的線程也就是我們消息接收的線程
所以,你現在知道了,Looper.prepare()獲取與所在線程對應的Looper對象,決定消息接收處。
Looper.loop()
public static void loop() {
        final Looper me = myLooper();
        if (me == null) {
            throw new RuntimeException("No Looper; Looper.prepare() wasn't called on this thread.");
        }
        final MessageQueue queue = me.mQueue;

        Binder.clearCallingIdentity();
        final long ident = Binder.clearCallingIdentity();

        for (;;) {
            Message msg = queue.next(); // might block
            if (msg == null) {
                // No message indicates that the message queue is quitting.
                return;
            }

            Printer logging = me.mLogging;
            if (logging != null) {
                logging.println(">>>>> Dispatching to " + msg.target + " " +
                        msg.callback + ": " + msg.what);
            }

            msg.target.dispatchMessage(msg);

            if (logging != null) {
                logging.println("<<<<< Finished to " + msg.target + " " + msg.callback);
            }

            final long newIdent = Binder.clearCallingIdentity();
            if (ident != newIdent) {
                Log.wtf(TAG, "Thread identity changed from 0x"
                        + Long.toHexString(ident) + " to 0x"
                        + Long.toHexString(newIdent) + " while dispatching to "
                        + msg.target.getClass().getName() + " "
                        + msg.callback + " what=" + msg.what);
            }

            msg.recycleUnchecked();
        }
    }
這個玩的就更嗨了,先是獲取MessageQueue對象,而後開啟了自我輪回模式(無限循環),怎麼輪回呢?看326行,從MessageQueue中不斷地取出msg對象,然後將該msg對象分發傳遞出去(338),msg.target即為我們的handler對象,請注意,前方高能Handler源碼解析開始…
接上面的msg.target.dispatchMessage(msg)該方法源碼如下
public void dispatchMessage(Message msg) {
        if (msg.callback != null) {
            handleCallback(msg);
        } else {
            if (mCallback != null) {
                if (mCallback.handleMessage(msg)) {
                    return;
                }
            }
            handleMessage(msg);
        }
    }
看到沒,該方法首先會判斷callback接口,若非空,直接處理即可,這也恰恰對應了我們的第二種異步實現方式(簡單來說就是直接傳遞一個Runnable,該Runnable最後會在Looper線程運行),那麼第三種方式呢,也很類似不是麼?看代碼
    public final void runOnUiThread(Runnable action) {
        if (Thread.currentThread() != mUiThread) {
            mHandler.post(action);
        } else {
            action.run();
        }
    }
看到某,就是第二種方式的封裝版,而且省去了Handler的創建。
你可能要問了,mCallback是哪裡冒出來野生奧特曼,干啥玩意的?
對應這個問題,我只能說,看代碼
    public Handler(Callback callback, boolean async) {
        if (FIND_POTENTIAL_LEAKS) {
            final Class klass = getClass();
            if ((klass.isAnonymousClass() || klass.isMemberClass() || klass.isLocalClass()) &&
                    (klass.getModifiers() & Modifier.STATIC) == 0) {
                Log.w(TAG, "The following Handler class should be static or leaks might occur: " +
                    klass.getCanonicalName());
            }
        }

        mLooper = Looper.myLooper();
        if (mLooper == null) {
            throw new RuntimeException(
                "Can't create handler inside thread that has not called Looper.prepare()");
        }
        mQueue = mLooper.mQueue;
        mCallback = callback;
        mAsynchronous = async;
    }
很明顯這貨來自於Handler的構造方法(不止一個),408行已然說明一切,最後我們看到在dispatchMessage終究要執行終極方法handleMessage(msg),於是乎消息對象來到了我們早已寫好的handleMessage()方法中並在你Looper“綁定”的線程執行(一般都是主線程啦啦啦)…
ThreadLocal是一個線程內部的數據存儲類,通過該類可以在指定的線程中存儲數據,當然也只能獲取當前線程的存儲數據
在Handler異步消息處理中我們每個線程都要指定自己的Looper對象,那麼如果沒有該類,我們可能需要較為麻煩的方式去管理這些Looper對象,如hash表存儲等
一個簡單的使用示例
    private ThreadLocal mIntegerThreadLocal = new ThreadLocal<>();

        mIntegerThreadLocal.set(111);

        new Thread("Thread_1") {
            @Override
            public void run() {
                mIntegerThreadLocal.set(222);
                Log.d("TAG2", mIntegerThreadLocal.get().toString());
                Log.d("TAG", Thread.currentThread().getName());
            }
        }.start();

        new Thread("Thread_2") {
            @Override
            public void run() {
                mIntegerThreadLocal.set(333);
                Log.d("TAG3", mIntegerThreadLocal.get().toString());
                Log.d("TAG", Thread.currentThread().getName());
            }
        }.start();

        Log.d("TAG1", mIntegerThreadLocal.get().toString());
        Log.d("TAG", Thread.currentThread().getName());
輸出:

顯然,結果表明了同一個對象在不同的線程有著不同的值,再來看一下它內部的源碼實現(以搞懂源碼為目標)
首先是set方法
    public void set(T value) {
        Thread currentThread = Thread.currentThread();
        Values values = values(currentThread);
        if (values == null) {
            values = initializeValues(currentThread);
        }
        values.put(this, value);
    }
看到某,ThreadLocal能根據不同線程維護不同Values對象(Thread內部產生),進而存儲獲取不同的數據,更具體的可以自行查閱源碼。
再來看下get
    public T get() {
        // Optimized for the fast path.
        Thread currentThread = Thread.currentThread();
        Values values = values(currentThread);
        if (values != null) {
            Object[] table = values.table;
            int index = hash & values.mask;
            if (this.reference == table[index]) {
                return (T) table[index + 1];
            }
        } else {
            values = initializeValues(currentThread);
        }

        return (T) values.getAfterMiss(this);
    }
和set類似,清楚明白不扯淡,就不多說了
聊了這麼久,有人可能就問了,你說使用handler必須要調用Looper的prepare和loop方法,那麼主線程(ActivityThread)並沒有看到調用啊,你淨扯犢子呢?
有此問的道友先息息火,關於這個問題其實很簡單,Android已經為我們做好了封裝,而且第一個方法調用的是Looper.prepareMainLooper()
    public static void prepareMainLooper() {
        prepare(false);
        synchronized (Looper.class) {
            if (sMainLooper != null) {
                throw new IllegalStateException("The main Looper has already been prepared.");
            }
            sMainLooper = myLooper();
        }
    }
OK,到此為止我相信你應該是徹底搞懂了了Handler的異步消息機制,如果還有什麼疑問歡迎下方留言,當然我建議你能抽點時間自己去一點點的去閱讀分析handler的源碼,這樣才能真正深刻的理解並記憶。
 申請微信賬號 qq如何注冊微信賬號
玩微信的人都知道,微信無法直接使用QQ號登錄,想要使用QQ號登錄微信就需要先注冊,那麼我們如何使用qq號注冊微信帳號呢?本文就為大家詳細介紹使用申請微信賬號
 Android 開發第七彈:簡易時鐘(秒表)
本文承接,Android 開發第五彈:簡易時鐘(鬧鐘) 和 Android 開發第六彈:簡易時鐘(計時器),這一部分是關於秒表的。布局同樣是新建一個類(StopWatch
 手機藍牙使用教程
第一步:首先將兩個手機用藍牙進行配對。打開手機“設置”(如圖1),彈出設置對話框,然後選擇“無線和網絡”選項
 Android優化——UI優化(二)
使用include標簽復用布局- 1.include標簽的作用 假如說我下圖的這個布局在很多界面都用到了,我該怎麼辦?每個頁面都寫一遍的話,代碼太冗余,並且維護難度加大。