編輯:關於Android編程
在前文中,我們知道,如果需要生成補丁.patch文件需要借助apkpatch ,在本章節我們分析下該工具的內部原理。
apkpatch 是一個jar包,並沒有開源出來,但是我們可以用 JD-G UI 或者 procyon 來看下它的 源碼 ,版本1.0.3。
重要:
只提取出了 classes.dex 這個文件,所以源生工具並 不支持multidex ,如果使用了 multidex 方案,並且修復的類不在同一個 dex 文件中,那麼補丁就不會生效。所以這裡並不像作者在issue中提到的支持 multidex 那樣,不過我們可以通過 JavaAssist 工具 修改 apkpatch 這個jar包,來達到支持multidex的目的 AndFix 不支持增加成員變量,但是支持在新增方法中增加的局部變量 。 也不支持修改成員變量 對比方法過程中對比兩個 dex 文件中同時存在的方法,如果方法實現不同則 存儲為修改過的方法 ;如果方法名不同, 存儲為新增的方法 ,也就是說 AndFix支持增加新的方法 ,這一點已經測試證明位於 com.euler.patch 包下,找到 Main() 方法
public static void main(String[] args) {
    CommandLineParser parser = new PosixParser();
    CommandLine commandLine = null;
    option();
    try {
      commandLine = parser.parse(allOptions, args);
    } catch (ParseException e) {
      System.err.println(e.getMessage());
      usage(commandLine);
      return;
    }
//*************************1 start******************************
    if ((!commandLine.hasOption('k')) && (!commandLine.hasOption("keystore"))) {
      usage(commandLine);
      return;
    }
    if ((!commandLine.hasOption('p')) && (!commandLine.hasOption("kpassword"))) {
      usage(commandLine);
      return;
    }
    if ((!commandLine.hasOption('a')) && (!commandLine.hasOption("alias"))) {
      usage(commandLine);
      return;
    }
    if ((!commandLine.hasOption('e')) && (!commandLine.hasOption("epassword"))) {
      usage(commandLine);
      return;
    }

    File out = null;
    if ((!commandLine.hasOption('o')) && (!commandLine.hasOption("out")))
      out = new File("");
    else {
      out = new File(commandLine.getOptionValue('o'));
    }
    //***********************1 End********************************

    //***********************2 start********************************
    String keystore = commandLine.getOptionValue('k');
    String password = commandLine.getOptionValue('p');
    String alias = commandLine.getOptionValue('a');
    String entry = commandLine.getOptionValue('e');
    String name = "main";
    if ((commandLine.hasOption('n')) || (commandLine.hasOption("name")))
    {
      name = commandLine.getOptionValue('n');
    }

    if ((commandLine.hasOption('m')) || (commandLine.hasOption("merge"))) {
      String[] merges = commandLine.getOptionValues('m');
      File[] files = new File[merges.length];
      for (int i = 0; i < merges.length; i++) {
        files[i] = new File(merges[i]);
      }
      MergePatch mergePatch = new MergePatch(files, name, out, keystore,
        password, alias, entry);
      mergePatch.doMerge();
    } else {
      if ((!commandLine.hasOption('f')) && (!commandLine.hasOption("from"))) {
        usage(commandLine);
        return;
      }
      if ((!commandLine.hasOption('t')) && (!commandLine.hasOption("to"))) {
        usage(commandLine);
        return;
      }

      File from = new File(commandLine.getOptionValue("f"));
      File to = new File(commandLine.getOptionValue('t'));
      if ((!commandLine.hasOption('n')) && (!commandLine.hasOption("name"))) {
        name = from.getName().split("\\.")[0];
      }
    //***********************2 End********************************

        //***********************3 start********************************

      ApkPatch apkPatch = new ApkPatch(from, to, name, out, keystore,
        password, alias, entry);
    //***********************3 End********************************
      apkPatch.doPatch();
    }
  }
我們前面介紹如何使用命令行打補丁包的命令,檢查命令行是否有那些參數,如果沒有要求的參數,就給用戶相應的提示
我們在打正式包的時候,會指定keystore,password,alias,entry相關參數。另外name就是最後生成的文件,可以忽略
上面的參數傳給ApkPatch進行初始化,調用其構造函數
final ApkPatch apkPatch = new ApkPatch(from, to, name, out, keystore, password, alias, entry);
調用ApkPatch的doPatch()方法。
apkPatch.doPatch();
  public ApkPatch(File from, File to, String name, File out, String keystore, String password, String alias, String entry)
  {
    super(name, out, keystore, password, alias, entry);
    this.from = from;
    this.to = to;
  }
調用了父類Build的構造函數,干的事情其實比較簡單,就是給變量進行賦值。可以看到out,我們的輸出文件就是這麼來的,沒有的話,它會自己創建一個。
  protected static final String SUFFIX = ".apatch";
  protected String name;
  private String keystore;
  private String password;
  private String alias;
  private String entry;
  protected File out;
  public Build(String name, File out, String keystore, String password, String alias, String entry)
  {
    this.name = name;
    this.out = out;
    this.keystore = keystore;
    this.password = password;
    this.alias = alias;
    this.entry = entry;
    if (!out.exists())
      out.mkdirs();
    else if (!out.isDirectory())
      throw new RuntimeException("output path must be directory.");
  }
可以簡單描述為兩步:
對比apk文件,得到需要的信息 將結果打包為apatch文件
public void doPatch() {
        try {
        //生成smali文件夾
            final File smaliDir = new File(this.out, "smali");
            if (!smaliDir.exists()) {
                smaliDir.mkdir();
            }
            //新建diff.dex文件
            final File dexFile = new File(this.out, "diff.dex");
            //新建diff.apatch文件
            final File outFile = new File(this.out, "diff.apatch");
            //第一步,拿到兩個apk文件對比,對比信息寫入DiffInfo
            final DiffInfo info = new DexDiffer().diff(this.from, this.to);
            //第二步,將對比結果info寫入.smali文件中,然後打包成dex文件
            this.classes = buildCode(smaliDir, dexFile, info);
            //第三步,將生成的dex文件寫入jar包,並根據輸入的簽名信息進行簽名,生成diff.apatch文件
            this.build(outFile, dexFile);
            //第四步,將diff.apatch文件重命名,結束
            this.release(this.out, dexFile, outFile);
        }
        catch (Exception e2) {
            e2.printStackTrace();
        }
    }
public DiffInfo diff(final File newFile, final File oldFile) throws IOException {
  //提取新apk的dex文件
        final DexBackedDexFile newDexFile = DexFileFactory.loadDexFile(newFile, 19, true);
        //提取舊apk的dex文件
        final DexBackedDexFile oldDexFile = DexFileFactory.loadDexFile(oldFile, 19, true);
        final DiffInfo info = DiffInfo.getInstance();
        boolean contains = false;
        for (final DexBackedClassDef newClazz : newDexFile.getClasses()) {//一層for循環,新的所有類
            final Set oldclasses = oldDexFile.getClasses();
            for (final DexBackedClassDef oldClazz : oldclasses) {//二層for循環,舊的所有類
              //對比相同名的類,存儲為修改的方法
                if (newClazz.equals(oldClazz)) {
                  //對比class文件的變量
                    this.compareField(newClazz, oldClazz, info);
                    //對比class文件的方法
                    this.compareMethod(newClazz, oldClazz, info);
                    contains = true;
                    break;
                }
            }
            if (!contains) {
              //否則是新增的方法
                info.addAddedClasses(newClazz);
            }
        }
        //返回包含diff信息的DiffInfo對象
        return info;
    }
就是提取 dex 文件的地方,在 DexFileFactory 類中
可以看到,只提取出了 classes.dex 這個文件,所以源生工具並 不支持multidex ,如果使用了 multidex 方案,並且修復的類不在同一個 dex 文件中,那麼補丁就不會生效。所以這裡並不像作者在issue中提到的支持 multidex 那樣,不過我們可以通過 JavaAssist 工具 修改 apkpatch 這個jar包,來達到支持multidex的目的
public static DexBackedDexFile loadDexFile(File dexFile, int api, boolean experimental) throws IOException
  {
    return loadDexFile(dexFile, "classes.dex", new Opcodes(api, experimental));
  }
AndFix 不支持增加成員變量,但是支持在新增方法中增加的局部變量 。 也不支持修改成員變量
public void compareField(DexBackedField object, Iterable olds, DiffInfo info)
  {
    for (DexBackedField reference : olds) {
      if (reference.equals(object)) {
        if ((reference.getInitialValue() == null) &&
          (object.getInitialValue() != null)) {
          info.addModifiedFields(object);
          return;
        }
        if ((reference.getInitialValue() != null) &&
          (object.getInitialValue() == null)) {
          info.addModifiedFields(object);
          return;
        }
        if ((reference.getInitialValue() == null) &&
          (object.getInitialValue() == null)) {
          return;
        }
        if (reference.getInitialValue().compareTo(
          object.getInitialValue()) != 0) {
          info.addModifiedFields(object);
          return;
        }
        return;
      }
    }

    info.addAddedFields(object);
  }
對比方法過程中對比兩個 dex 文件中同時存在的方法,如果方法實現不同則 存儲為修改過的方法 ;如果方法名不同, 存儲為新增的方法 ,也就是說 AndFix支持增加新的方法 ,這一點已經測試證明
  public void compareMethod(DexBackedMethod object, Iterable olds, DiffInfo info)
  {
    for (DexBackedMethod reference : olds) {
      if (reference.equals(object))
      {
        if ((reference.getImplementation() == null) &&
          (object.getImplementation() != null)) {
          info.addModifiedMethods(object);
          return;
        }
        if ((reference.getImplementation() != null) &&
          (object.getImplementation() == null)) {
          info.addModifiedMethods(object);
          return;
        }
        if ((reference.getImplementation() == null) &&
          (object.getImplementation() == null)) {
          return;
        }

        if (!reference.getImplementation().equals(
          object.getImplementation())) {
          info.addModifiedMethods(object);
          return;
        }
        return;
      }
    }

    info.addAddedMethods(object);
  }
將上一步得到的 diff 信息寫入 smali 文件,並且生成 diff.dex 文件。 smali 文件的命名以 _CF.smali 結尾,並且在修改的地方用自定義的 Annotation ( MethodReplace )標注,用於在替換之前查找修復的變量或方法
private static Set buildCode(final File smaliDir, final File dexFile, final DiffInfo info) throws IOException, RecognitionException, FileNotFoundException {
        final ClassFileNameHandler outFileNameHandler = new ClassFileNameHandler(smaliDir, ".smali");
        final ClassFileNameHandler inFileNameHandler = new ClassFileNameHandler(smaliDir, ".smali");
        final DexBuilder dexBuilder = DexBuilder.makeDexBuilder();
        for (final DexBackedClassDef classDef : list) {
            final String className = classDef.getType();
            baksmali.disassembleClass(classDef, outFileNameHandler, options);
            final File smaliFile = inFileNameHandler.getUniqueFilenameForClass(TypeGenUtil.newType(className));
            classes.add(TypeGenUtil.newType(className).substring(1, TypeGenUtil.newType(className).length() - 1).replace('/', '.'));
            SmaliMod.assembleSmaliFile(smaliFile, dexBuilder, true, true);
        }
        dexBuilder.writeTo(new FileDataStore(dexFile));
        return classes;
    }
  protected void build(File outFile, File dexFile)
    throws KeyStoreException, FileNotFoundException, IOException, NoSuchAlgorithmException, CertificateException, UnrecoverableEntryException
  {
    KeyStore keyStore = KeyStore.getInstance(KeyStore.getDefaultType());
    KeyStore.PrivateKeyEntry privateKeyEntry = null;
    InputStream is = new FileInputStream(this.keystore);
    keyStore.load(is, this.password.toCharArray());
    privateKeyEntry = (KeyStore.PrivateKeyEntry)keyStore.getEntry(this.alias,
      new KeyStore.PasswordProtection(this.entry.toCharArray()));

    PatchBuilder builder = new PatchBuilder(outFile, dexFile,
      privateKeyEntry, System.out);
    builder.writeMeta(getMeta());
    builder.sealPatch();
  }

  protected abstract Manifest getMeta();
  protected Manifest getMeta()
  {
    Manifest manifest = new Manifest();
    Attributes main = manifest.getMainAttributes();
    main.putValue("Manifest-Version", "1.0");
    main.putValue("Created-By", "1.0 (ApkPatch)");
    main.putValue("Created-Time",
      new Date(System.currentTimeMillis()).toGMTString());
    main.putValue("From-File", this.from.getName());
    main.putValue("To-File", this.to.getName());
    main.putValue("Patch-Name", this.name);
    main.putValue("Patch-Classes", Formater.dotStringList(this.classes));
    return manifest;
  }
將dexFile進行md5加密,把build(outFile, dexFile);函數中生成的outFile重命名。哈哈,看到”.patch”有沒有很激動!!我們的補丁包一開始的命名就是一長串。好了,到這裡,補丁文件就生成了
  protected void release(File outDir, File dexFile, File outFile)
    throws NoSuchAlgorithmException, FileNotFoundException, IOException
  {
    MessageDigest messageDigest = MessageDigest.getInstance("md5");
    FileInputStream fileInputStream = new FileInputStream(dexFile);
    byte[] buffer = new byte[8192];
    int len = 0;
    while ((len = fileInputStream.read(buffer)) > 0) {
      messageDigest.update(buffer, 0, len);
    }

    String md5 = HexUtil.hex(messageDigest.digest());
    fileInputStream.close();
    outFile.renameTo(new File(outDir, this.name + "-" + md5 + ".apatch"));
  }
 基於Android實現仿QQ5.0側滑
本課程將帶領大家通過自定義控件實現QQ5.0側滑菜單,課程將循序漸進,首先實現最普通的側滑菜單,然後引入屬性動畫與拖動菜單效果相結合,最終實現QQ5.0側滑菜單效果。通過
 Android--Activity的生命周期(二)
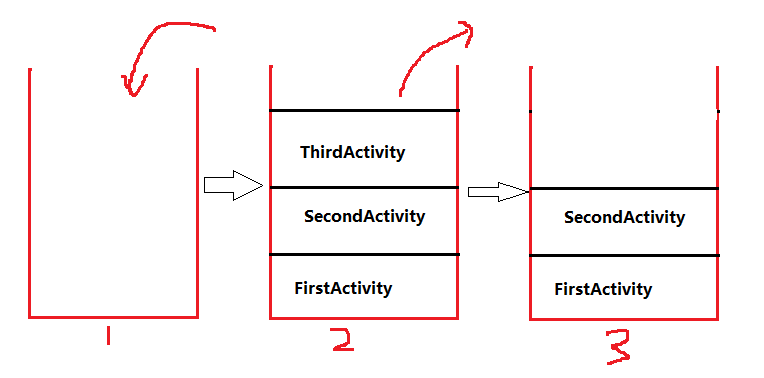
1、Activity的工作原理在我們的應用程序中,當存在多個Activity切換時,他們如何切換的。在上一個文章中,我們知道了Activity生命周期的幾個函數,當Act
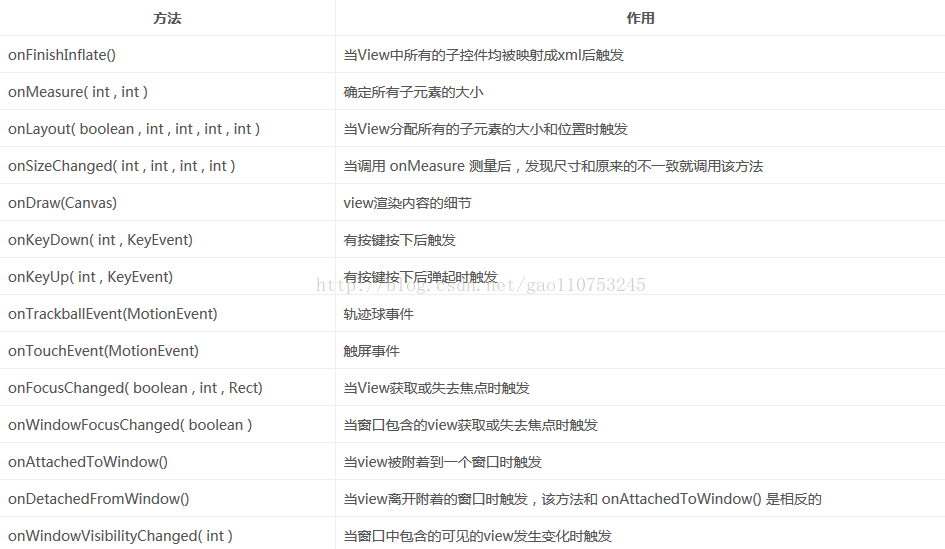 android 自定義控件之ViewGroup生命周期執行步驟
前言android 自定義控件之ViewGroup生命周期執行步驟。了解ViewGroup的生命周期的執行步驟對於自己自定義ViewGroup的時候十分重要,清楚了整個流
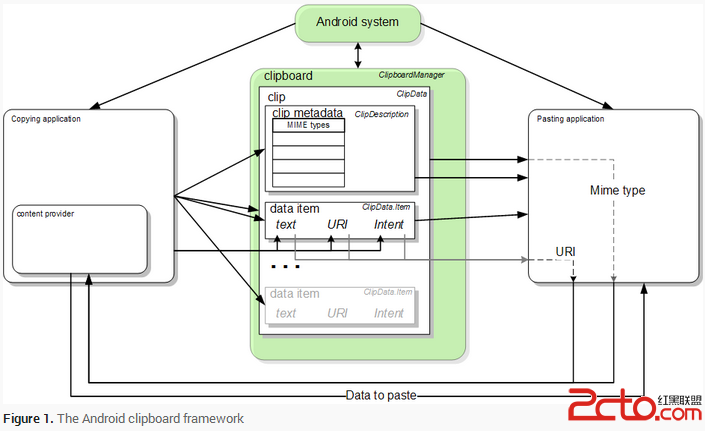 Android中的復制粘貼
Android中的復制粘貼 The Clipboard Framework 當使用clipboard framework時,把數據放在一個