編輯:關於Android編程
iOS開發中,UITextField和UITextView是最常用的文本接受類和文本展示類的控件。UITextField和UITextView都輸入文本,也都可以監聽文本的改變。不同的是,UITextField繼承自UIControl這個抽象類。UITextView繼承自UIScrollView這個實體類。這就導致了UITextView可以多行展示內容,並且還可以像UIScrollView一樣滾動。而UITextField只能單獨的展示一行內容。從這個角度,UITextView在功能上是優於UITextField的。
但是,眾所周知,UITextField中有一個placeholder屬性,可以設置UITextField的占位文字,起到提示用戶輸入相關信息的作用。可是,UITextView就沒那麼幸運了,apple沒有給UITextView提供一個類似於placeholder這樣的屬性來供開發者使用。而開發中,我們經常會遇到既要占位文字,又要可以多行展示並且可以滾動的控件,單純的UITextField或者UITextView都不能滿足這種產品上的需求。比如,現在市面上的app大多都有一個用戶反饋的入口,如下圖(一)所示。下面我就把自己能夠想到的方法匯總一下,讓更多的開發者知道,原來有這麼多方法可以實現UITextView的占位文字。
1.把UITextView的text屬性當成“placeholder”使用。
2.在開始編輯的代理方法裡清除“placeholder”。
3.在結束編輯的代理方法裡根據條件設置“placeholder”。
特點:這種方法的特點是,當用戶點擊了textView,placeholder占位文字就會立馬消失,官方的placeholder是當系統監聽到用戶輸入了文字後placeholder才會消失。
// 創建textView
UITextView *textView =[[UITextViewalloc]initWithFrame:CGRectMake(20,70,SCREEN.width-40,100)];
textView.backgroundColor= [UIColor whiteColor];
textView.text = @"我是placeholder";
textView.textColor = [UIColor grayColor];
textView.delegate = self;
[self.view addSubview:textView];

#pragma mark - UITextViewDelegate
- (void)textViewDidEndEditing:(UITextView *)textView
{
    if(textView.text.length < 1){
        textView.text = @"我是placeholder";
        textView.textColor = [UIColor grayColor];
    }
}
- (void)textViewDidBeginEditing:(UITextView *)textView
{
    if([textView.text isEqualToString:@"我是placeholder"]){
        textView.text=@"";
        textView.textColor=[UIColor blackColor];
    }
}
1.創建textView
2.給textView添加一個UILabel子控件,作為placeholder
3.在文本改變的代理方法裡面顯示/隱藏UILabel
特點:該方法同樣也可以實現類似於placeholder的功能。相比較方法一,方法二可以實現動態監聽文本的改變,並非彈出鍵盤就立即清除placeholder,只有當用戶開始輸入文本的時候。placeholder才會消失。同樣,當用戶清空文本的時候,placeholder又會重新顯示出來。
#import "WSViewController.h" @interface WSViewController ()@property(nonatomic, weak)UITextView *textView; @property(nonatomic, weak)UILabel *placeHolder; @end @implementation WSViewController - (void)viewDidLoad { [super viewDidLoad]; // Do any additional setup after loading the view. [self setupTextView]; } // 添加textView - (void)setupTextView { UITextView *textView = [[UITextView alloc] initWithFrame:CGRectMake(10, 74, SCREEN_WIDTH - 2 * 10, 200)]; textView.frame = CGRectMake(10, 74, SCREEN_WIDTH - 2 * 10, 200); [self.view addSubview:textView]; self.textView = textView; textView.contentInset = UIEdgeInsetsMake(-64, 0, 0, 0); textView.delegate = self; [self setupPlaceHolder]; //在彈出的鍵盤上面加一個view來放置退出鍵盤的Done按鈕 UIToolbar * topView = [[UIToolbar alloc] initWithFrame:CGRectMake(0, 0, 320, 30)]; [topView setBarStyle:UIBarStyleDefault]; UIBarButtonItem * btnSpace = [[UIBarButtonItem alloc] initWithBarButtonSystemItem:UIBarButtonSystemItemFlexibleSpace target:self action:nil]; UIBarButtonItem * doneButton = [[UIBarButtonItem alloc] initWithTitle:@"完成" style:UIBarButtonItemStyleDone target:self action:@selector(dismissKeyBoard)]; NSArray * buttonsArray = [NSArray arrayWithObjects:btnSpace, doneButton, nil]; [topView setItems:buttonsArray]; [textView setInputAccessoryView:topView]; } // 給textView添加一個UILabel子控件 - (void)setupPlaceHolder { UILabel *placeHolder = [[UILabel alloc] initWithFrame:CGRectMake(15, -2, SCREEN_WIDTH - 2 * 15, 200)]; self.placeHolder = placeHolder; placeHolder.text = @"我是placeholder"; placeHolder.textColor = [UIColor lightGrayColor]; placeHolder.numberOfLines = 0; placeHolder.contentMode = UIViewContentModeTop; [self.textView addSubview:placeHolder]; } #pragma mark - UITextViewDelegate - (void)textViewDidChange:(UITextView *)textView { if (!textView.text.length) { self.placeHolder.alpha = 1; } else { self.placeHolder.alpha = 0; } } //關閉鍵盤 -(void) dismissKeyBoard{ [self.textView resignFirstResponder]; } @end
同樣地思路,我們也可以把作為占位文字的UILabel用UITextField或者UITextView來替換,同樣可以實現帶placeholder的textView,在次就不在詳述。
1.自定義UITextView
2.給UITextView添加placeholder和placeholderColor屬性
3.重寫initWithFrame方法
4.添加通知監聽文字改變
5.重寫drawRect:方法
6.重寫相關屬性的set方法
特點:相比計較上面兩種方法,這種方法可移植性、拓展性更好,這種方法,不僅樂意隨意通過我們添加的placeholder屬性設置默認文字,還可以通過我們添加的placeholderColor設置默認文字的顏色。今後,我們只需要寫好這麼一個自定義UITextView,就可以一勞永逸。
#import@interface WSPlaceholderTextView : UITextView /** 占位文字 */ @property (nonatomic, copy) NSString *placeholder; /** 占位文字顏色 */ @property (nonatomic, strong) UIColor *placeholderColor; @end #import "WSPlaceholderTextView.h" @implementation WSPlaceholderTextView - (instancetype)initWithFrame:(CGRect)frame { if (self = [super initWithFrame:frame]) { // 設置默認字體 self.font = [UIFont systemFontOfSize:15]; // 設置默認顏色 self.placeholderColor = [UIColor grayColor]; // 使用通知監聽文字改變 [[NSNotificationCenter defaultCenter] addObserver:self selector:@selector(textDidChange:) name:UITextViewTextDidChangeNotification object:self]; } return self; } - (void)textDidChange:(NSNotification *)note { // 會重新調用drawRect:方法 [self setNeedsDisplay]; } - (void)dealloc { [[NSNotificationCenter defaultCenter] removeObserver:self]; } /** * 每次調用drawRect:方法,都會將以前畫的東西清除掉 */ - (void)drawRect:(CGRect)rect { // 如果有文字,就直接返回,不需要畫占位文字 if (self.hasText) return; // 屬性 NSMutableDictionary *attrs = [NSMutableDictionary dictionary]; attrs[NSFontAttributeName] = self.font; attrs[NSForegroundColorAttributeName] = self.placeholderColor; // 畫文字 rect.origin.x = 5; rect.origin.y = 8; rect.size.width -= 2 * rect.origin.x; [self.placeholder drawInRect:rect withAttributes:attrs]; } - (void)layoutSubviews { [super layoutSubviews]; [self setNeedsDisplay]; } #pragma mark - setter - (void)setPlaceholder:(NSString *)placeholder { _placeholder = [placeholder copy]; [self setNeedsDisplay]; } - (void)setPlaceholderColor:(UIColor *)placeholderColor { _placeholderColor = placeholderColor; [self setNeedsDisplay]; } - (void)setFont:(UIFont *)font { [super setFont:font]; [self setNeedsDisplay]; } - (void)setText:(NSString *)text { [super setText:text]; [self setNeedsDisplay]; } - (void)setAttributedText:(NSAttributedString *)attributedText { [super setAttributedText:attributedText]; [self setNeedsDisplay]; } @end
1.自定義UITextView
2.給UITextView添加placeholder和placeholderColor屬性
3.重寫initWithFrame方法
4.重寫drawRect:方法
5.重寫相關屬性的set方法
特點:這個方法的和方法三很相似,只是沒有利用通知來監聽文本的改變,需要配合textViewDidChanged:這個文本改變的代理方法使用。
#import@interface WSTextView : UITextView /** 占位文字 */ @property (nonatomic,copy) NSString *placeholder; /** 占位文字顏色 */ @property (nonatomic,strong) UIColor *placeholderColor; @end #import "WSTextView.h" @implementation WSTextView - (instancetype)initWithFrame:(CGRect)frame { if (self = [super initWithFrame:frame]) { self.font = [UIFont systemFontOfSize:15]; self.placeholderColor = [UIColor lightGrayColor]; self.placeholder = @"請輸入內容"; } return self; } // Only override drawRect: if you perform custom drawing. // An empty implementation adversely affects performance during animation. - (void)drawRect:(CGRect)rect { // Drawing code NSMutableDictionary *attrs = [NSMutableDictionary dictionary]; attrs[NSFontAttributeName] = self.font; attrs[NSForegroundColorAttributeName] = self.placeholderColor; [self.placeholder drawInRect:CGRectMake(0, 0, self.frame.size.width, self.frame.size.height) withAttributes:attrs]; } // 布局子控件的時候需要重繪 - (void)layoutSubviews { [super layoutSubviews]; [self setNeedsDisplay]; } // 設置屬性的時候需要重繪,所以需要重寫相關屬性的set方法 - (void)setPlaceholder:(NSString *)placeholder { _placeholder = placeholder; [self setNeedsDisplay]; } - (void)setPlaceholderColor:(UIColor *)placeholderColor { _placeholderColor = placeholderColor; [self setNeedsDisplay]; } - (void)setFont:(UIFont *)font { [super setFont:font]; [self setNeedsDisplay]; } - (void)setText:(NSString *)text { [super setText:text]; if (text.length) { // 因為是在文本改變的代理方法中判斷是否顯示placeholder,而通過代碼設置text的方式又不會調用文本改變的代理方法,所以再此根據text是否不為空判斷是否顯示placeholder。 self.placeholder = @""; } [self setNeedsDisplay]; } - (void)setAttributedText:(NSAttributedString *)attributedText { [super setAttributedText:attributedText]; if (attributedText.length) { self.placeholder = @""; } [self setNeedsDisplay]; } @end // 應用的時候需要配合UITextView的文本改變的代理方法 #import "ViewController.h" #import "WSTextView.h" @interface ViewController () // @property(nonatomic,weak) WSTextView *textView; @end @implementation ViewController - (void)viewDidLoad { [super viewDidLoad]; // Do any additional setup after loading the view, typically from a nib. } - (void)didReceiveMemoryWarning { [super didReceiveMemoryWarning]; // Dispose of any resources that can be recreated. } - (void)touchesBegan:(NSSet *)touches withEvent:(UIEvent *)event { WSTextView *textView = [[WSTextView alloc] initWithFrame:CGRectMake(10, 20, self.view.frame.size.width, 30)]; textView.placeholder = @"ws"; textView.delegate = self; [self.view addSubview:textView]; // textView.text = @"試試會不會調用文本改變的代理方法"; // 不會調用文本改變的代理方法 textView.attributedText = [[NSAttributedString alloc] initWithString:@"富文本"]; // self.textView = textView; } #pragma mark - UITextViewDelegate - (void)textViewDidChange:(WSTextView *)textView // 此處取巧,把代理方法參數類型直接改成自定義的WSTextView類型,為了可以使用自定義的placeholder屬性,省去了通過給控制器WSTextView類型屬性這樣一步。 { if (textView.hasText) { // textView.text.length textView.placeholder = @""; } else { textView.placeholder = @"ws"; } } @end
通過runtime,我們發現,UITextView內部有一個名為“_placeHolderLabel”的私有成員變量。大家知道,Objective-C沒有絕對的私有變量,因為我們可以通過KVC來訪問私有變量。
特點:相對於上面的4種方法,這種方法更加取巧,雖然Apple官方沒有給我們開發者提供類似於placeholder的屬性,但是通過運行時,我們遍歷出了一個placeHolderLabel的私有變量。這種方法簡單易懂,代碼量少,推薦大家使用這種方法。
#import "ViewController.h" #import#import @interface ViewController () @end @implementation ViewController - (void)viewDidLoad { [super viewDidLoad]; // 通過運行時,發現UITextView有一個叫做“_placeHolderLabel”的私有變量 unsigned int count = 0; Ivar *ivars = class_copyIvarList([UITextView class], &count); for (int i = 0; i < count; i++) { Ivar ivar = ivars[i]; const char *name = ivar_getName(ivar); NSString *objcName = [NSString stringWithUTF8String:name]; NSLog(@"%d : %@",i,objcName); } [self setupTextView]; } - (void)setupTextView { UITextView *textView = [[UITextView alloc] initWithFrame:CGRectMake(0, 100, [UIScreen mainScreen].bounds.size.width, 100]; [textView setBackgroundColor:[UIColor greenColor]]; [self.view addSubview:textView]; // _placeholderLabel UILabel *placeHolderLabel = [[UILabel alloc] init]; placeHolderLabel.text = @"請輸入內容"; placeHolderLabel.numberOfLines = 0; placeHolderLabel.textColor = [UIColor lightGrayColor]; [placeHolderLabel sizeToFit]; [textView addSubview:placeHolderLabel]; [textView setValue:placeHolderLabel forKey:@"_placeholderLabel"]; } @end
 Android--消息機制--handler--getImageFromUrl--網絡上獲取圖片
+ code); if (code == 200) { InputStream is = conn.getInputStream();
 微信的錢可以轉到支付寶嗎|微信的錢怎麼轉到支付寶
微信的錢可以轉到支付寶嗎?其實,微信與支付寶,是二大死對頭,都在向移動支付市場發力,所以彼此都不會為對方提供支付入口的。無論是微信,還是支付寶,如果要充值或
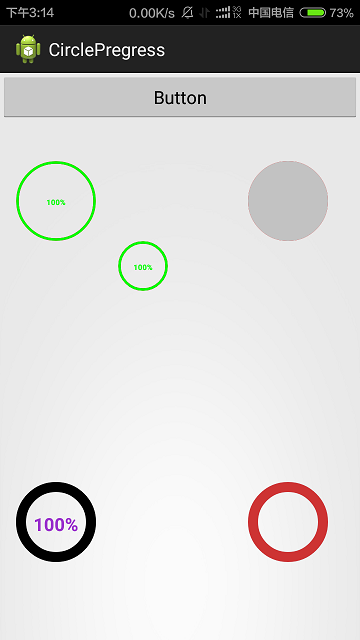 自定義Android圓形進度條(附源碼)
本文實例講述了Android自定義圓形進度條,分享給大家供大家參考。具體如下:運行效果截圖如下:具體代碼如下:自定義的View:import com.example.ci
 Android操作系統的架構設計分析
之前一直在Android應用層上做工作,最近開始研究Android平台上的東東了,主要是在Android Frameworks層和系統庫層進行研究。以下是我自己的理解,領