編輯:關於Android編程
??最近一段時間比較忙,都沒有時間更新博客,今天公司的事情忙完得空,繼續為我的自定義控件系列博客添磚加瓦。本篇博客講解的是標簽自動換行的布局容器,正好前一陣子有個項目中需要,想了想沒什麼難度就自己弄了。而自定義控件系列文章中對於自定義ViewGroup上次只是講解了一些基礎和步驟 Android自定義ViewGroup(四、打造自己的布局容器),這次就著這個例子我們來完成一個能在項目中使用的自定義布局容器。
??首先我們看一看要完成的效果圖:
??????
??上面紅色標示出的就是我們要實現的效果,Android自帶的布局容器是沒辦法達到這樣的效果的。每個標簽長度不一定,當一行擺放滿需要自動換行,標簽之間左右上下有一定的距離,這就是這個容器的需求。其中每個標簽可以用TextView,標簽點擊之後有選中的效果(邊框和字體變為藍色)。初步分析,我們自定義的容器需要兩個自定義屬性,維護兩個標簽集合(所有標簽、選中標簽)。接下來我們就動手一步步完成。
2. 定義屬性??在values/attrs.xml中為我們的容器定義兩個屬性,一個是標簽左右的間隔距離LEFT_RIGHT_SPACE ,另一個是標簽的行距ROW_SPACE,然後在構造方法中獲取屬性值:
values/attrs.xml
布局中使用
LineBreakLayout.java
#666666
#308BE9 //藍色
#d9d9d9 //細分割線顏色
標簽背景drawable/shape_item_lable_bg.xml
-
-
標簽布局layout/item_lable.xml
4. 提供接口setlables(List lables)向容器中添加標簽
/**
 * 添加標簽
 * @param lables 標簽集合
 * @param add 是否追加
    */
public void setLables(List lables, boolean add){
   if(this.lables == null){
      this.lables = new ArrayList<>();
   }
   if(add){
      this.lables.addAll(lables);
   }else{
      this.lables.clear();
      this.lables = lables;
   }
   if(lables!=null && lables.size()>0){
      LayoutInflater inflater = LayoutInflater.from(getContext());
      for (final String lable : lables) {
         //獲取標簽布局
         final TextView tv = (TextView) inflater.inflate(R.layout.item_lable, null);
         tv.setText(lable);
         //設置選中效果
         if (lableSelected.contains(lable)) {
            //選中
            tv.setSelected(true);
            tv.setTextColor(getResources().getColor(R.color.tv_blue));
         } else {
            //未選中
            tv.setSelected(false);
            tv.setTextColor(getResources().getColor(R.color.tv_gray));
         }
         //點擊標簽後,重置選中效果
         tv.setOnClickListener(new View.OnClickListener() {
            @Override
            public void onClick(View v) {
               tv.setSelected(tv.isSelected() ? false : true);
               if (tv.isSelected()) {
                  tv.setTextColor(getResources().getColor(R.color.tv_blue));
                  //將選中的標簽加入到lableSelected中
                  lableSelected.add(lable);
               } else {
                  tv.setTextColor(getResources().getColor(R.color.tv_gray));
                  lableSelected.remove(lable);
               }
            }
         });
         //將標簽添加到容器中
         addView(tv);
      }
   }
}
5. 重寫onMeasure()計算容器高度??對於onMeasure()方法,之前已有一篇博客詳細講解,如果不明白可參考 Android自定義View(三、深入解析控件測量onMeasure)。這裡針對本布局單獨說明一下,本布局在寬度上是使用的建議的寬度(填充父窗體或者具體的size),如果需要wrap_content的效果,還需要重新計算,當然這種需求是非常少見的,所以直接用建議寬度即可;布局的高度就得看其中的標簽需要占據多少行(row ),那麼高度就為row * 單個標簽的高度+(row -1) * 行距,具體實現代碼如下:
@Override
protected void onMeasure(int widthMeasureSpec, int heightMeasureSpec) {
   //為所有的標簽childView計算寬和高
   measureChildren(widthMeasureSpec, heightMeasureSpec);

   //獲取高的模式
   int heightMode = MeasureSpec.getMode(heightMeasureSpec);
   //建議的高度
   int heightSize = MeasureSpec.getSize(heightMeasureSpec);
   //布局的寬度采用建議寬度(match_parent或者size),如果設置wrap_content也是match_parent的效果
   int width = MeasureSpec.getSize(widthMeasureSpec);

   int height ;
   if (heightMode == MeasureSpec.EXACTLY) {
      //如果高度模式為EXACTLY(match_perent或者size),則使用建議高度
      height = heightSize;
   } else {
      //其他情況下(AT_MOST、UNSPECIFIED)需要計算計算高度
      int childCount = getChildCount();
      if(childCount<=0){
         height = 0;   //沒有標簽時,高度為0
      }else{
         int row = 1;  // 標簽行數
         int widthSpace = width;// 當前行右側剩余的寬度
         for(int i = 0;i= childW ){
               //如果剩余的寬度大於此標簽的寬度,那就將此標簽放到本行
               widthSpace -= childW;
            }else{
               row ++;    //增加一行
               //如果剩余的寬度不能擺放此標簽,那就將此標簽放入一行
               widthSpace = width-childW;
            }
            //減去標簽左右間距
            widthSpace -= LEFT_RIGHT_SPACE;
         }
         //由於每個標簽的高度是相同的,所以直接獲取第一個標簽的高度即可
         int childH = getChildAt(0).getMeasuredHeight();
         //最終布局的高度=標簽高度*行數+行距*(行數-1)
         height = (childH * row) + ROW_SPACE * (row-1);

         Log.v(TAG , "總高度:"+height +" 行數:"+row+"  標簽高度:"+childH);
      }
   }

   //設置測量寬度和測量高度
   setMeasuredDimension(width, height);
}
6. 重寫onLayout()擺放標簽??onLayout(boolean changed, int l, int t, int r, int b)方法是一個抽象方法,自定義ViewGroup時必須實現它,用於給布局中的子控件分配位置,其中的參數l,t,r,b分別代表本ViewGroup的可用空間(除去margin和padding後的剩余空間)的左、上、右、下的坐標(相對於自身),相當於一個約束,如果子控件擺放的位置超過這個范圍,超出的部分將不可見。onLayout()的實現代碼如下,注釋已經很清楚,就不再贅述:
@Override
protected void onLayout(boolean changed, int l, int t, int r, int b) {
   int row = 0;
   int right = 0;   // 標簽相對於布局的右側位置
   int botom;       // 標簽相對於布局的底部位置
   for (int i = 0; i < getChildCount(); i++) {
      View childView = getChildAt(i);
      int childW = childView.getMeasuredWidth();
      int childH = childView.getMeasuredHeight();
      //右側位置=本行已經占有的位置+當前標簽的寬度
      right += childW;
      //底部位置=已經擺放的行數*(標簽高度+行距)+當前標簽高度
      botom = row * (childH + ROW_SPACE) + childH;
      // 如果右側位置已經超出布局右邊緣,跳到下一行
      // if it can't drawing on a same line , skip to next line
      if (right > (r - LEFT_RIGHT_SPACE)){
         row++;
         right = childW;
         botom = row * (childH + ROW_SPACE) + childH;
      }
      Log.d(TAG, "left = " + (right - childW) +" top = " + (botom - childH)+
            " right = " + right + " botom = " + botom);
      childView.layout(right - childW, botom - childH,right,botom);

       right += LEFT_RIGHT_SPACE;
   }
}
7. 使用??到此為止,這個自動換行的標簽布局已經定義完成,現在就讓我們使用看看運行效果怎麼樣,這裡為布局設置了紅色背景,用於直觀的查看我們的計算有沒有出錯,可以看到,標簽沒有超出布局,布局的寬高也正好包裹所有標簽:
List lable = new ArrayList<>();
lable.add("經濟");
lable.add( "娛樂");
lable.add("八卦");
lable.add("小道消息");
lable.add("政治中心");
lable.add("彩票");
lable.add("情感");
//設置標簽
lineBreakLayout.setLables(lable, true);
//獲取選中的標簽
List selectedLables = lineBreakLayout.getSelectedLables();
運行效果:

??????
8.總結??這個布局的實現在技術上來說是比較簡單的,但是它非常具有代表性,非常典型的自定義ViewGroup,相信如果能完全寫下這個示例,下次需要自定義ViewGroup的時候也不會有太大難度了。當然這個布局不是完美的,就算Android自帶的布局也不能說完美,只要它能滿足我們項目中的開發需求就ok。對於自定義ViewGroup還有一些重要的知識點(事件處理等)在後面的博客中會陸續講解。
源碼下載:https://github.com/openXu/LineBreakLayout
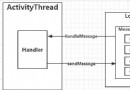 Android Handler 機制實現原理分析
handler在安卓開發中是必須掌握的技術,但是很多人都是停留在使用階段。使用起來很簡單,就兩個步驟,在主線程重寫handler的handleMessage( )方法,在
 Android Studio教程從入門到精通
本文目標在於指導新手,文章順序如下:Android Studio新手–>下載安裝配置–>零基礎入門–>基本使用&nd
 Android Path繪制貝塞爾曲線實現QQ拖拽泡泡
這兩天學習了使用Path繪制貝塞爾曲線相關,然後自己動手做了一個類似QQ未讀消息可拖拽的小氣泡,效果圖如下:最終效果圖接下來一步一步的實現整個過程。基本原理其實就是使用P
 android提供外部資源的規則和注意事項
您應該始終外部化應用資源,例如圖像和代碼中的字符串,這樣有利於您單獨維護這些資源。 此外,您還應該為特定設備配置提供備用資源,方法是將它們分組到專門命名的資源目錄中。 在