編輯:關於Android編程
一、View動畫存在問題:就是動畫移動後,點擊動畫的結束為止不會觸發點擊事件,當點擊動畫的起始位置,會觸發點擊事件。
而屬性動畫就不會,屬性動畫使用動畫的效果得到了加強,不僅可以完全實現View動畫的效果,更能實現更炫的效果。屬性動畫是API11才有的,若想兼容以前的版本,可以使用開源的動畫庫nineoldandroids。
二、想要使用屬性動畫必須有兩個條件:
1.第一個有參數的對象,友誼第二個參數為名字的成員變量
2.該成員變量必須有set,get方法,若沒有的話,輕則無效,重則程序崩潰
三、屬性:
Duration:動畫的持續時間
TimeInterpolation:屬性值的計算方式,如先快後慢
TypeEvaluator:根據屬性的開始、結束值與TimeInterpolation計算出的因子計算出當前時間的屬性值
Repeat Country and behavoir:重復次數與方式,如播放3次、5次、無限循環,可以此動畫一直重復,或播放完時再反向播放
Animation sets:動畫集合,即可以同時對一個對象應用幾個動畫,這些動畫可以同時播放也可以對不同動畫設置不同開始偏移
Frame refreash delay:多少時間刷新一次,即每隔多少時間計算一次屬性值,默認為10ms,最終刷新時間還受系統進程調度與硬件的影響
四、ObjectAnimator官方文檔:
extends ValueAnimator
This subclass of ValueAnimator provides support for animating properties on target objects. The constructors of this class take parameters to define the target object that will be animated as well as the name of the property that will be animated. Appropriate set/get functions are then determined internally and the animation will call these functions as necessary to animate the property.
Animators can be created from either code or resource files, as shown here:
When using resource files, it is possible to use PropertyValuesHolder and Keyframe to create more complex animations. Using PropertyValuesHolders allows animators to animate several properties in parallel, as shown in this sample:
Using Keyframes allows animations to follow more complex paths from the start to the end values. Note that you can specify explicit fractional values (from 0 to 1) for each keyframe to determine when, in the overall duration, the animation should arrive at that value. Alternatively, you can leave the fractions off and the keyframes will be equally distributed within the total duration. Also, a keyframe with no value will derive its value from the target object when the animator starts, just like animators with only one value specified. In addition, an optional interpolator can be specified. The interpolator will be applied on the interval between the keyframe that the interpolator is set on and the previous keyframe. When no interpolator is supplied, the default linear interpolator will be used.
大致意思:
ObjectAnimator繼承ValueAnimator
這個ValueAnimator子類給動畫的目標對象上的屬性提供支持。獲取這類的構造方法的參數,定義目標對象的參數,使動畫以及屬性的名稱更形象動畫。適當的set/get方法決定了內部和動畫會調用這些方法作為必要的動畫屬性。
動畫可以從創建代碼或資源文件,如下所示:
  < objectAnimator xmlns:android = " http://schemas.android.com/apk/res/android "
  android:duration= " 1000 "
  android:valueTo = " 200 "
  android:valueType = " floatType "
  android:propertyName = " y "
  android:repeatCount = " 1 "
  android:repeatMode = "reverse" / >
當使用資源文件時,可以使用PropertyValuesHolder和Keyframe 來創建更復雜的動畫。使用並行PropertyValuesHolders允許生動的動畫幾個屬性,如本例所示:
< objectAnimator xmlns:android = " http://schemas.android.com/apk/res/android "
  android:duration= " 1000 "
  android:repeatCount = " 1 "
  android:repeatMode =“反向”>
  < propertyValuesHolder android:propertyName = " x " android:valueTo = " 400 " / >
  < propertyValuesHolder android:propertyName = " y " android:valueTo = " 200 " / >
  < / objectAnimator >
使用關鍵幀允許動畫可以遵循更復雜的路徑從開始到結束的值。注,您可以指定明確的值(從0到1)對於每一個關鍵幀時確定,在整個持續時間中,動畫應該到達這個值。或者,你可以把分割和關鍵幀內均勻分布的總時間。同樣,當動畫開始的時候,一個沒有值的關鍵幀將從目標對象獲得它的值,就像動畫只有一個值指定。另外,可以指定一個可選的插入器。插入器將應用於插入器的關鍵幀之間的時間間隔,是設置在之前的關鍵幀。當沒有提供插入器,將使用默認的線性差值器。
對於ObjectAnimator簡單介紹:
1、提供了ofInt、ofFloat方法,這幾個方法都是設置動畫作用的元素、作用的屬性、動畫開始、結束、以及中間的任意個屬性值。
這裡第一個參數要求傳入一個object對象,傳入一個想要操作的對象。第二個參數是想要對該對象的哪個屬性進行動畫操作。後面的參數就是可變長數組了,根據需要傳入相應的值。
而ofObject方法需要一個差值器,後面我們還介紹的。
2.當對於屬性值,只設置一個的時候,會認為當然對象該屬性的值為開始(getPropName反射獲取),然後設置的值為終點。如果設置兩個,則一個為開始、一個為結束。若設置多個,則會連續執行。
動畫更新的過程中,會不斷調用setPropName更新元素的屬性,所有使用ObjectAnimator更新某個屬性,必須得有getter(設置一個屬性值的時候)和setter方法。
3.初始化需要指定對象和對象的屬性以及值區間。
有些改變需要調用invalidate()方法,重繪。可以在onAnimationUpdate()方法中做。
五、Java代碼中使用示例:
1.改變textView的背景顏色:
private void showColor() {
    //設置顏色變化
    ObjectAnimator objectAnimator = ObjectAnimator.ofInt(textView, "textColor", 0xFFFF8080, 0xFF8080FF);
    //無限循環
    objectAnimator.setRepeatCount(ValueAnimator.INFINITE);
    objectAnimator.setRepeatMode(ValueAnimator.REVERSE);
    //設置為色差估值器
    objectAnimator.setEvaluator(new ArgbEvaluator());
    //設置持續時間
    objectAnimator.setDuration(500);
    //開啟動畫
    objectAnimator.start();
}
2.平移textView:
private void showMove() {
    //設置x平移
    ObjectAnimator obj = ObjectAnimator.ofFloat(textView, "translationX", 50, -50, 30, -30, 20, -20, 10, -10, 5, -5, 1, -1);
    //設置差值器
    obj.setInterpolator(new DecelerateInterpolator());
    //設置持續時間
    obj.setDuration(5000);
    //開啟動畫
    obj.start();
}
3.聯合使用動畫:
private void showAll() {
    AnimatorSet set = new AnimatorSet();
    set.playTogether(
            //textView的X軸旋轉360°
            ObjectAnimator.ofFloat(textView, "rotationX", 0, 360),
            //textView的Y軸旋轉180°
            ObjectAnimator.ofFloat(textView, "rotationY", 0, 180),
            //設置平面旋轉90°
            ObjectAnimator.ofFloat(textView, "rotation", 0, 90),
            //設置X軸的位移
            ObjectAnimator.ofFloat(textView, "translationX", 0, 90),
            //設置Y軸位移
            ObjectAnimator.ofFloat(textView, "translationY", 0, 90),
            //設置X軸縮放1.5倍
            ObjectAnimator.ofFloat(textView, "scaleX", 1, 1.5f),
            //設置Y軸縮放0.5倍
            ObjectAnimator.ofFloat(textView, "scaleY", 1, 0.5f),
            //設置透明度
            ObjectAnimator.ofFloat(textView, "alpha", 1, 0.5f, 1)
    );
    //設置持續時間
    set.setDuration(5000);
    //開啟動畫
    set.start();
}
六、插值器簡單介紹:( TimeInterpolator)
AccelerateInterpolator 加速插值器
AccelerateDecelerateInterpolator 加速減速插值器
LinearInterpolator 線性插值器
BounceInterpolator 彈跳插值器
AnticipateInterpolator 回蕩秋千插值器
AnticipateOvershootInterpolator開始的時候向後然後向前甩一定值後返回最後的值
CycleInterpolator 正弦周期變化插值器
OvershootInterpolator 向前甩一定值後再回到原來位置
七、可以看見我們上面並沒有使用set和get方法,主要是因為textView的可以直接獲取到屬性,任何繼承自View的對象都可以的。而我們下面要講的是,當不能直接獲取屬性的時候,我們應該怎麼辦?
一共有3種解決方法:
1. 給你的對象加上get和set方法,如果你有權限的話
2. 用一個類來包裝原始對象,間接為其提供get和set方法
3. 采用ValueAnimator,監聽動畫過程,自己實現屬性的改變
八、我們使用第二種方式來實現:
1.首先獲取到button的寬度:
testBtn.post(new Runnable() {
    @Override
    public void run() {
        width = testBtn.getWidth();
    }
});
順便介紹一下post()方法:
官方文檔:Causes the Runnable to be added to the message queue. The runnable will be run on the user interface thread.
Parameters
action
The Runnable that will be executed.
Returns
Returns true if the Runnable was successfully placed in to the message queue. Returns false on failure, usually because the looper processing the message queue is exiting.
大致意思:
是runnable可被添加到消息隊列。runnable可將用戶界面線程上運行。
參數:
action: runnable可被執行。
Returns: 返回true,如果運行的成功放在消息隊列。如果執行失敗將返回false,這通常是因為looper退出處理消息隊列。
2.MyButton類:
public class MyButton {

    private View button;

    public MyButton(View button) {
        this.button = button;
    }

    public int getWidth() {
        return button.getLayoutParams().width;
    }

    public void setWidth(int width) {
        button.getLayoutParams().width = width;
        //requestLayout:當view確定自身已經不再適合現有的區域時,
        // 該view本身調用這個方法要求parent view重新調用他的onMeasure onLayout來對重新設置自己位置。
       // 特別的當view的layoutparameter發生改變,並且它的值還沒能應用到view上,這時候適合調用這個方法。
        //而,invalidate:View本身調用迫使view重畫。
        button.requestLayout();
    }
}
3.MainActivity中使用:
MyButton b = new MyButton(testBtn);
ObjectAnimator.ofInt(b, "width", width, 500).setDuration(3000).start();
九、以上就是對屬性動畫做出的簡單介紹,現在寫出所有的代碼,
MainActivity中:
public class MainActivity extends AppCompatActivity implements View.OnClickListener {

    private Button colorBtn, moveBtn, allBtn, testBtn;
    private TextView textView;
    int width;

    @Override
    protected void onCreate(Bundle savedInstanceState) {
        super.onCreate(savedInstanceState);
        setContentView(R.layout.activity_main);
        textView = (TextView) findViewById(R.id.tv);
        colorBtn = (Button) findViewById(R.id.colorBtn);
        moveBtn = (Button) findViewById(R.id.moveBtn);
        allBtn = (Button) findViewById(R.id.allBtn);
        testBtn = (Button) findViewById(R.id.testBtn);
        colorBtn.setOnClickListener(this);
        moveBtn.setOnClickListener(this);
        allBtn.setOnClickListener(this);
        testBtn.setOnClickListener(this);


        testBtn.post(new Runnable() {
            @Override
            public void run() {
                width = testBtn.getWidth();
            }
        });
    }

    @Override
    public void onClick(View view) {
        switch (view.getId()) {
            case R.id.colorBtn:
                //改變textView的背景顏色
                showColor();
                break;
            case R.id.moveBtn:
                //平移textView
                showMove();
                break;
            case R.id.allBtn:
                //聯合使用動畫
                showAll();
                break;

            case R.id.testBtn:
                Toast.makeText(this, "dianji", Toast.LENGTH_SHORT).show();
                MyButton b = new MyButton(testBtn);
                ObjectAnimator.ofInt(b, "width", width, 500).setDuration(3000).start();

                break;
        }
    }

    private void showColor() {
        //設置顏色變化
        ObjectAnimator objectAnimator = ObjectAnimator.ofInt(textView, "textColor", 0xFFFF8080, 0xFF8080FF);
        //無限循環
        objectAnimator.setRepeatCount(ValueAnimator.INFINITE);
        objectAnimator.setRepeatMode(ValueAnimator.REVERSE);
        //設置為色差估值器
        objectAnimator.setEvaluator(new ArgbEvaluator());
        //設置持續時間
        objectAnimator.setDuration(500);
        //開啟動畫
        objectAnimator.start();
    }

    private void showMove() {
        //設置x平移
        ObjectAnimator obj = ObjectAnimator.ofFloat(textView, "translationX", 50, -50, 30, -30, 20, -20, 10, -10, 5, -5, 1, -1);
        //設置差值器
        obj.setInterpolator(new DecelerateInterpolator());
        //設置持續時間
        obj.setDuration(5000);
        //開啟動畫
        obj.start();
    }


    private void showAll() {
        AnimatorSet set = new AnimatorSet();
        set.playTogether(
                //textView的X軸旋轉360°
                ObjectAnimator.ofFloat(textView, "rotationX", 0, 360),
                //textView的Y軸旋轉180°
                ObjectAnimator.ofFloat(textView, "rotationY", 0, 180),
                //設置平面旋轉90°
                ObjectAnimator.ofFloat(textView, "rotation", 0, 90),
                //設置X軸的位移
                ObjectAnimator.ofFloat(textView, "translationX", 0, 90),
                //設置Y軸位移
                ObjectAnimator.ofFloat(textView, "translationY", 0, 90),
                //設置X軸縮放1.5倍
                ObjectAnimator.ofFloat(textView, "scaleX", 1, 1.5f),
                //設置Y軸縮放0.5倍
                ObjectAnimator.ofFloat(textView, "scaleY", 1, 0.5f),
                //設置透明度
                ObjectAnimator.ofFloat(textView, "alpha", 1, 0.5f, 1)
        );
        //設置持續時間
        set.setDuration(5000);
        //開啟動畫
        set.start();
    }

}
MainActivity的布局文件:
MyButton類:
public class MyButton {

    private View button;

    public MyButton(View button) {
        this.button = button;
    }

    public int getWidth() {
        return button.getLayoutParams().width;
    }

    public void setWidth(int width) {
        button.getLayoutParams().width = width;
        //requestLayout:當view確定自身已經不再適合現有的區域時,
        // 該view本身調用這個方法要求parent view重新調用他的onMeasure onLayout來對重新設置自己位置。
       // 特別的當view的layoutparameter發生改變,並且它的值還沒能應用到view上,這時候適合調用這個方法。
        //而,invalidate:View本身調用迫使view重畫。
        button.requestLayout();
    }
}
本人菜鳥一個有什麼不對的地方希望大家指出評論,大神勿噴,希望大家一起學習進步!
 手機QQ2015怎麼徹底刪除好友?
手機QQ2015安卓版最近有了一個很大的更新,我們會驚奇的發現自己的手機QQ2015軟件無論是在軟件功能上還是軟件界面上都有了很大的變化,頁面的布置跟以前有
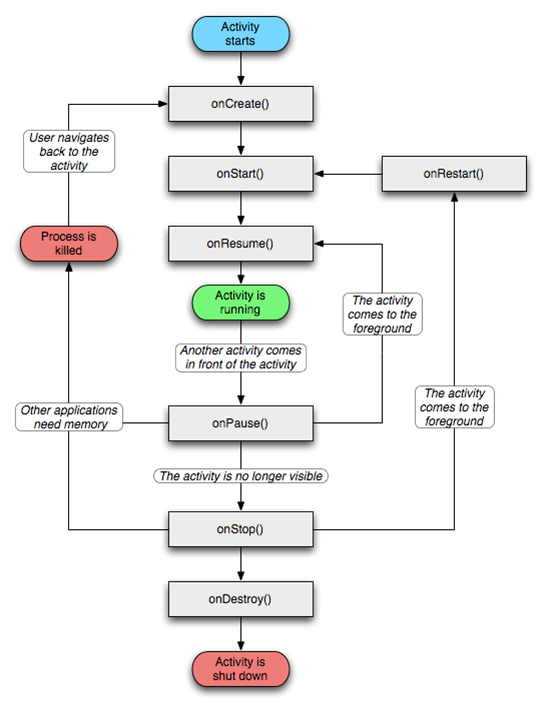
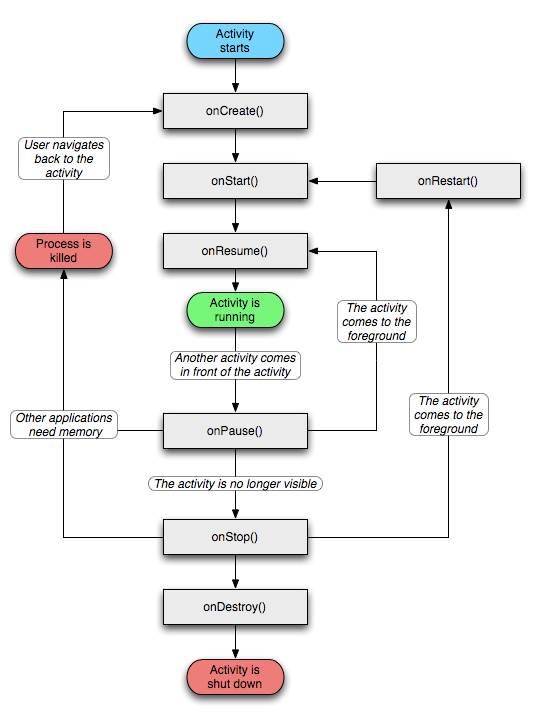 Android 程序應用的生命周期
程序應用步驟:打開應用:onCreateonStartonResumeBACK鍵:onPauseonStoponDestoryHOME鍵:onPauseonStop再次啟
 Android FM模塊學習之一 FM啟動流程
最近在學習FM模塊,FM是一個值得學習的模塊,可以從上層看到底層。上層就是FM的按扭操作和界面顯示,從而調用到FM底層驅動來實現廣播收聽的功能。 看看
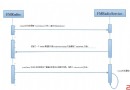
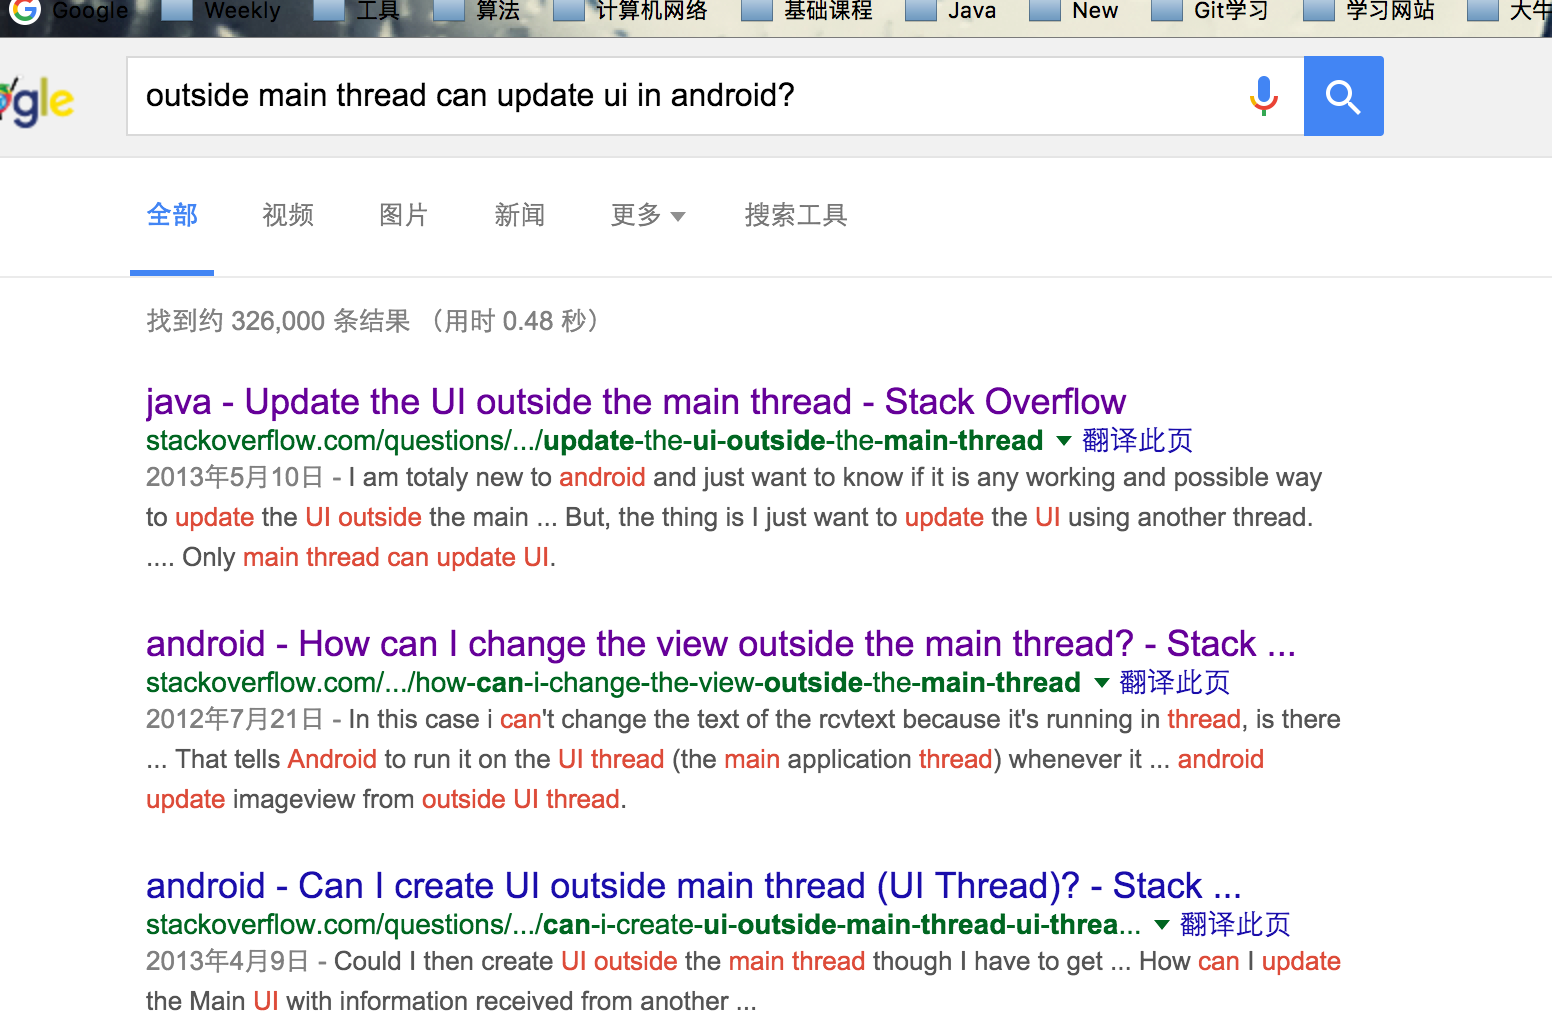 非UI線程更新UI!?
今天晚上被弟弟告知他在子線程中更新了UI,問我是不是版本的問題,我果斷說是他的代碼寫錯了,不過分分鐘被打臉,經過我一番仔細的探查最終發現了原因,或許這件事的結果不是多麼