編輯:關於Android編程
OC中類目無法直接添加屬性,可以通過runtime實現在類目中添加屬性。
在學習的過程中,試著為UITextField添加了一個類目,實現了當TextField被鍵盤遮住時視圖上移的功能,順便也添加了點擊空白回收鍵盤功能。
效果預覽
使用時不需要一句代碼就可以實現上述功能
github鏈接
.h文件
// // UITextField+CHTPositionChange.h // CHTTextFieldHealper // // Created by risenb_mac on 16/8/17. // Copyright ? 2016年 risenb_mac. All rights reserved. // #import@interface UITextField (CHTHealper) /** * 是否支持視圖上移 */ @property (nonatomic, assign) BOOL canMove; /** * 點擊回收鍵盤、移動的視圖,默認是當前控制器的view */ @property (nonatomic, strong) UIView *moveView; /** * textfield底部距離鍵盤頂部的距離 */ @property (nonatomic, assign) CGFloat heightToKeyboard; @property (nonatomic, assign, readonly) CGFloat keyboardY; @property (nonatomic, assign, readonly) CGFloat keyboardHeight; @property (nonatomic, assign, readonly) CGFloat initialY; @property (nonatomic, assign, readonly) CGFloat totalHeight; @property (nonatomic, strong, readonly) UITapGestureRecognizer *tapGesture; @property (nonatomic, assign, readonly) BOOL hasContentOffset; @end
在.h文件中聲明屬性之後需要在.m中重寫setter,getter方法
首先定義全局key用作關聯唯一標識符
static char canMoveKey;
static char moveViewKey;
@implementation UITextField (CHTHealper)
@dynamic canMove;
@dynamic moveView;
具體實現
- (void)setCanMove:(BOOL)canMove {
// 參數意義:關聯對象 ,關聯標識符,關聯屬性值,關聯策略
  objc_setAssociatedObject(self, &canMoveKey, @(canMove), OBJC_ASSOCIATION_RETAIN_NONATOMIC);
}

- (BOOL)canMove {
// 關聯屬性值為對象類型,需要轉換
  return [objc_getAssociatedObject(self, &canMoveKey) boolValue];
}
想要實現鍵盤遮住TextField後視圖上移,首先應確定TextField是否被鍵盤遮住,需要知道TextField在整個屏幕中的位置
// 此方法可以獲得TextField左上角在當前window中的坐標
[self convertPoint:self.bounds.origin toView:[UIApplication sharedApplication].keyWindow]
還需要知道鍵盤高度,這點需要接受系統通知,但是什麼時候接受通知、注銷通知?
我的思路是在TextField成為第一響應者的時候,為TextField添加通知,但是如果直接重寫becomeFirstResponder方法會覆蓋掉UITextField本身的方法,造成的最明顯的後果就是沒有光標了……為了避免這個問題,我用了runtime另外一個強大的功能,方法交換
為了保證方法交換只進行一次,使用dispatch_once
為了保證方法交換盡早執行,寫在了load方法中
+ (void)load {
  static dispatch_once_t onceToken;
  dispatch_once(&onceToken, ^{
    SEL systemSel = @selector(initWithFrame:);
    SEL mySel = @selector(setupInitWithFrame:);
    [self exchangeSystemSel:systemSel bySel:mySel];

    SEL systemSel2 = @selector(becomeFirstResponder);
    SEL mySel2 = @selector(newBecomeFirstResponder);
    [self exchangeSystemSel:systemSel2 bySel:mySel2];

    SEL systemSel3 = @selector(resignFirstResponder);
    SEL mySel3 = @selector(newResignFirstResponder);
    [self exchangeSystemSel:systemSel3 bySel:mySel3];

    SEL systemSel4 = @selector(initWithCoder:);
    SEL mySel4 = @selector(setupInitWithCoder:);
    [self exchangeSystemSel:systemSel4 bySel:mySel4];
  });
  [super load];
}
具體交換步驟
// 交換方法
+ (void)exchangeSystemSel:(SEL)systemSel bySel:(SEL)mySel {
  Method systemMethod = class_getInstanceMethod([self class], systemSel);
  Method myMethod = class_getInstanceMethod([self class], mySel);
  //首先動態添加方法,實現是被交換的方法,返回值表示添加成功還是失敗
  BOOL isAdd = class_addMethod(self, systemSel, method_getImplementation(myMethod), method_getTypeEncoding(myMethod));
  if (isAdd) {
    //如果成功,說明類中不存在這個方法的實現
    //將被交換方法的實現替換到這個並不存在的實現
    class_replaceMethod(self, mySel, method_getImplementation(systemMethod), method_getTypeEncoding(systemMethod));
  }else{
    //否則,交換兩個方法的實現
    method_exchangeImplementations(systemMethod, myMethod);
  }
}
在上面我交換了四組方法,兩組init方法,是為了保證無論是代碼創建的還是xib拖得TextField都進行初始化
- (instancetype)setupInitWithCoder:(NSCoder *)aDecoder {
  [self setup];
  return [self setupInitWithCoder:aDecoder];
}

- (instancetype)setupInitWithFrame:(CGRect)frame {
  [self setup];
  return [self setupInitWithFrame:frame];
}

- (void)setup {
  self.heightToKeyboard = 10;
  self.canMove = YES;
  self.keyboardY = 0;
  self.totalHeight = 0;
  self.tapGesture = [[UITapGestureRecognizer alloc] initWithTarget:self action:@selector(tapAction)];
}
在TextField成為第一響應者時,為self添加通知接收,為moveView添加點擊事件(實現點擊空白回收鍵盤),注銷第一響應者時,注銷通知,移除點擊事件
- (BOOL)newBecomeFirstResponder {
// 如果沒有設置moveView 默認為當前控制器的view
  if (self.moveView == nil) {
    self.moveView = [self viewController].view;
  }
// 保證moveView只有一個本TextField的點擊事件
  if (![self.moveView.gestureRecognizers containsObject:self.tapGesture]) {
    [self.moveView addGestureRecognizer:self.tapGesture];
  }
// 當重復點擊當前TextField時(重復成為第一響應者)或設置為不可移動 不再添加通知
  if ([self isFirstResponder] || !self.canMove) {
    return [self newBecomeFirstResponder];
  }
  [[NSNotificationCenter defaultCenter] addObserver:self selector:@selector(showAction:) name:UIKeyboardWillShowNotification object:nil];
  [[NSNotificationCenter defaultCenter] addObserver:self selector:@selector(hideAction:) name:UIKeyboardWillHideNotification object:nil];
  return [self newBecomeFirstResponder];
}

- (BOOL)newResignFirstResponder {
// 確保當前moveView有當前點擊事件,移除
  if ([self.moveView.gestureRecognizers containsObject:self.tapGesture]) {
    [self.moveView removeGestureRecognizer:self.tapGesture];
  }
  if (!self.canMove) {
    return [self newResignFirstResponder];
  }
  BOOL result = [self newResignFirstResponder];
  [[NSNotificationCenter defaultCenter] removeObserver:self name:UIKeyboardWillShowNotification object:nil];
  [[NSNotificationCenter defaultCenter] removeObserver:self name:UIKeyboardWillHideNotification object:nil];
// 當另外一個TextField成為第一響應者,當前TextField注銷第一響應者時不會回收鍵盤,手動調用moveView改變方法
  [self hideKeyBoard:0];
  return result;
}
//獲取當前TextField所在controller
- (UIViewController *)viewController {
  UIView *next = self;
  while (1) {
    UIResponder *nextResponder = [next nextResponder];
    if ([nextResponder isKindOfClass:[UIViewController class]]) {
      return (UIViewController *)nextResponder;
    }
    next = next.superview;
  }
  return nil;
}
接收到彈出鍵盤後調用的方法
- (void)showAction:(NSNotification *)sender {
  if (!self.canMove) {
    return;
  }
// 獲取鍵盤高度以及鍵盤的Y坐標
  self.keyboardY = [sender.userInfo[UIKeyboardFrameEndUserInfoKey] CGRectValue].origin.y;
  self.keyboardHeight = [sender.userInfo[UIKeyboardFrameEndUserInfoKey] CGRectValue].size.height;
  [self keyboardDidShow];
}

- (void)hideAction:(NSNotification *)sender {
  if (!self.canMove || self.keyboardY == 0) {
    return;
  }
  [self hideKeyBoard:0.25];
}

- (void)keyboardDidShow {
  if (self.keyboardHeight == 0) {
    return;
  }
// 獲取TextField在window中的Y坐標
  CGFloat fieldYInWindow = [self convertPoint:self.bounds.origin toView:[UIApplication sharedApplication].keyWindow].y;
// 確定是否需要視圖上移,以及移動的距離
  CGFloat height = (fieldYInWindow + self.heightToKeyboard + self.frame.size.height) - self.keyboardY;
  CGFloat moveHeight = height > 0 ? height : 0;

  [UIView animateWithDuration:0.25 animations:^{
// 判斷是否是scrollView並進行相應移動
    if (self.hasContentOffset) {
      UIScrollView *scrollView = (UIScrollView *)self.moveView;
      scrollView.contentOffset = CGPointMake(scrollView.contentOffset.x, scrollView.contentOffset.y + moveHeight);
    } else {
      CGRect rect = self.moveView.frame;
      self.initialY = rect.origin.y;
      rect.origin.y -= moveHeight;
      self.moveView.frame = rect;
    }
// 記錄當前TextField使得moveView移動的距離
    self.totalHeight += moveHeight;
  }];
}

- (void)hideKeyBoard:(CGFloat)duration {
  [UIView animateWithDuration:duration animations:^{
    if (self.hasContentOffset) {
      UIScrollView *scrollView = (UIScrollView *)self.moveView;
      scrollView.contentOffset = CGPointMake(scrollView.contentOffset.x, scrollView.contentOffset.y - self.totalHeight);
    } else {
      CGRect rect = self.moveView.frame;
      rect.origin.y += self.totalHeight;
      self.moveView.frame = rect;
    }
// moveView回復狀態後將移動距離置0
    self.totalHeight = 0;
  }];
}
點擊事件當前controllerview endediting
- (void)tapAction {
  [[self viewController].view endEditing:YES];
}
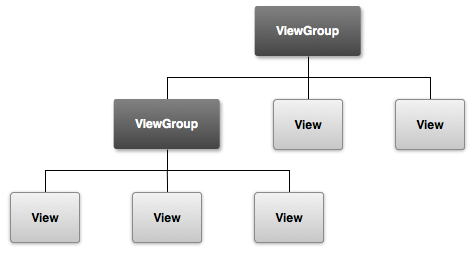 深入理解Android事件分發機制
Android事件分發,參考了網上的很多資料。基本基於android2.2的源碼來分析,因為即使是新的版本,裡面的原理思想也沒有改變。有了大神的肩膀,我在理解了其原理的基
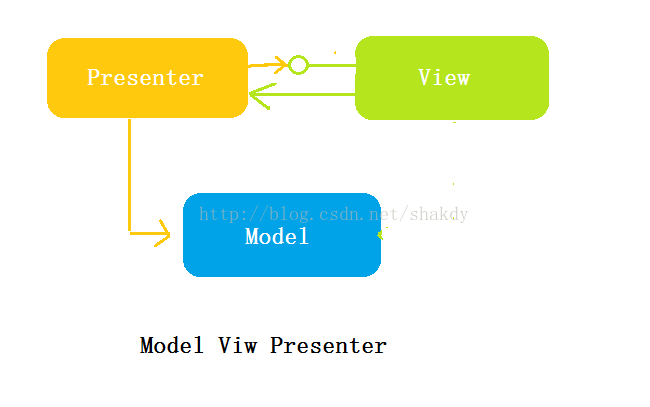 Android開發之MVP模式的學習
Android開發之MVP模式的學習:提問:明白如何選擇開發框架,和為什麼要學MVP模式觀察:比較MVC模式和MVP模式,理解MVP模式的概念使用:通過一個例子,學習如何
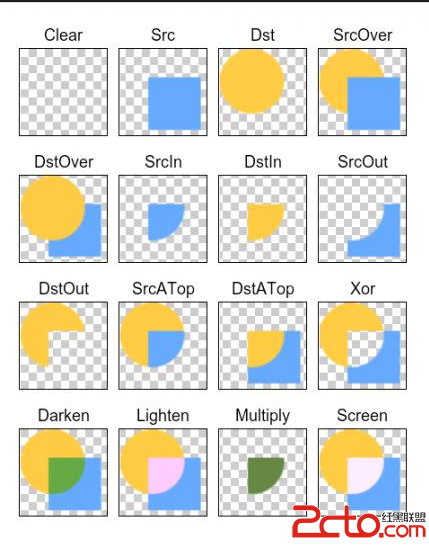 android圖形圖像處理PorterDuffXfermode
設置兩張圖片重疊的模式。在正常的情況下,在已有的圖像上繪圖將會在其上面添加一層新的形狀。如果新的Paint是完全不透明的,那麼它將完全遮擋住下面的Paint;如果它是部分
 Eclipse Android項目中XML文件格式化配置教程
Eclipse Android項目中XML文件格式化配置是本文要介紹的內容,主要是來了解並學習Eclipse Android的內容,具體關於Eclipse