編輯:關於Android編程
好久沒有更新博客,寫這篇技術時,感覺很多東西生疏了好多。於是心有感慨:我們做技術的,要是長時間不搞技術,那就是被技術搞!所以攻守之間,大家謹慎思量。
冬天已過,放假出去玩耍時,看到兩旁嫩嫩的樹葉,想起賀知章的詩句:
《詠柳》
碧玉妝成一樹高,
萬條垂下綠絲絛。
不知細葉誰裁出,
二月春風似剪刀。
猶自感歎,春天來了,美腿還會遠麼 。
。
好了,閒言少敘,言歸正傳。
代碼效果
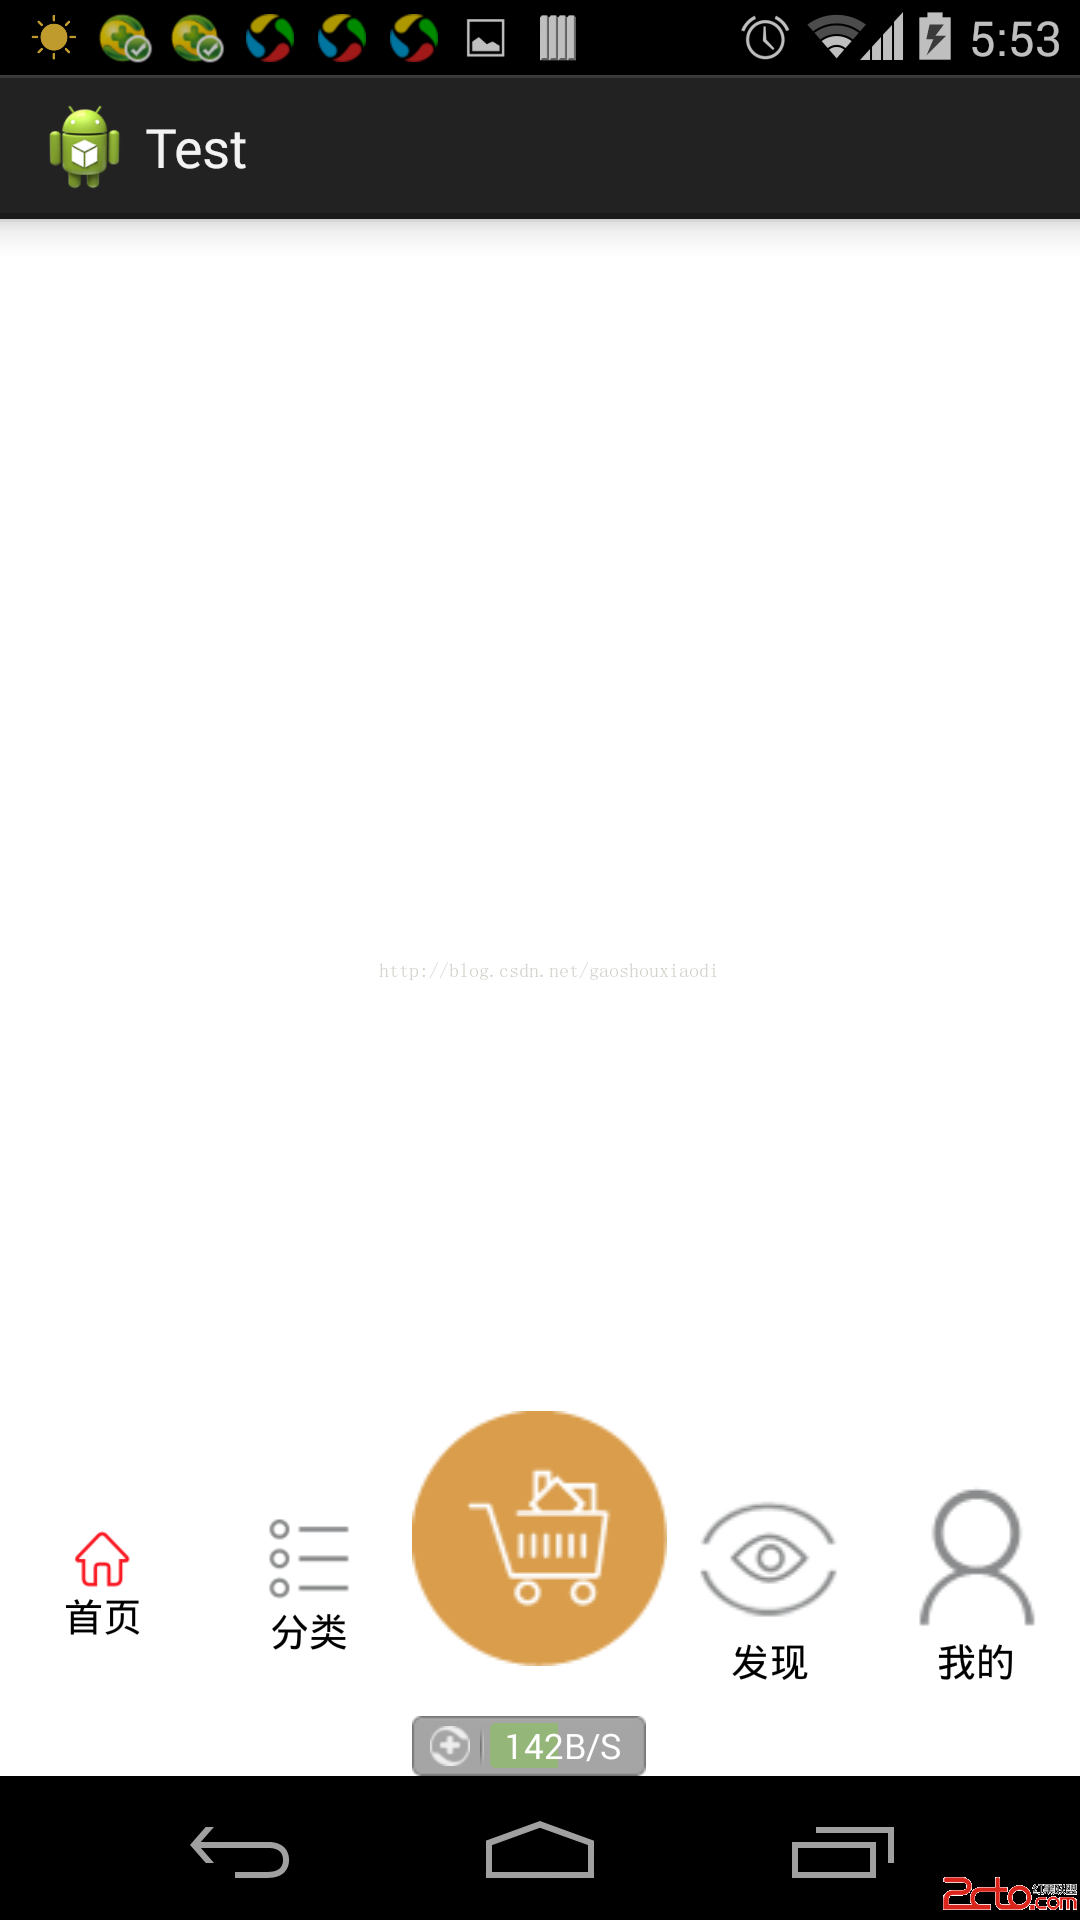
前兩天一個朋友提出的需求,用RadioButton實現的應用頁面切換。效果圖如下

這種想法很好,但也出現了兩個問題:其一,界面擴展性很差;其二,RadioButton設置圖片後,無法在xml中設置圖片大小,導致布局不美觀。那麼問題來了?如何設置這個圖片的大小。
百度常見的回答是,在代碼中動態設置圖片大小。然後設置在布局上。代碼如下:
mRadioButton.setCompoundDrawables(left, top, right, bottom);參數類型都是Drawable,分別是左,上,右,下四個方向要顯示的Drawable圖片我們查看setCompoundDrawables(left, top, right, bottom)方法:有這樣的一段說明:
Sets the Drawables (if any) to appear to the left of, above, to the right of, and below the text. Use null if you do not want a Drawable there. The Drawables must already have hadDrawable.setBounds called.
意思是說,用次方法之前,需要用Drawable.setBounds()方法來為Drawable圖片設置邊界,即要顯示的大小。
達到同樣效果的還有一個方法:
setCompoundDrawablesWithIntrinsicBounds(drawableLeft, drawableTop, drawableRight, drawableBottom);進入源碼查看該方法的具體實現:
public void setCompoundDrawablesWithIntrinsicBounds(Drawable left, Drawable top,
            Drawable right, Drawable bottom) {

        if (left != null) {
            left.setBounds(0, 0, left.getIntrinsicWidth(), left.getIntrinsicHeight());
        }
        if (right != null) {
            right.setBounds(0, 0, right.getIntrinsicWidth(), right.getIntrinsicHeight());
        }
        if (top != null) {
            top.setBounds(0, 0, top.getIntrinsicWidth(), top.getIntrinsicHeight());
        }
        if (bottom != null) {
            bottom.setBounds(0, 0, bottom.getIntrinsicWidth(), bottom.getIntrinsicHeight());
        }
        setCompoundDrawables(left, top, right, bottom);
    }
原來這個方法,同樣調用了setCompoundDrawables(left, top, right, bottom)方法,並在調用之前,給傳入的圖片設置了邊界范圍,即圖片自身的大小。再看這個方法的注釋:
Sets the Drawables (if any) to appear to the left of, above, to the right of, and below the text. Use null if you do not want a Drawable there. The Drawables' bounds will be set to their intrinsic bounds.
意思是說:設置drawable圖像顯示在文字的上下左右的位置,如果不想設置,則傳遞null參數。drawable圖片的邊界是其自身固定的邊界范圍。
OK,一切明了,那麼是不是我們自己改變這個邊界值參數,就能達到改變圖片大小的目的呢?答案是肯定的。下面,是見證奇跡的時刻。
首先,我們要在xml中用到設置圖片大小的屬性,這裡用drawableSize來顯示。然後分別給出四個方向的圖片屬性。最後我們得到的attrs.xml文件的內容為:
獲取屬性的代碼如下:
Drawable drawableLeft = null, drawableTop = null, drawableRight = null, drawableBottom = null;
		TypedArray a = context.obtainStyledAttributes(attrs,
				R.styleable.MyRadioButton);

		int n = a.getIndexCount();
		for (int i = 0; i < n; i++) {
			int attr = a.getIndex(i);
			Log.i("MyRadioButton", "attr:" + attr);
			switch (attr) {
			case R.styleable.MyRadioButton_drawableSize:
				mDrawableSize = a.getDimensionPixelSize(R.styleable.MyRadioButton_drawableSize, 50);
				Log.i("MyRadioButton", "mDrawableSize:" + mDrawableSize);
				break;
			case R.styleable.MyRadioButton_drawableTop:
				drawableTop = a.getDrawable(attr);
				break;
			case R.styleable.MyRadioButton_drawableBottom:
				drawableRight = a.getDrawable(attr);
				break;
			case R.styleable.MyRadioButton_drawableRight:
				drawableBottom = a.getDrawable(attr);
				break;
			case R.styleable.MyRadioButton_drawableLeft:
				drawableLeft = a.getDrawable(attr);
				break;
			default :
					break;
			}
		}
		a.recycle();
	public void setCompoundDrawablesWithIntrinsicBounds(Drawable left,
			Drawable top, Drawable right, Drawable bottom) {

		if (left != null) {
			left.setBounds(0, 0, mDrawableSize, mDrawableSize);
		}
		if (right != null) {
			right.setBounds(0, 0, mDrawableSize, mDrawableSize);
		}
		if (top != null) {
			top.setBounds(0, 0, mDrawableSize, mDrawableSize);
		}
		if (bottom != null) {
			bottom.setBounds(0, 0, mDrawableSize, mDrawableSize);
		}
		setCompoundDrawables(left, top, right, bottom);
	}
到此,我們代碼部分已經編寫完畢。
接下來添加需要的圖片資源以及xml布局設置。
xml布局如下:
        <frameLayout
            android:id="@+id/tab_content"
            android:layout_width="fill_parent"
            android:layout_height="0dp"
            android:layout_weight="1.0"
            android:background="#FFFFFF" />
自定義RadioButton的完整源碼如下:
package com.example.test;

import android.R.integer;
import android.R.raw;
import android.content.Context;
import android.content.res.Resources;
import android.content.res.TypedArray;
import android.graphics.drawable.Drawable;
import android.util.AttributeSet;
import android.util.Log;
import android.widget.RadioButton;

public class MyRadioButton extends RadioButton {

	private int mDrawableSize;// xml文件中設置的大小

	public MyRadioButton(Context context) {
		this(context, null, 0);
	}

	public MyRadioButton(Context context, AttributeSet attrs) {
		this(context, attrs, 0);
	}

	public MyRadioButton(Context context, AttributeSet attrs, int defStyle) {
		super(context, attrs, defStyle);
		// TODO Auto-generated constructor stub
		Drawable drawableLeft = null, drawableTop = null, drawableRight = null, drawableBottom = null;
		TypedArray a = context.obtainStyledAttributes(attrs,
				R.styleable.MyRadioButton);

		int n = a.getIndexCount();
		for (int i = 0; i < n; i++) {
			int attr = a.getIndex(i);
			Log.i("MyRadioButton", "attr:" + attr);
			switch (attr) {
			case R.styleable.MyRadioButton_drawableSize:
				mDrawableSize = a.getDimensionPixelSize(R.styleable.MyRadioButton_drawableSize, 50);
				Log.i("MyRadioButton", "mDrawableSize:" + mDrawableSize);
				break;
			case R.styleable.MyRadioButton_drawableTop:
				drawableTop = a.getDrawable(attr);
				break;
			case R.styleable.MyRadioButton_drawableBottom:
				drawableRight = a.getDrawable(attr);
				break;
			case R.styleable.MyRadioButton_drawableRight:
				drawableBottom = a.getDrawable(attr);
				break;
			case R.styleable.MyRadioButton_drawableLeft:
				drawableLeft = a.getDrawable(attr);
				break;
			default :
					break;
			}
		}
		a.recycle();

		setCompoundDrawablesWithIntrinsicBounds(drawableLeft, drawableTop, drawableRight, drawableBottom);

	}

	public void setCompoundDrawablesWithIntrinsicBounds(Drawable left,
			Drawable top, Drawable right, Drawable bottom) {

		if (left != null) {
			left.setBounds(0, 0, mDrawableSize, mDrawableSize);
		}
		if (right != null) {
			right.setBounds(0, 0, mDrawableSize, mDrawableSize);
		}
		if (top != null) {
			top.setBounds(0, 0, mDrawableSize, mDrawableSize);
		}
		if (bottom != null) {
			bottom.setBounds(0, 0, mDrawableSize, mDrawableSize);
		}
		setCompoundDrawables(left, top, right, bottom);
	}

}
至此自定義改變Drawable圖片大小的RadioButton已經完成。經此一役,我們可以定義任何想要的東東。沒有做不到,只有想不到。
源碼下載地址
轉載請注明出處
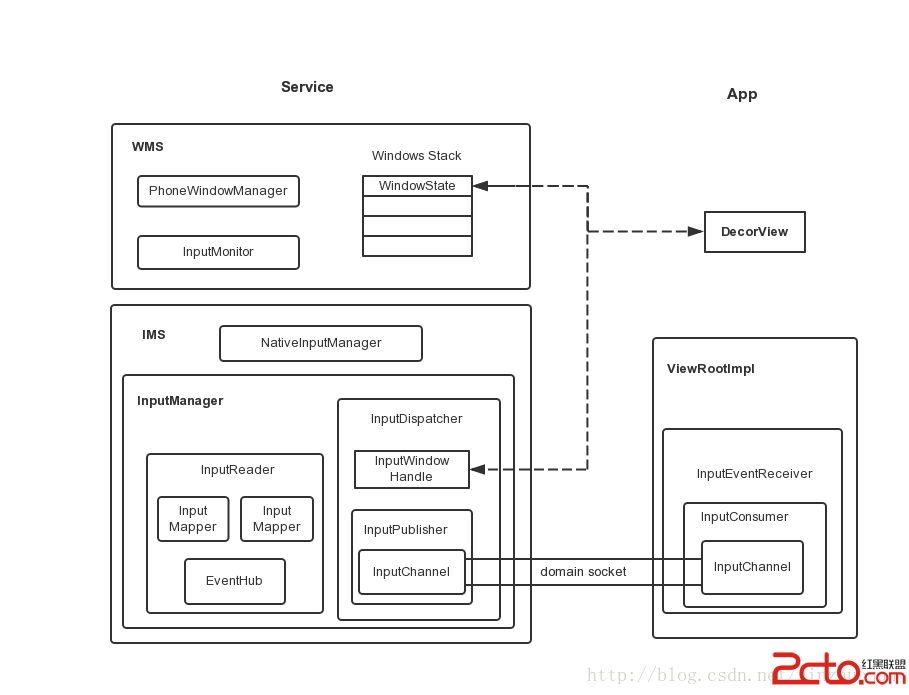 Android 5.0(Lollipop)事件輸入系統(Input System)
其實Android 5.0中事件輸入子系統的框架和流程沒有本質變化。Service端的實現在/frameworks/native/services/inputflinge
 unity3d發布apk在android虛擬機中運行的詳細步驟(unity3d導出android apk)
unity3d發布apk在android虛擬機中運行的詳細步驟(unity3d導出android apk),總的流程分為以下6個步驟:1、安裝java_jdk2、配置ja
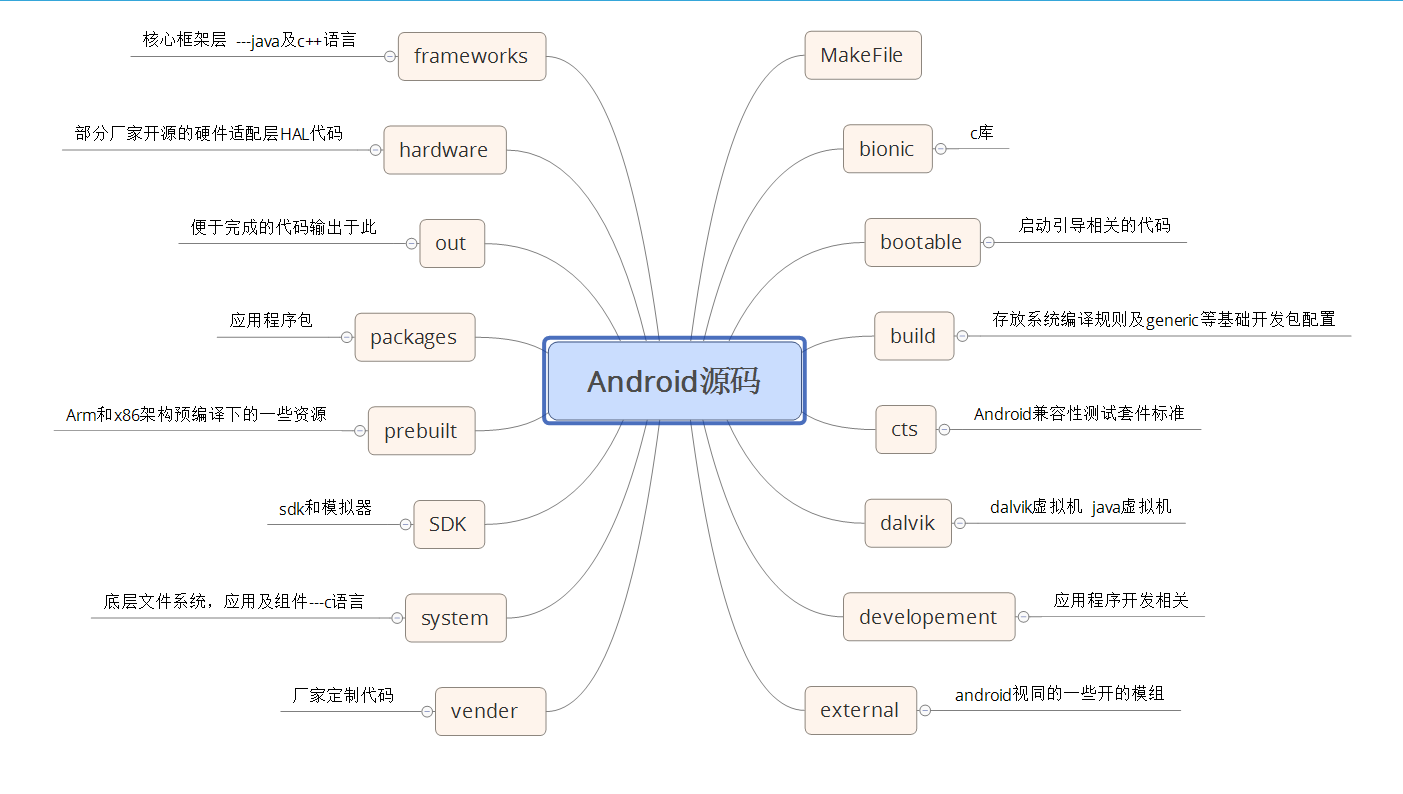 Android源碼的結構
bionic 目錄– libc (C庫)| |– arch-arm (ARM架構,包含系統調用匯編實現)| |– arch-x86 (
 Android-自定義view之圓形與“半圓形”菜單
前不久看到鴻洋大大的圓形菜單,就想開始模仿,因為實在是太酷了,然後自己根據別人(zw哥)給我講的一些思路、一些分析,就開始改造自己的圓形菜單了。文章結構:1.功能介紹以及