編輯:關於Android編程
在Android中,Activity主要負責前台頁面的展示,Service主要負責需要長期運行的任務,所以在我們實際開發中,就會常常遇到Activity與Service之間的通信,我們一般在Activity中啟動後台Service,通過Intent來啟動,Intent中我們可以傳遞數據給Service,而當我們Service執行某些操作之後想要更新UI線程,我們應該怎麼做呢?接下來我就介紹兩種方式來實現Service與Activity之間的通信問題
1、通過Binder對象
當Activity通過調用bindService(Intent service, ServiceConnection conn,int flags),我們可以得到一個Service的一個對象實例,然後我們就可以訪問Service中的方法,我們還是通過一個例子來理解一下吧,一個模擬下載的小例子,帶大家理解一下通過Binder通信的方式
首先我們新建一個工程Communication,然後新建一個Service類
package com.example.communication;
import android.app.Service;
import android.content.Intent;
import android.os.Binder;
import android.os.IBinder;

public class MsgService extends Service {
 /**
  * 進度條的最大值
  */
 public static final int MAX_PROGRESS = 100;
 /**
  * 進度條的進度值
  */
 private int progress = 0;

 /**
  * 增加get()方法,供Activity調用
  * @return 下載進度
  */
 public int getProgress() {
  return progress;
 }

 /**
  * 模擬下載任務,每秒鐘更新一次
  */
 public void startDownLoad(){
  new Thread(new Runnable() {

   @Override
   public void run() {
    while(progress < MAX_PROGRESS){
     progress += 5;
     try {
      Thread.sleep(1000);
     } catch (InterruptedException e) {
      e.printStackTrace();
     }

    }
   }
  }).start();
 }


 /**
  * 返回一個Binder對象
  */
 @Override
 public IBinder onBind(Intent intent) {
  return new MsgBinder();
 }

 public class MsgBinder extends Binder{
  /**
   * 獲取當前Service的實例
   * @return
   */
  public MsgService getService(){
   return MsgService.this;
  }
 }

}
上面的代碼比較簡單,注釋也比較詳細,最基本的Service的應用了,相信你看得懂的,我們調用startDownLoad()方法來模擬下載任務,然後每秒更新一次進度,但這是在後台進行中,我們是看不到的,所以有時候我們需要他能在前台顯示下載的進度問題,所以我們接下來就用到Activity了
Intent intent = new Intent("com.example.communication.MSG_ACTION");
bindService(intent, conn, Context.BIND_AUTO_CREATE);
通過上面的代碼我們就在Activity綁定了一個Service,上面需要一個ServiceConnection對象,它是一個接口,我們這裡使用了匿名內部類
ServiceConnection conn = new ServiceConnection() {

  @Override
  public void onServiceDisconnected(ComponentName name) {

  }

  @Override
  public void onServiceConnected(ComponentName name, IBinder service) {
   //返回一個MsgService對象
   msgService = ((MsgService.MsgBinder)service).getService();

  }
 };
在onServiceConnected(ComponentName name, IBinder service) 回調方法中,返回了一個MsgService中的Binder對象,我們可以通過getService()方法來得到一個MsgService對象,然後可以調用MsgService中的一些方法,Activity的代碼如下
package com.example.communication;
import android.app.Activity;
import android.content.ComponentName;
import android.content.Context;
import android.content.Intent;
import android.content.ServiceConnection;
import android.os.Bundle;
import android.os.IBinder;
import android.view.View;
import android.view.View.OnClickListener;
import android.widget.Button;
import android.widget.ProgressBar;

public class MainActivity extends Activity {
 private MsgService msgService;
 private int progress = 0;
 private ProgressBar mProgressBar;


 @Override
 protected void onCreate(Bundle savedInstanceState) {
  super.onCreate(savedInstanceState);
  setContentView(R.layout.activity_main);


  //綁定Service
  Intent intent = new Intent("com.example.communication.MSG_ACTION");
  bindService(intent, conn, Context.BIND_AUTO_CREATE);


  mProgressBar = (ProgressBar) findViewById(R.id.progressBar1);
  Button mButton = (Button) findViewById(R.id.button1);
  mButton.setOnClickListener(new OnClickListener() {

   @Override
   public void onClick(View v) {
    //開始下載
    msgService.startDownLoad();
    //監聽進度
    listenProgress();
   }
  });

 }


 /**
  * 監聽進度,每秒鐘獲取調用MsgService的getProgress()方法來獲取進度,更新UI
  */
 public void listenProgress(){
  new Thread(new Runnable() {

   @Override
   public void run() {
    while(progress < MsgService.MAX_PROGRESS){
     progress = msgService.getProgress();
     mProgressBar.setProgress(progress);
     try {
      Thread.sleep(1000);
     } catch (InterruptedException e) {
      e.printStackTrace();
     }
    }

   }
  }).start();
 }

 ServiceConnection conn = new ServiceConnection() {
  @Override
  public void onServiceDisconnected(ComponentName name) {

  }

  @Override
  public void onServiceConnected(ComponentName name, IBinder service) {
   //返回一個MsgService對象
   msgService = ((MsgService.MsgBinder)service).getService();

  }
 };

 @Override
 protected void onDestroy() {
  unbindService(conn);
  super.onDestroy();
 }


}
其實上面的代碼我還是有點疑問,就是監聽進度變化的那個方法我是直接在線程中更新UI的,不是說不能在其他線程更新UI操作嗎,可能是ProgressBar比較特殊吧,我也沒去研究它的源碼,知道的朋友可以告訴我一聲,謝謝!
上面的代碼就完成了在Service更新UI的操作,可是你發現了沒有,我們每次都要主動調用getProgress()來獲取進度值,然後隔一秒在調用一次getProgress()方法,你會不會覺得很被動呢?可不可以有一種方法當Service中進度發生變化主動通知Activity,答案是肯定的,我們可以利用回調接口實現Service的主動通知,不理解回調方法的可以看
http://www.jb51.net/article/95523.htm
新建一個回調接口
public interface OnProgressListener {
 void onProgress(int progress);
}
MsgService的代碼有一些小小的改變,為了方便大家看懂,我還是將所有代碼貼出來
package com.example.communication;

import android.app.Service;
import android.content.Intent;
import android.os.Binder;
import android.os.IBinder;

public class MsgService extends Service {
 /**
  * 進度條的最大值
  */
 public static final int MAX_PROGRESS = 100;
 /**
  * 進度條的進度值
  */
 private int progress = 0;

 /**
  * 更新進度的回調接口
  */
 private OnProgressListener onProgressListener;


 /**
  * 注冊回調接口的方法,供外部調用
  * @param onProgressListener
  */
 public void setOnProgressListener(OnProgressListener onProgressListener) {
  this.onProgressListener = onProgressListener;
 }

 /**
  * 增加get()方法,供Activity調用
  * @return 下載進度
  */
 public int getProgress() {
  return progress;
 }

 /**
  * 模擬下載任務,每秒鐘更新一次
  */
 public void startDownLoad(){
  new Thread(new Runnable() {

   @Override
   public void run() {
    while(progress < MAX_PROGRESS){
     progress += 5;

     //進度發生變化通知調用方
     if(onProgressListener != null){
      onProgressListener.onProgress(progress);
     }

     try {
      Thread.sleep(1000);
     } catch (InterruptedException e) {
      e.printStackTrace();
     }

    }
   }
  }).start();
 }


 /**
  * 返回一個Binder對象
  */
 @Override
 public IBinder onBind(Intent intent) {
  return new MsgBinder();
 }

 public class MsgBinder extends Binder{
  /**
   * 獲取當前Service的實例
   * @return
   */
  public MsgService getService(){
   return MsgService.this;
  }
 }

}
Activity中的代碼如下
package com.example.communication;

import android.app.Activity;
import android.content.ComponentName;
import android.content.Context;
import android.content.Intent;
import android.content.ServiceConnection;
import android.os.Bundle;
import android.os.IBinder;
import android.view.View;
import android.view.View.OnClickListener;
import android.widget.Button;
import android.widget.ProgressBar;

public class MainActivity extends Activity {
 private MsgService msgService;
 private ProgressBar mProgressBar;


 @Override
 protected void onCreate(Bundle savedInstanceState) {
  super.onCreate(savedInstanceState);
  setContentView(R.layout.activity_main);


  //綁定Service
  Intent intent = new Intent("com.example.communication.MSG_ACTION");
  bindService(intent, conn, Context.BIND_AUTO_CREATE);


  mProgressBar = (ProgressBar) findViewById(R.id.progressBar1);
  Button mButton = (Button) findViewById(R.id.button1);
  mButton.setOnClickListener(new OnClickListener() {

   @Override
   public void onClick(View v) {
    //開始下載
    msgService.startDownLoad();
   }
  });

 }

 ServiceConnection conn = new ServiceConnection() {
  @Override
  public void onServiceDisconnected(ComponentName name) {

  }

  @Override
  public void onServiceConnected(ComponentName name, IBinder service) {
   //返回一個MsgService對象
   msgService = ((MsgService.MsgBinder)service).getService();

   //注冊回調接口來接收下載進度的變化
   msgService.setOnProgressListener(new OnProgressListener() {

    @Override
    public void onProgress(int progress) {
     mProgressBar.setProgress(progress);

    }
   });

  }
 };

 @Override
 protected void onDestroy() {
  unbindService(conn);
  super.onDestroy();
 }
}
用回調接口是不是更加的方便呢,當進度發生變化的時候Service主動通知Activity,Activity就可以更新UI操作了
2、通過broadcast(廣播)的形式
當我們的進度發生變化的時候我們發送一條廣播,然後在Activity的注冊廣播接收器,接收到廣播之後更新ProgressBar,代碼如下
package com.example.communication;
import android.app.Activity;
import android.content.BroadcastReceiver;
import android.content.Context;
import android.content.Intent;
import android.content.IntentFilter;
import android.os.Bundle;
import android.view.View;
import android.view.View.OnClickListener;
import android.widget.Button;
import android.widget.ProgressBar;

public class MainActivity extends Activity {
 private ProgressBar mProgressBar;
 private Intent mIntent;
 private MsgReceiver msgReceiver;


 @Override
 protected void onCreate(Bundle savedInstanceState) {
  super.onCreate(savedInstanceState);
  setContentView(R.layout.activity_main);

  //動態注冊廣播接收器
  msgReceiver = new MsgReceiver();
  IntentFilter intentFilter = new IntentFilter();
  intentFilter.addAction("com.example.communication.RECEIVER");
  registerReceiver(msgReceiver, intentFilter);


  mProgressBar = (ProgressBar) findViewById(R.id.progressBar1);
  Button mButton = (Button) findViewById(R.id.button1);
  mButton.setOnClickListener(new OnClickListener() {

   @Override
   public void onClick(View v) {
    //啟動服務
    mIntent = new Intent("com.example.communication.MSG_ACTION");
    startService(mIntent);
   }
  });

 }


 @Override
 protected void onDestroy() {
  //停止服務
  stopService(mIntent);
  //注銷廣播
  unregisterReceiver(msgReceiver);
  super.onDestroy();
 }


 /**
  * 廣播接收器
  * @author len
  *
  */
 public class MsgReceiver extends BroadcastReceiver{

  @Override
  public void onReceive(Context context, Intent intent) {
   //拿到進度,更新UI
   int progress = intent.getIntExtra("progress", 0);
   mProgressBar.setProgress(progress);
  }

 }

}
package com.example.communication;

import android.app.Service;
import android.content.Intent;
import android.os.IBinder;

public class MsgService extends Service {
 /**
  * 進度條的最大值
  */
 public static final int MAX_PROGRESS = 100;
 /**
  * 進度條的進度值
  */
 private int progress = 0;

 private Intent intent = new Intent("com.example.communication.RECEIVER");


 /**
  * 模擬下載任務,每秒鐘更新一次
  */
 public void startDownLoad(){
  new Thread(new Runnable() {

   @Override
   public void run() {
    while(progress < MAX_PROGRESS){
     progress += 5;

     //發送Action為com.example.communication.RECEIVER的廣播
     intent.putExtra("progress", progress);
     sendBroadcast(intent);

     try {
      Thread.sleep(1000);
     } catch (InterruptedException e) {
      e.printStackTrace();
     }

    }
   }
  }).start();
 }


 @Override
 public int onStartCommand(Intent intent, int flags, int startId) {
  startDownLoad();
  return super.onStartCommand(intent, flags, startId);
 }


 @Override
 public IBinder onBind(Intent intent) {
  return null;
 }


}
總結:
以上就是本文的全部內容,希望對大家的學習有所幫助,也希望大家多多支持本站。
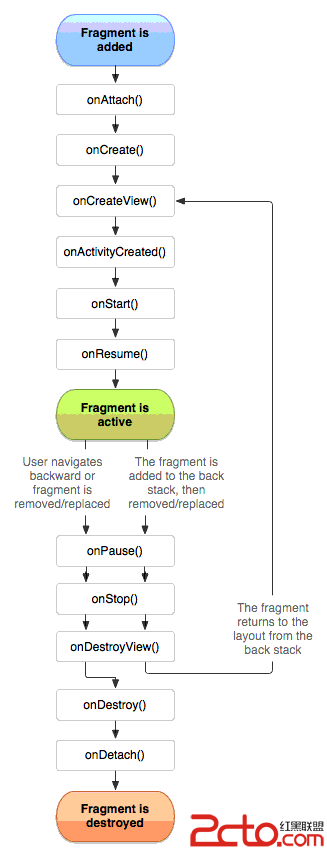 Android 開發 之 Fragment 詳解
作者 : 韓曙亮轉載請著名出處 : http://blog.csdn.net/shulianghan/article/details/38064191本博客代碼地址 :
 刷機精靈root卡在65怎麼辦?
問題說明:其實這個問題有可能是沒有問題需要多試幾次 解決辦法:重新用手機連接電腦,並且重新打開USB調試模式(部分ROM默認打開的,如果找不到),再次自動
 Android通過Path實現搜索按鈕和時鐘復雜效果
在Android中復雜的圖形的繪制絕大多數是通過path來實現,比如繪制一條曲線,然後讓一個物體隨著這個曲線運動,比如搜索按鈕,比如一個簡單時鐘的實現:那麼什麼是path
 Android學習筆記之四
基本視圖介紹1.文本 按鈕與輸入框文本 按鈕 輸入框的繼承關系TextView:android:text=”文本”android:textSize